


Hardware components | ||||||
_ztBMuBhMHo.jpg?auto=compress%2Cformat&w=48&h=48&fit=fill&bg=ffffff) |
| × | 1 | |||
 |
| × | 1 | |||
 |
| × | 1 | |||
| × | 2 | ||||
 |
| × | 4 | |||
 |
| × | 1 | |||
| × | 1 | ||||
| × | 1 | ||||
 |
| × | 1 | |||
Software apps and online services | ||||||
 |
| |||||
 |
| |||||
Hand tools and fabrication machines | ||||||
 |
| |||||
I'm usually with my headphones on when I'm at work. This could be because I'm attending a Skype Meeting with people from different places, or I'm having a Skype voice call, or simply because I'm listening to music while I'm getting stuff done. This works great for me, except for one thing: sometimes someone will walk by my desk and interrupt me while I'm in a meeting, because the person did not know if I was really busy; or someone will see me with my headphones on and will not talk to me when I was just listening to music and available for a chat.
Skype is great because you can let the people connected to you know when you are busy, in a meeting, away from your desk or available. But what about the people around you? How do you let them know when you are actually busy or free?
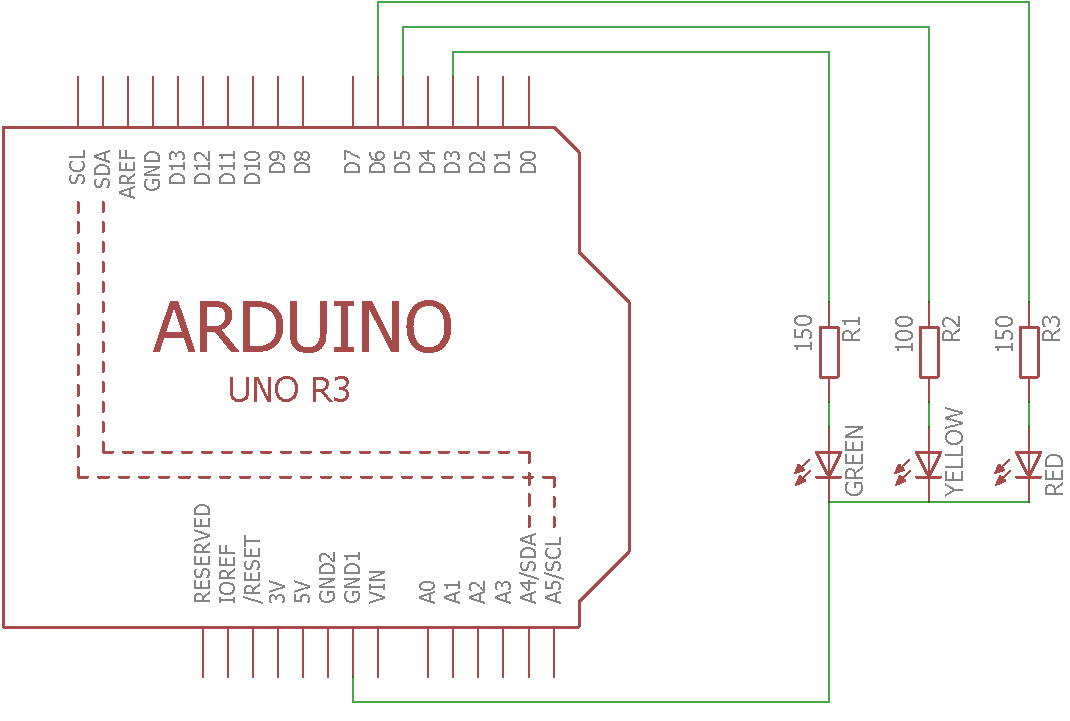
Well, one simple solution for that would be to turn on a light on your desk that would mimic your Skype status color...and this is exactly what this project is about. For this simple project, all you'll need is an Arduino board, LEDs, resistors, wires and a ping-pong ball.
I needed 3 color lights to do the project: Green, Yellow and Red. I started with an RGB Led which should give me the 3 colors, but this did not turn out to be true when I added the ping-pong ball on top of it - the mixture of red and green should give me yellow color, but the mixture result was not the expected. See picture below:
As I was not able to get yellow color from the RGB Led inside the ping-pong ball, I decided to add an additional yellow LED to the project. Green and Red colors would still come from the RGB Led. I used 100 ohm resistor for the yellow Led and 150 ohm resistor for the red and green pins of the RGB Led.
For a better light effect with the Leds inside the ping-pong ball, I covered the top of each Led with black tape. This helped to reduce very bright color spots on the ball.
I made a tight hole in the ping-pong ball to stick the Leds in the ping-pong ball, then added some glue so it wouldn't come out with time.
The chalenge was to let the Arduino board know when the Skype status was changed to then change the color of the Leds. Luckily and thanks to the power of open source, someone had done a lot of the job for us already. I found a project on GitHub that used a blink(1) to show the Skypestatus. This made my task a lot easier. You can find the Arduino code and Skype bridge software under the Attachments section.
The easiest way to get the Leds to shine according to the Skype status is to dowload the Arduino code from here and the executable files for the bridge from here. In case you want to take a look at the whole C# bridge project, you can also take a look at here.
To get the system running you first need to get the code loaded into the Arduino board. After that, the Arduino code builder must be closed to release the COM port so the bridge software can use to connect to the board.
After you run the bridge software (LyncPresenceBridge.exe), make sure it's using the correct COM port.
If everything is set correctly, the Arduino board will start to get the Skype status information and start changing the led colors. You can also manually change the colors through the bridge software menu.
PrototypeThe first assembly was on a breadboard.
Everything was fitted inside a demo box.
This project was based on a simmilar project by Thomas Jensen.


_3u05Tpwasz.png?auto=compress%2Cformat&w=40&h=40&fit=fillmax&bg=fff&dpr=2)
Comments