

Hardware components | ||||||
_ztBMuBhMHo.jpg?auto=compress%2Cformat&w=48&h=48&fit=fill&bg=ffffff) |
| × | 1 | |||
 |
| × | 1 | |||
 |
| × | 1 | |||
 |
| × | 6 | |||
Software apps and online services | ||||||
 |
| |||||
| ||||||
Hand tools and fabrication machines | ||||||
 |
| |||||
EquisenseA behavioral assessment gadget for horses, designed to make the invisible visible.
Horses have shared human history for thousands of years as workers, as warriors, as companions, and eventually as athletes. Even after the Industrial Revolution made their physical labor largely obsolete, horses found a new role in sport and entertainment. Today, equestrian disciplines like show jumping, dressage, racing, and polo are practiced globally, and within them exists a world of deep skill, tradition, and unfortunately, sometimes harm.
In competitive equestrian sport, the pressure to win can lead trainers and riders to push horses beyond their limits, not always with bad intentions, but often without the tools to recognize when a boundary is being crossed. Horses cannot speak. They can only show. And many people do not know how to read what they are showing.
This project began with a simple but urgent question: can we design something that helps humans understand what a horse is feeling?
The answer became Equisense — a handheld gadget that uses behavioral observation to assess a horse's emotional and physical state, producing a result that communicates back to the human in a clear, accessible visual language.
Research PhaseThe project began with research into equine stress measurement. In the previous semester, I had explored the use of EMG sensors to measure muscle activity in horses and display that data as light on a wearable garment. While that system worked on a physical level, it became clear that it could only tell part of the story. Muscle tension is a symptom, but what causes it? What is the horse feeling?
This realization pushed the project in a new direction: instead of measuring the horse's body directly, could the human become the measurement instrument? Could structured behavioral observation, guided by a device, produce a meaningful understanding of a horse's condition?
To ground this idea in real-world context, I attended the Madrid show jumping competition, one of the most significant equestrian events on the circuit. There, I had conversations with riders, trainers, and grooms from across the equestrian world. I asked them about how they read their horses, what signs they looked for, and when they knew something was wrong. Their answers confirmed what the research was pointing toward: experienced horse people carry enormous knowledge about equine behavior, but that knowledge is informal, undocumented, and difficult to transfer.
Following those conversations, I built a reference website focused on horse body language, covering physical indicators, digestive and health signals, and emotional and behavioral states. This became the knowledge base from which the gadget's question logic was developed.
The core interaction model was inspired by the Tamagotchi, the iconic Japanese toy that simulates a living creature through a tiny screen and a few buttons. What made Tamagotchi powerful was not complexity; it was the emotional connection it created through simplicity. A small visual language that made you feel responsible for something alive.
Equisense works on a similar principle. The user is walked through 16 questions about the horse's behavior, covering physical presentation, movement, appetite, social interaction, response to touch, and more. Based on the answers, the system generates one of 20 possible results, each describing a likely emotional and physical state and offering guidance on what to do next.
The device is not a diagnostic tool. It is a prompt for attention. It asks the human to slow down, observe carefully, and engage with the horse as a feeling being rather than a performing one.
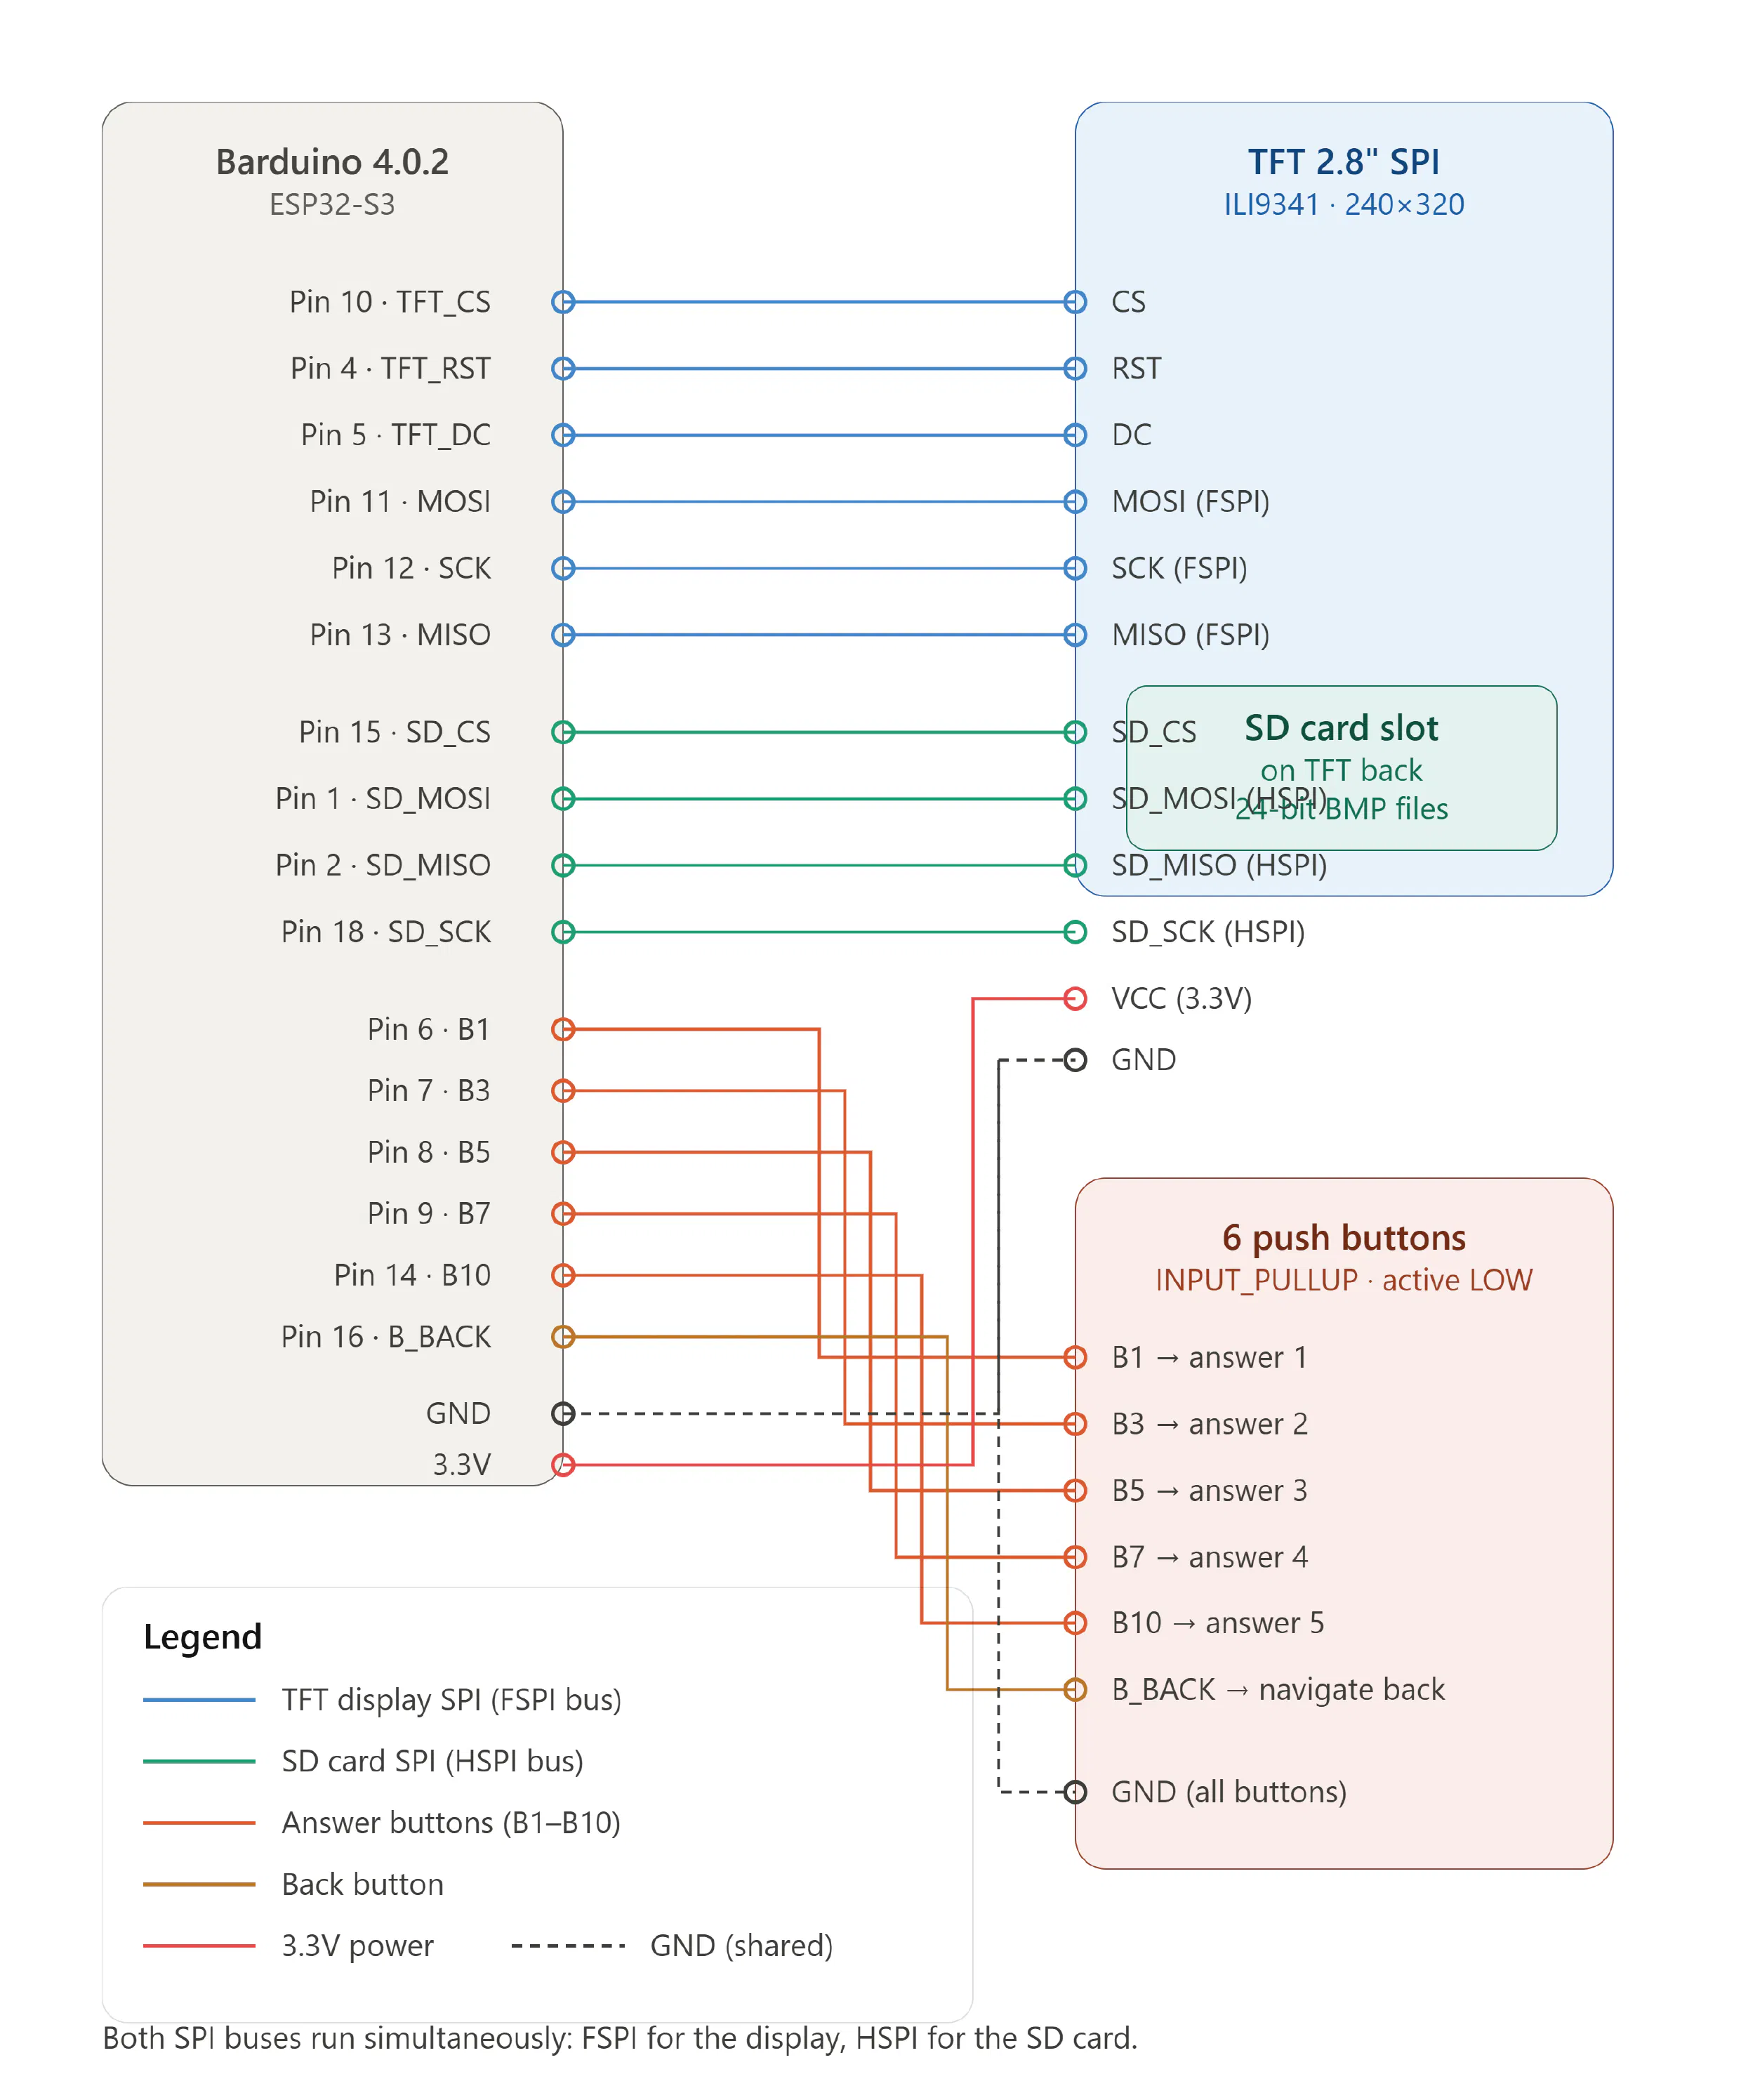
Fabrication: ElectronicsBuilding the electronics was the most challenging and most transformative part of this project. I came in with no background in electronics whatsoever.
The display chosen was a 2.8" TFT SPI 240×320 V1.2 screen—small enough to be held comfortably and large enough to display readable visuals and text. To drive it, I used an Arduino (Arduino IDE 4.0.2), initially working on a breadboard to test connections and logic.
The interaction system required six buttons: five for answering questions across a behavioral scale, and one for navigating back. Wiring these correctly, managing pull-up resistors, and making sure each button registered reliably took significant iteration.
The first working version of the code used Arduino's native pixel graphics system — simple colored shapes and a basic pixel font, questions and answers displayed against a black background. It worked, but it felt cold. The visual language did not match the warmth and care that the project was trying to communicate.
Claude AI was used throughout the coding process to help write, debug, and structure the Arduino code. For someone building an electronic system for the first time, this was essential — not as a shortcut, but as a collaborator that helped translate intent into syntax and errors into understanding.
Fabrication: Visual DesignWith the logic working, the next challenge was the visual layer. Rather than keeping the simple pixel graphics, I decided to design all screens myself in Adobe Illustrator — 38 screens in total, covering the main menu, all 16 question pages, and all 20 result pages.
The first design direction moved away from the Tamagotchi aesthetic and drew instead from Persian visual culture and the symbolic imagery of horses in Iranian art and history. The results were visually interesting but, on reflection, too complex for the small screen and too abstract for quick, practical use in a barn or competition setting.
The designs were rethought. The new direction returned to pixel art — deliberately referencing the Tamagotchi — but incorporated Iranian geometric patterns and motifs into the borders and decorative elements. This kept the interface readable and functional while preserving a personal cultural signature in the design.
With 38 fully designed screens ready, the next step was getting them onto the device — and this is where one of the project's most significant technical challenges emerged.
The original approach had been to convert images into C++ byte arrays using the Image2CPP tool, which encodes image data directly into Arduino code. This works well for a small number of images, but at 38 screens the data volume was simply too large for the Arduino's internal storage to hold. The device could not compile and run the full set of screens. This felt, for a time, like a fundamental barrier.
The solution came not from adding anything new, but from looking more carefully at what was already there. The TFT screen — the 2.8" TFT SPI 240×320 — had a small SD card slot built directly into its back. It had been there the entire time, a feature I had not initially registered or thought to use. Once I noticed it, the path forward became clear.
I converted all 38 images from their Illustrator originals into 24-bit BMP format — a standard bitmap format that the Arduino's SD and display libraries can read and render. I organized them carefully on an SD card in the correct sequence and inserted the card into the slot on the back of the screen. Then came the harder part: the code had to be completely restructured. Instead of calling pre-compiled byte arrays stored in memory, the Arduino now needed to read image files from the SD card at runtime, load them into the display buffer, and render them on screen in response to button inputs.
This required learning a fundamentally different approach to how the Arduino, the SD library, and the TFT display library communicated with each other. Getting the file paths correct, ensuring the BMP color depth matched what the display expected, and sequencing the image calls correctly through 38 different screens across 16 questions and 20 results took extensive debugging. But when it finally worked — when all 38 screens loaded and displayed exactly as designed — it was one of the clearest moments of genuine technical achievement in the entire project.
Fabrication: CasingBecause Equisense is designed for use in equestrian environments — stables, competition grounds, training arenas — it needed to be larger and more robust than a consumer toy. The casing was developed through multiple sketch iterations before arriving at a final form.
The first printed version used white filament and had all components integrated into a single-piece shell. After printing, the surface was sanded extensively in preparation for painting — but the paint finish did not behave as expected. The surface remained uneven and the result looked unfinished, not at all matching the clean aesthetic the design called for.
The solution was to redesign the casing as two separate pieces: one printed in the primary color and one in black. This eliminated the need for painting entirely and produced the clean, defined aesthetic that the single-piece version had failed to achieve. The final version was 3D printed in two parts, assembled, and the electronics installed inside.
Memory and image storage — The Arduino's internal memory could not hold 38 screens of image data compiled as byte arrays. The solution was already built into the hardware: the TFT screen had a rear SD card slot that had been overlooked. All images were converted to 24-bit BMP format, stored on an SD card in the correct sequence, and the entire codebase was restructured to load and display images from the card at runtime rather than from compiled memory.
Rewriting the code around SD card reading — Moving from byte-array image rendering to SD card image reading required learning a completely different approach to how the Arduino communicated with the display. File path management, color depth matching, and render sequencing all had to be debugged from scratch.
Paint finishing on 3D prints — Painting over FDM-printed PLA without visible layer lines proved extremely difficult even after heavy sanding. Solved by redesigning the casing into two color-separated pieces, eliminating the need for paint entirely.
Learning electronics from zero — Every step of the circuit, from display wiring to button logic to SD card integration, was learned in the course of making this project. This was the biggest challenge and the biggest achievement.
Balancing aesthetics and usability — The first visual design direction was culturally rich but not practical for the use context. Iterating toward something that was both personally meaningful and functionally clear required letting go of some early ideas and returning to the simplicity of pixel art with cultural accents rather than full cultural immersion.
The SystemThe final gadget contains:
- 2 main/menu pages
- 16 question pages covering key behavioral indicators
- 20 result pages describing horse conditions and recommending responses
- 6 buttons (5 for answering, 1 for back navigation)
- SD card inserted into the built-in slot on the rear of the TFT screen, storing all 38 screens as 24-bit BMP files
- Custom pixel art visuals with Persian geometric design influences
- Custom 3D-printed casing in two-color design, assembled without painting
Equisense is conceived as the hardware layer of a larger ecosystem. The longer-term vision is a platform — something like The Sims, but for horses — where each horse has a digital profile built from real behavioral data collected through the gadget and the companion website.
On this platform, horse owners could track their horse's condition over time. Prospective buyers could read a horse's behavioral history before making decisions. Riders and trainers could share experiences, challenges, and knowledge. The community could monitor poor training practices and raise awareness. Horses would, for once, be at the center — not as objects of sport, but as subjects with histories, personalities, and needs.
This platform does not yet exist beyond concept. But the gadget, the questions it asks, and the data it could generate are the first real step toward it.
This project started as a question about horses and ended as a lesson about attention — both the attention we owe to animals, and the attention that making something difficult demands of the maker.
I did not know how to write code. I did not know how to build a circuit. I did not know how to convert a hand-drawn illustration into a 24-bit BMP file and load it from an SD card onto a TFT screen through an Arduino. I know all of these things now — imperfectly, but genuinely, and because I had to figure them out myself.
The memory problem is the moment I keep coming back to. I had designed 38 screens. The Arduino could not hold them. For a while that felt like the end of something. And then I looked at the back of the screen in my hand and saw the SD card slot that had been there all along. The solution was inside the problem. I just had to look carefully enough to find it. That, I think, is the most honest summary of what this project taught me about design and about making: the answer is usually closer than you think, but you have to be present enough to see it.
As for the horses: I still believe the most important thing we can give them is not better sensors or smarter algorithms. It is people who are willing to slow down and look. Equisense is a tool for exactly that. A small, hand-held device with pixel-art screens, Persian patterns on its borders, and an SD card in the back of its display carrying 38 hand-drawn images — each one a question, or an answer, in a conversation between a human and a horse.
That conversation is worth having. It always was.


Comments