


Hardware components | ||||||
| × | 1 | ||||
_wzec989qrF.jpg?auto=compress%2Cformat&w=48&h=48&fit=fill&bg=ffffff) |
| × | 1 | |||
| × | 3 | ||||
| × | 1 | ||||
| × | 1 | ||||
| × | 1 | ||||
| × | 1 | ||||
| × | 1 | ||||
| × | 1 | ||||
| × | 1 | ||||
| × | 1 | ||||
Software apps and online services | ||||||
 |
| |||||
Hand tools and fabrication machines | ||||||
 |
| |||||
One day I decided to change the light bulbs on my Christmas Tree to customize the colors of the bulbs and create my own animations!
On the Adafruit website, I have found out that the 12mm diffused thin digital RGB LED pixels WS2801 are addressable (you can tell to every single LED what to do and when!) and can be controlled by an Arduino MEGA 2560 rev3 board (I have bought the LEDs from a reseller).
I've added to my project a Real Time Clock (RTC) chip, in order to give to Arduino the real time. The strand is always plugged to the power outlet, but the tree is on just from 5 pm to 8 am!
Adafruit has helped me make my project with the dedicated WS2801 LEDs tutorial! Check it out for further details and more accurate information!
If you are using different models of LEDs, please refer to their guide/instruction for wiring and coding. If they are compatible with FastLED, the code will need minor changes!
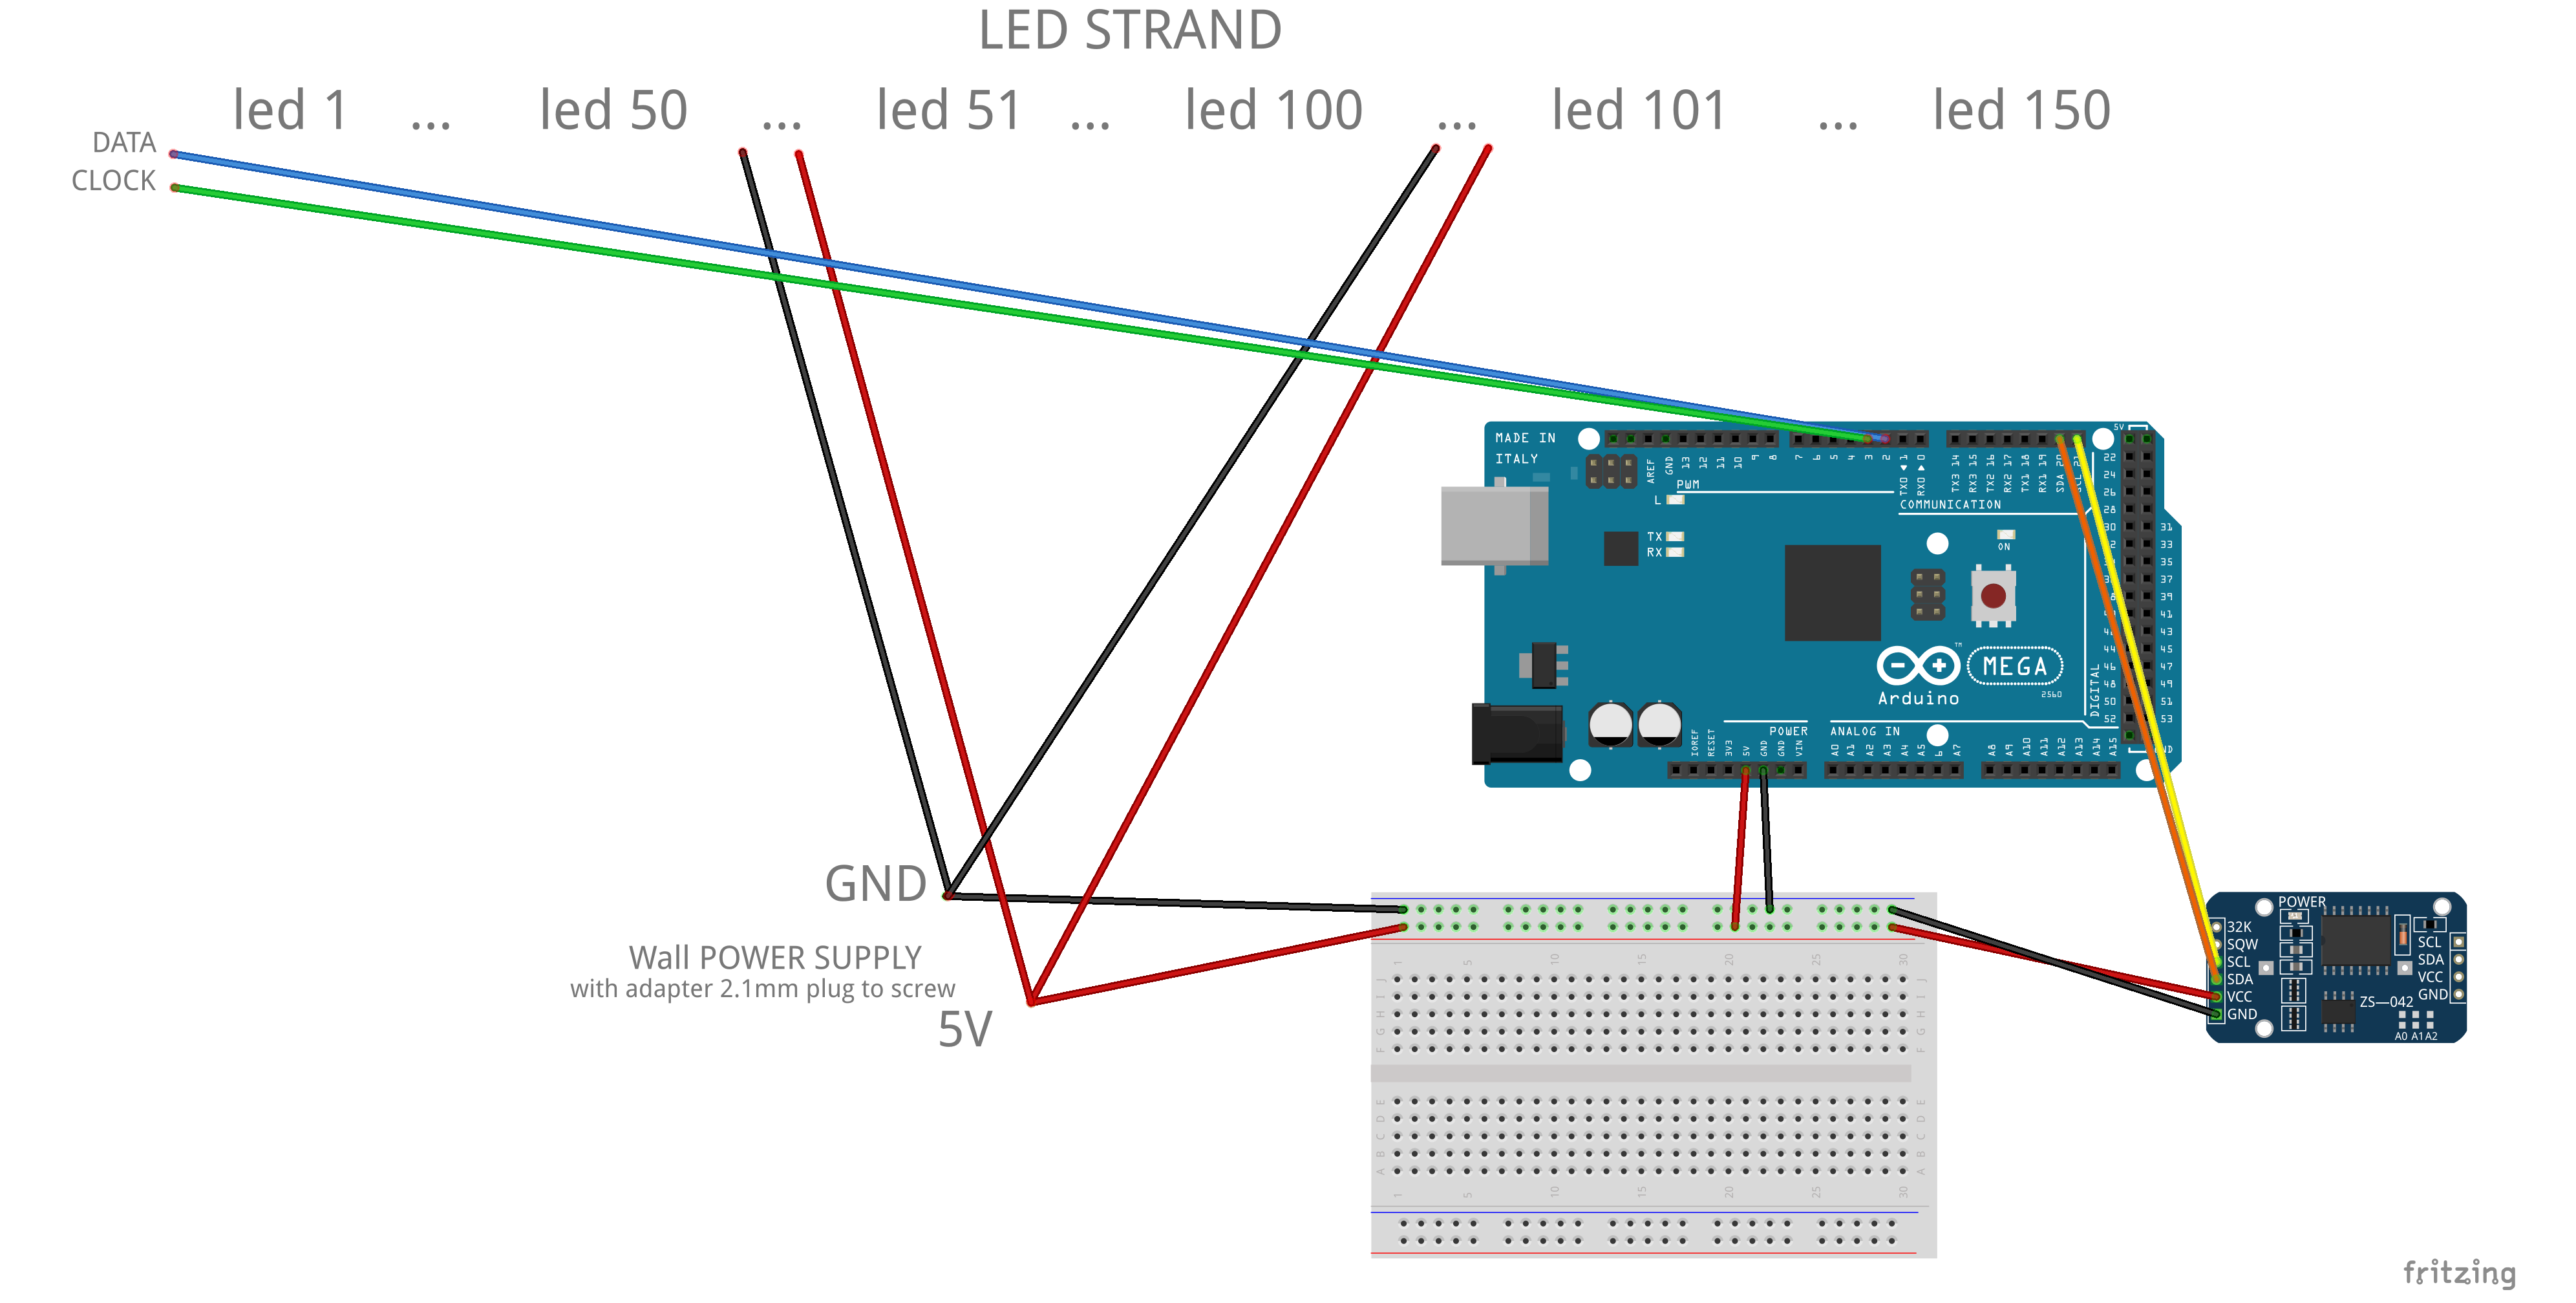
1. Assembling and wiringI suggest you to test the project before putting the LEDs on the tree!
Connect the strands of LEDs to each other with their connectors. The 4 inputs on the strip should be:
- RED -> 5V
- WHITE -> GND
- BLUE -> DATA
- GREEN -> CLOCK
Connect the strand DATA pin to Arduino PIN 2; and CLOCK pin to Arduino PIN 3. (Note: data and clock color might be inverted, look for the mark on every led chip).
The Real Time Clock (RTC) DS3231 allows Arduino to get the real time, because the on-board chips are not accurate enough to keep the time for hours and days. Connect the SDA pin to Arduino PIN 20 and SCL pin to Arduino PIN 21.
The 5V 10A power supply is adapted for 150 LEDs. Each WS2801 LED requests 60mA, so 50 LEDs need 3A; 150 LEDs need 9A.
Connect the power supply 2.1mm jack to the female adapter ("2.1mm to screw/terminal block"). Connect 6 wires to the adapter (OR USE THE BREADBOARD TO SPLIT THE POWER in an easier way):
- 2 (1 5V and 1 GND) for the first 75 LEDs -> between LEDs 50 and 51, there should be a pair of power wires. Otherwise, connect them in the strand connectors;
- 2 (1 5V and 1 GND) for the last 75 LEDs -> plug between LEDs 100 and 101;
- 2 (1 5V and 1 GND) to the BREADBOARD, to power up Arduino and RTC.
Note: Be sure to connect the (+) positive pole to 5V and the (-) negative pole to GND. Wires can be soldered, especially in case of permanent/outdoor projects. You can use a Header Pin Housing Kit to create your own jumper wires! Clock and data wires must be connected only at the beginning of the strand. Power should be split throughout the whole strand in at least 2 points. In this way each LED has enough power!
With the BREADBOARD, connect the power wires to other jumper wires to Arduino (5V pin and GND pin) and to the RTC (5V and GND pins).
3. CodeTo make the code running properly, you have to install on your computer the following libraries:
- FastLED by FastLED (click Clone or download then Download ZIP)
- Time by PaulStoffregen
- DS1307RTC by PaulStoffregen
3.1 Setting the time
Upload on Arduino the Example file TimeRTCSet (File -> Examples -> Time -> TimeRTCSet) or dowload and run the RTC_set.ino (see the Code section). Then open the Serial Monitor (Tools -> Serial monitor). It will copy your computer's time on the RTC. You need do this process just once.
Note: There will be a little error of a pair of seconds in the RTC time due to the synchronization between the PC and the board. Also, I suggest you to use this code, it's the easiest that I've found on the Internet. Instead you can use the examples that are included in the libraries.
You can check the time stored by running the RTC_read.ino (dowload it at the end of this page).
3.2 Coding the animations
Now you can download the file Christmas_tree.ino
(this is the main code) and upload it on Arduino. It is ready to use, but you can customize it! Colors are set via named HTML web colors.
There are 3 animations (I think the best is the Adafruit's rainbow). I have created the other two animations: every 300 ms (= 0,3 s) an LED on the tree changes its color to red, orange, yellow, green, blue, etc. I prefer a tree with quite slow animations; every second that you watch the Christmas Tree, some lights have different colors than before, but you are not blinded by flashing lights.
The code will switch on the LEDs at 5 pm and it will switch them off at 8 am in the morning. During the day, Arduino will check the time every 10 minutes to see if it is 5 o' clock! (It is the best solution to bypass the lack of a relay).
I wrote an updated version of the code, Christmas_tree_UPDATED.ino. There are the same animations and functions, but colors are more calibrated because they are set via the HSV method (Hue, Saturation, Value). If you are not an expert user, check out the FastLED Pixel Reference guide!
The strand is now ready to be put on the tree! And your Christmas tree is ready!
If you have enjoyed this tutorial, please post in the comments photos of your project! Feedback and improvement suggestions are welcome!
5. Next...I am currently adding 50 LEDs to reach the 200 (I have to add a second power supply though).
I am also working on the code to make the tree look better; I am correcting the color encoding (to make them more calibrated) and adding new animations!
Latest major update of this tutorial: 31 October 2017
DISCLAIMER: I am NOT responsible for any damage to things or people that might occur while replicating this project. This script is a simplified recap of what I have created. If you are not sure of what you are doing, please leave a comment below or look for competent help on the web.


Comments