


Hardware components | ||||||
 |
| × | 1 | |||
 |
| × | 1 | |||
Software apps and online services | ||||||
| ||||||
Samsung's ARTIK is here (ARTIK 10: alpha build) and as an early adopter, I put it to work as a hub to collect data from various sensors and upload it to the new Samsung SAMI cloud platform for visualization. This tutorial will take you through the steps I took to create it, including code samples and BOM. Be advised that the ARTIK is still in alpha and will become even better once it is publicly released.
Before you begin, I highly recommend that you go through the basic ARTIK getting started tutorial, found here: https://www.hackster.io/team-samsung-iot/getting-started-with-artik-10-alpha-build
All console commands are assumed to be input into the ARTIK console unless otherwise stated.
Step 1: Configuring your ARTIK
Lets start by configuring and installing a few things to the ARTIK:
Stop the console log spam!
There is some noisy console output from one of the radios. Turning off ALL console messages is the quick and dirty way to deal with that:
> dmesg -n 1
Set correct date
Having an incorrect date can lead to errors:
> date -s '2015-M-D HH:MM:SS'
Install NPM
The Node Package Manager is absent for some reason on the ARTIK Yocto build. Lets fix that with:
> curl -L https://www.npmjs.com/install.sh | sh
Install PIP
The Python package manager is also absent, lets get that too:
> wget https://bootstrap.pypa.io/get-pip.py
> python get-pip.py
Step 2: Get the ARTIK on WiFi
Those antennas are there for a reason! Lets connect the ARTIK to your WiFi:
Get a list of WiFi networks:
> nmcli dev wifi list
Add your WiFi SSID, add a static IP and the gateway IP (replace <YOUR SSID> with your ssid:
NOTE: You MUST enter a IP address which is both on the same subnet as your router/gateway and not in use by another device. For instance my router is on 192.168.0.1 so I have to use an IP of the form 192.168.0.XXX.
> nmcli con add con-name <YOUR SSID> ifname wlan0 type wifi ssid <YOUR SSID> \
ip4 192.168.0.100/24 gw4 192.168.0.1
Set the DNS. I'm using google public DNS:
> nmcli con mod <YOUR SSID> ipv4.dns "8.8.8.8 8.8.4.4"
Add the WPA password:
> nmcli con modify <YOUR SSID> wifi-sec.key-mgmt wpa-psk
> nmcli con modify <YOUR SSID> wifi-sec.psk <YOUR WPA PASSWORD>
Turn on the connection:
> nmcli con up <YOUR SSID>
You should now be able to use your WiFi connection with the ARTIK.
Step 3: Read a sensor value
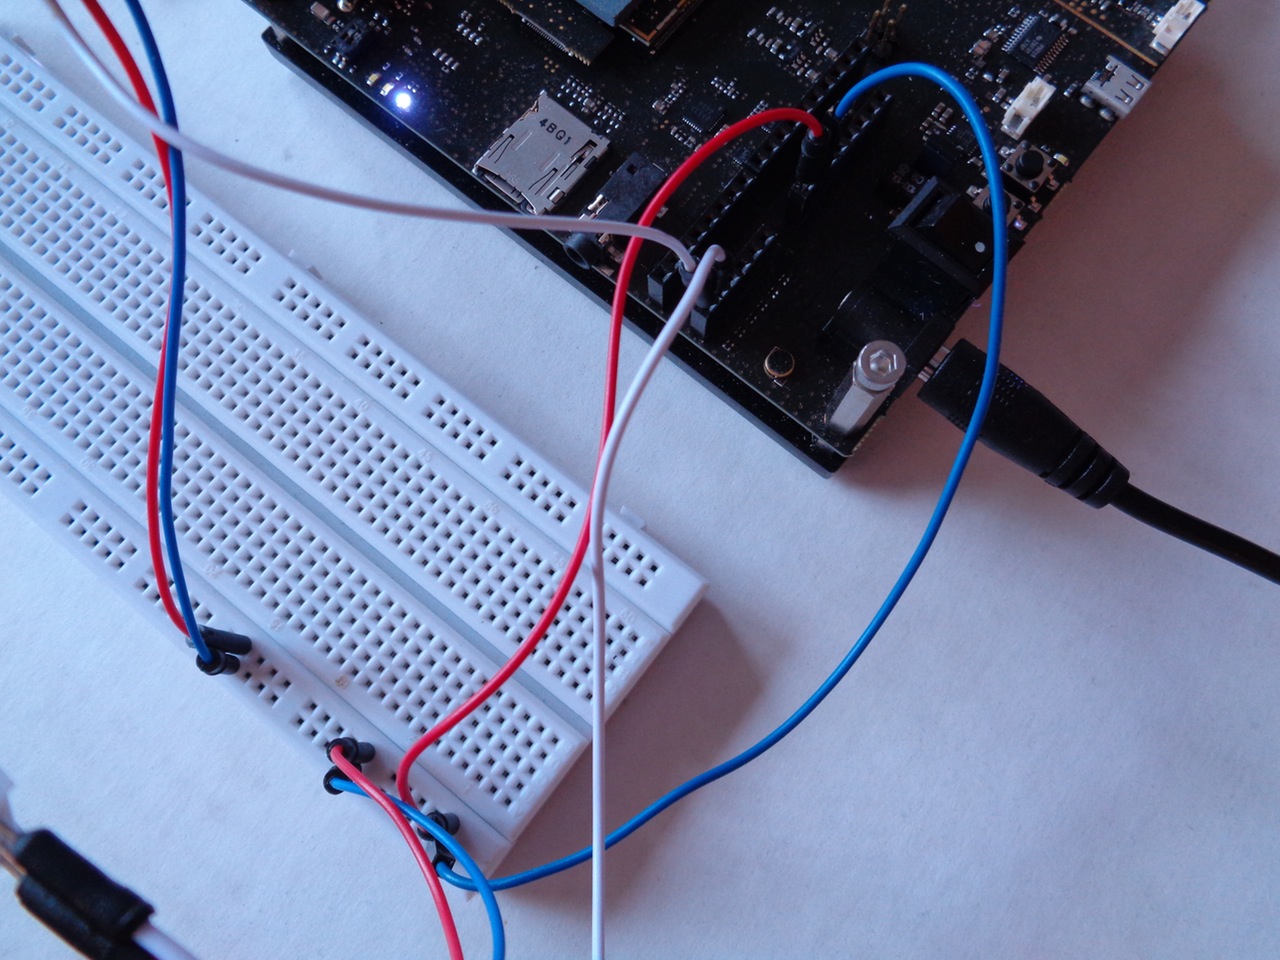
The Grove sensors are simple modular sensors that can be interfaced with most embedded systems or minicomputers (ARTIK, Raspberry PI, Arduino, etc). They usually require an input voltage, either 3.3V or 5V, a ground, and will output a voltage to a signal pin. In this example we will use a Grove light sensor and a button.
First hook up the sensor and button to the ARTIK board as shown in the image below. In the example code below we will be reading the light sensor from analog pin 7 (the pin marked with a red 7) and have the button attached to analog pin 6. Use the diagram below for reference:
Since the ARTIK is still in alpha there are no built in node.js libraries for reading pin voltages, but we can simply write our own. The voltage values for the analog pins are stored in /sys/devices/12d10000.adc/iio:device0/. We will use the node module 'fs' to read that value at an interval of 1 second using the following code:
var fs = require('fs');
setInterval(function(){
fs.readFile("/sys/devices/12d10000.adc/iio:device0/in_voltage7_raw",'utf8',function(err,data){
console.log(data);
});
},1000);
Save the script as read_pin_7.js
In order to run this script on the ARTIK you could either use VI, the most basic command line text editor, or use an FTP client like Filezilla to transfer files from your computer to the ARTIK. If you are using Filezilla enter the IP of the ARTIK (192.168.0.100 is my case) as the host, root as the username, f@s)P!A$RTNER as the password, and 22 as the port.
Before running the script you must install the math module with:
Once the script is on the ARTIK run it with:
> node read_pin_7.js
If you have connected the sensor to pin 7 the console will output a raw voltage reading from 0-4096. This number is not Volts, as you might have guessed, but instead the 16 byte encoding of the voltage (2^8 * 16). Hence a 0 readout is 0 Volts and 4096 is 5 Volts, with the other values mapped linearly.
The process above can be used to read most any sensor value. If you want to use a different pin change the "in_voltage7_raw" above to "in_voltage<pin>_raw". Aside from that you will also have to find the datasheet for your sensor and code in the conversion from raw voltage to sensor value. Remember that 0 -> 4096 is equal to 0 -> 5 Volts!
Step 4: Write your sensor value to SAMI and visualize it in real time
Now that you are able to read data from a sensor lets send it up to Samsung's cloud service SAMI (https://www.developer.samsungsami.io/).
Follow Step 2 of the tutorial at: https://www.hackster.io/monica/getting-started-with-sami-grove-weather-station. However name the device "ARTIK" and give it an appropriate unique name. Also when adding fields add two: one for the light sensor and one for the button state.
When you are finished your device manifest should look something like the image below:
Now in order to send the read sensor data to SAMI we will be using Websockets to create a stream of data between the ARTIK and SAMI.
To do this we will install the Websockets module with:
> npm install ws
Once Websockets is installed you can run the script: https://github.com/martinkronberg/node-code/blob/master/read_and_send_to_sami.js
Make sure to replace <Your Device ID> and <Your Device Token> with the device ID and Token that you received above.
Run the script with:
> node read_and_send_to_sami.js
Navigate to the SAMI User Portal at developer.samsungsami.io This contest is over! Check out . open the ARTIK device, and add the data fields. You can now see your data visualized in the cloud! , open the ARTIK device, and add the data fields. You can now see your data visualized in the cloud!


Comments