markbennettuk
Published © CC BY-NC-SA

Throttle Quadrant and Trim Wheel

A modular 3D printed throttle quadrant and trim wheel for use with flight simulators.

BeginnerFull instructions provided20,715
Throttle Quadrant and Trim Wheel

Things used in this project

Hardware components

Arduino Leonardo
Arduino Leonardo
A Leonardo or Micro will be suitable for this project, up to 6 controls possible on each Arduino
×1
Wire, Hook Up
Wire, Hook Up
3 wires per module
×3
Rotary potentiometer 50k, details in story section
1 per module
×1

Software apps and online services

Arduino IDE
Arduino IDE

Hand tools and fabrication machines
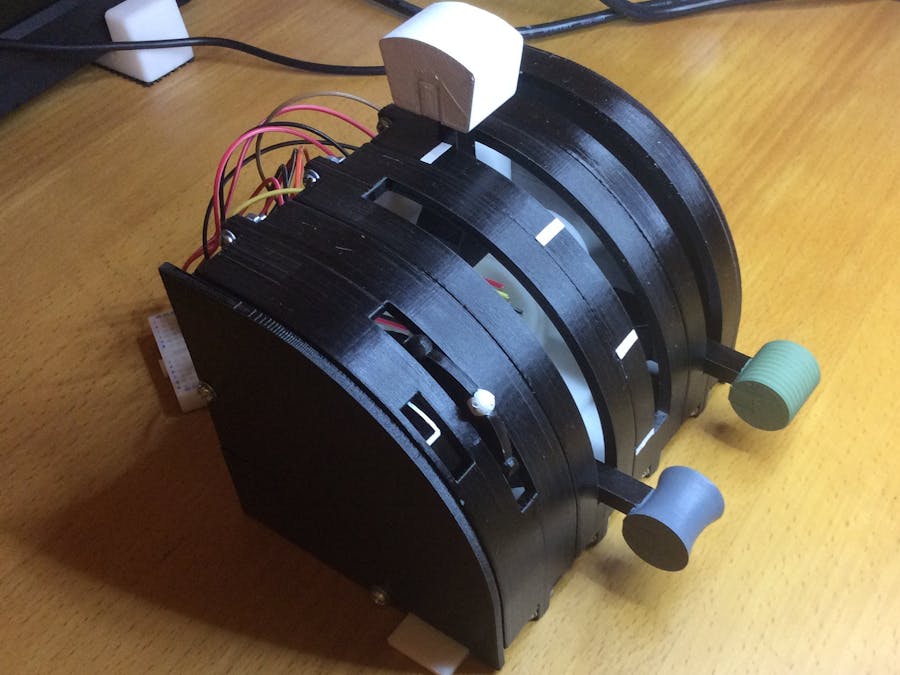
Soldering iron (generic)
3D Printer (generic)

Story

Read more

Custom parts and enclosures

Body left

Body Right

End Cap Left

End Cap Plain (Optional)

One without the tab in case you need it

End Cap Right

Friction Plate Option 1 (Least friction)

Friction Plate Option 2 (Middle friction)

The one I use

Friction Plate Option 3 (Most friction)

Knob for Flaps

Knob for Landing Gear

Knob for Fuel Mixture

Knob for Propeller Pitch

Knob for Throttle (Type 1)

Knob for Throttle (Type 2)

Lever with 0 Detents

Lever with 2 Detents

Lever with 3 Detents

Lever with 4 Detents

Lever with 5 Detents

Lever with 6 Detents

Lever End

Potentiometer Holder

Trim Wheel Body Left

Trim Wheel Body Right

Trim Wheel Gear

Trim Wheel Hub

Trim Wheel Nodule

Trim Wheel Quadrant Drive

Trim Wheel Quadrant

Trim Wheel Single Piece (Option)

Trim Wheel Wheel

Sketchfab still processing.

Back Box Narrow Centre

Back Box Narrow End Right

Back Box Narrow End Left

Back Box Wide End Left

Back Box Wide Centre

Complete STEP File

This file contains all the parts as a STEP file

Schematics

Single potentiometer diagram

To add more controls hook up 5V and GRD and use pins A1 to A5

Code

Quadrant.ino

Arduino
Use the setting variable and the serial monitor to find the end point values for each potentiometer, enter them into the axisLimits array.
Use this joystick library, not the one found in the Arduino library manager, they are for different applications. https://github.com/MHeironimus/ArduinoJoystickLibrary
#include <Joystick.h>

Joystick_ Joystick;

// put the max and min values from the analogRead in these arrays
// these are translated to a range of 0 - 1023
int axisLimits0[] = {686, 338};
int axisLimits1[] = {345, 695};
int axisLimits2[] = {327, 678};
int axisLimits3[] = {342, 692};
int axisLimits4[] = {0, 1023};
int axisLimits5[] = {0, 1023};

// turn axes on or off by setting these variables
bool a0Used = true;
bool a1Used = true;
bool a2Used = true;
bool a3Used = true;
bool a4Used = false;
bool a5Used = false;

// setting mode prints the pin value and translated value to the serial monitor
// int setting = -1; // no printing to the serial monitor
// int setting = 2; // values 0 - 5, print the pin values to the serial monitor
int setting = -1;

void setup() {
  if(a0Used) pinMode(A0, INPUT);
  if(a1Used) pinMode(A1, INPUT);
  if(a2Used) pinMode(A2, INPUT);
  if(a3Used) pinMode(A3, INPUT);
  if(a4Used) pinMode(A4, INPUT);
  if(a5Used) pinMode(A5, INPUT);
  Joystick.begin();
  if(setting >= 0) Serial.begin(9600);
}

void loop() {
  int value = 0;
  int pos = 0;

  if(a0Used){
    value = analogRead(A0);
    pos = translateValue(value, axisLimits0[0], axisLimits0[1]);
    Joystick.setThrottle(pos);
    if(setting == 0) settingPrint(value, pos);
  }
  
  if(a1Used){
    value = analogRead(A1);
    pos = translateValue(value, axisLimits1[0], axisLimits1[1]);
    Joystick.setRxAxis(pos);
    if(setting == 1) settingPrint(value, pos);
  }
  
  if(a2Used){
    value = analogRead(A2);
    pos = translateValue(value, axisLimits2[0], axisLimits2[1]);
    Joystick.setRyAxis(pos);
    if(setting == 2) settingPrint(value, pos);
  }
  
  if(a3Used){
    value = analogRead(A3);
    pos = translateValue(value, axisLimits3[0], axisLimits3[1]);
    Joystick.setRzAxis(pos);
    if(setting == 3) settingPrint(value, pos);
  }
  
  if(a4Used){
    value = analogRead(A4);
    pos = translateValue(value, axisLimits4[0], axisLimits4[1]);
    Joystick.setXAxis(pos);
    if(setting == 4) settingPrint(value, pos);
  }
  
  if(a5Used){
    value = analogRead(A5);
    pos = translateValue(value, axisLimits5[0], axisLimits5[1]);
    Joystick.setYAxis(pos);
    if(setting == 5) settingPrint(value, pos);
  }

  delay(5);
}

int translateValue(int v, int f1, int f2){
  // translates values to a 0 - 1023 range
  int result = 0;
  int start = 0;
  float range = 0;
  
  if(f1 < f2){
    start = f1;
    range = f2 - f1;
  }
  else{
    start = f2;
    range = f1 - f2;
  }
  
  result = (v - start) * (1023 / range);

  if(result < 0) result = 0;
  if(result > 1023) result = 1023;
  
  return result;
}

void settingPrint(int value, int pos){
  Serial.print(value); 
  Serial.print(" "); 
  Serial.println(pos);
}

Credits

markbennettuk

markbennettuk

4 projects • 19 followers

Comments