


Hardware components | ||||||
 |
| × | 1 | |||
Software apps and online services | ||||||
| ||||||
 |
| |||||
| ||||||
| ||||||
Hand tools and fabrication machines | ||||||
 |
| |||||
How many times have you ever wanted to turn on your PC in order to remotely access your computer to view or edit some files that you needed on the spot? Or maybe start a render of a video to be able to stay out more time, or simply turn off the computer you had carelessly forgotten turned on? These are all situations that have occurred to me several times, and I have looked for a way to do this, and much more, thanks to the oplà kit, the arduino kit that contains a magnificent mkr 1010 microcontroller, a carrier with many... many sensors and actuators that allow you to give vent to the most beautiful, simple or crazy ideas you want.
In the specific case of today, we are going to create a pc controller that will allow you to:
- Remotely turn on and turn off the PC
- Monitor the trend of the temperature of the pc case, that will eventually let you know immediately particular rises of the temperature through an acoustic warning
- Customize the LEDs in order to best match them with your computer surely full of RGB LEDs (remember more RGB will make your PC go faster ;) )
- Use the PIR sensor to automatically turn on the pc when you sit in your desk
(all these features can be modified, activated and de-activated)
Obviously, nothing prevents you from adding other automation systems, for example, in my project I thought of including a sensor, which, in the event of a leak in the liquid system, our little controller would immediately shut down the computer.What you need to know
Let's start with the theory, if you don't know the carrier, I highly recommend you visit these links:
- Clicking here you can find how to use all integrated carrier sensors and actuators thanks to the Arduino_MKRIoTCarrier library
- You can also visit this page to find the hardware configuration of the carrier
- You can see some sample project here
If you are new to IoT Cloud, and you aren't already registred, I recommend you to register here. I also recommend you to visit the following repositories to see how the various classes work. Viewing these repositories saved my life. Unfortunately, I didn't easily find other sources to see how the various IoTcloud classes work.
If you have never used Arduino and you know absolutely nothing about it, don't worry, with a little bit of patience and passion you will learn. In the meantime, you can follow me step by step and start customizing everything you don't like to make my project more beautiful and efficient. I'm sure you will!
Software ConfigurationYou will already have understood that we will use the online services made available by arduino. The only tool you will need to install in your pc to configure your arduino and upload your sketches from the web is "arduino create agent", here you will find the download link.
Ok, now you can connect your arduino to the pc and add it to your devices. To do it, just click on 'add device' and then choose 'set up an Arduino device'
Now we can go in the Dashboard panel to create new one.
I called it "my pc", but feel free to call it whatever you like.
To add a new widget just click on the little pencil in the top left, then click "add" and finally choose the widget.
Down here you can see my dashboard:
Obviously, all this widgets are associated with different variables, so below you will find everything you need:
Now we need to create our "thing", it's really easy to do that, go to the "things" section and click "create thing".
Now, in the new panel:
1) link the device you created earlier
2) enter your network credentials
3) add all the variables I mentioned before
Perfect, only the last step is missing, you will need to link the variables to the widgets created earlier, this operation is also very simple, go back to the dashboard panel and click on the edit button, if you pass over a widget you will see three small dots appear, click on the three dots and then, click on "add variable".
You have finished all the setup part. You are now ready to uploud the code!
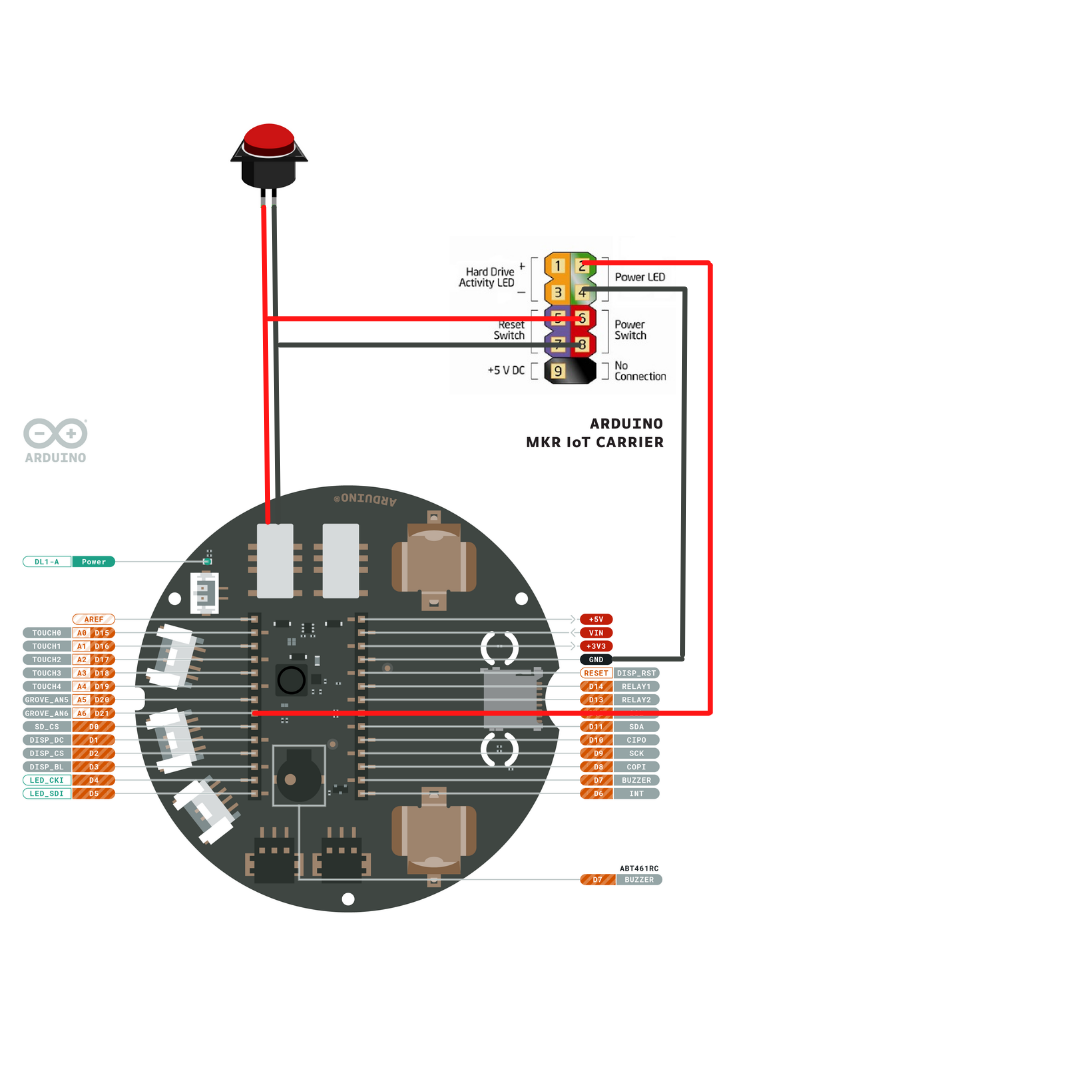
Hardware ConfigurationNow let's move to the hardware configuration, after opening your kit and inserting your mkr in the carrier, you need to make just a few small changes to your pc, I summarize them in 3 small steps:
- Put the carrier relay in parallel with the PC power button
- Add two jumpers to the pwr led pins and connect it to the carrier(if no led is connected even better)
- place the PIR sensor where it suits you most
Note: the PIR sensor is very sensitive, so adjust it carefully and place it well. If you don't like it, you can also disable it from the dashboard.
Below you can see how to connect all
Note: in the diagram I used pin A5 for the PIR sensor and A6 to take the state of the motherboard, you can use the GROVE connectors that are the same as using pins A5 and A6.
Now put the carrier inside your pc case and power it on, to do it, you have two options:
A) if possible, put the USB of the pc in always-on mode (through the BIOS)
B) power on the carrier externally
Attention: it is essential that the carrier is always powered even when the pc is off, otherwise goodbye remote control :(
Fortunately, many modern computers have the always-on USB, like in my case.
Well, if you've made it this far, the simplest part remains.
Learn all the featuresYou are almost at the end, you have to understand how everything works:
Carrier Display: The display will show the current temperature of the PC case, you can enter temperature ranges through the dasboard, in particular, you can choose the minimum and maximum temperature. Below the minimum temperature, the background of the display will be green to indicate that the computer is cool; between the minimum and maximum temperature, the background of the display will turn yellow, while if the maximum threshold is exceeded, the display will turn red.
Tip: since the refresh rate of the display is very slow, I made sure that when the temperature changes, only the part of the display containing the numbers is updated, same thing for the background. This allows you to avoid horrible flickering due to continuous refresh of the display.
Note: there is a small error in the carrier reference regarding the display, when I wanted to disable the display I gave the following command: digitalWrite (TFT_BLACKLIGHT, LOW); but this wouldn't work, so I discovered digitalWrite (TFT_BACKLIGHT, LOW), that works.
Here is a demo on how the screen and the LEDs work:
Led: the LEDs can be customized as you prefer thanks to a color picker, they can also be activated and deactivated, you can increase and decrease their brightness and, finally, you can activate a flag that will allow you to synchronize them with the same color as the carrier background display.
Note: I made sure that when the PC is off, both the display and the LEDs are off, to avoid unnecessary energy consume.
PIR: the motion sensor, if enabled, will turn on the computer when it senses movement in a certain area.
Note: I made sure that once the computer is turned on the sensor no longer acts.
Buzzer: The buzzer will warn you when the temperature rises above the set temperature, this function can also be disabled.
Note: I noticed that the beep() function is missing on the library Carrier (i don't know why), so it doesn't work, so I use the sound(frequency) function.
Temperature sensor: the temperature sensor does not require special presentations, once the temperature has been read, it will be shown on the display. You can also see a graph of the temperature trend on the dashboard, so you can understand if it is time to replace yours old pc case, or maybe just give it a good dusting.
Message Box: In the dashboard you will find a message box where you can receive detailed information on the widgets by sending the name of the widget. Obviously this will not be very useful for you, who have just read this post, but think of someone who uses all these functions for the first time... probably even I'll forget soon about it, so it will be useful to the future myself.
Control the pc remotelyNow that you can turn on your PC remotely, you will also have the ability to control your workstation wherever you are, on the train, on a ship, in Hawaii or on a remote island, although, for the latter case, you will have to spend hundreds of dollars for a Starlink connection.
For remote control I decided to use Chrome Remote Desktop, which allows me to access my pc even if I am in the windows user selection screen, in other words, it is enough to have the pc turned on and you can start the remote connection.
Here's a small demo where I show you the remote control:
That's all friends. Feel free to point out any issues in the comments or contact me privately, and I'll get it resolved as quickly as possible.


Comments