



Hardware components | ||||||
 |
| × | 1 | |||
| × | 1 | ||||
| × | 1 | ||||
| × | 1 | ||||
| × | 1 | ||||
Software apps and online services | ||||||
 |
| |||||
 |
| |||||
 |
| |||||
 |
| |||||
Space Drums are a pair of smart motion tracking sticks that let you play a full drum kit in thin air. Its free (as in freedom), open source, portable to carry in a tiny backpack, and so much fun!
Meet Space Drums 2.0What if you could play a full drum kit without having a single drum in front of you?
That’s the idea behind Space Drums 2.0, a pair of open-source electronic drumsticks that let you play drums in thin air.
Each stick tracks its own motion and orientation, so instead of hitting a physical drum, you simply point and swing toward where a virtual drum would be. The system has virtual positions for a crash, toms, ride, hi-hat, snare, and floor tom, along with two foot pedals for the kick drum and hi-hat control.
And it isn't just about detecting whether you hit a drum. Space Drums 2.0 is velocity-sensitive, so softer and harder swings can produce different sound levels. The sticks also provide haptic feedback, giving you a small physical vibration whenever you trigger a virtual drum.
This is the second version of the project. The original Space Drums relied on a smartphone to track your posture and determine which virtual drum you were hitting. In version 2.0, the motion tracking has moved onto the sticks themselves, making the system more compact, self-contained, and responsive.
How Space Drums 2.0 WorksBefore heating up the soldering iron, let's take a quick look at how all the pieces work together.
Space Drums 2.0 is made up of three main parts:
- Two ESP32-S3 based drumsticks that track motion and detect hits
- An ESP32-S3 foot-pedal hub that receives the sticks' wireless data and reads the pedals
- A PC or Android application that turns those events into drum sounds and provides the user interface
The two sticks communicate with the hub using ESP-NOW. The hub then sends the drum and pedal events to the computer over USB serial, where the audio application plays the appropriate samples.
The drumsticks
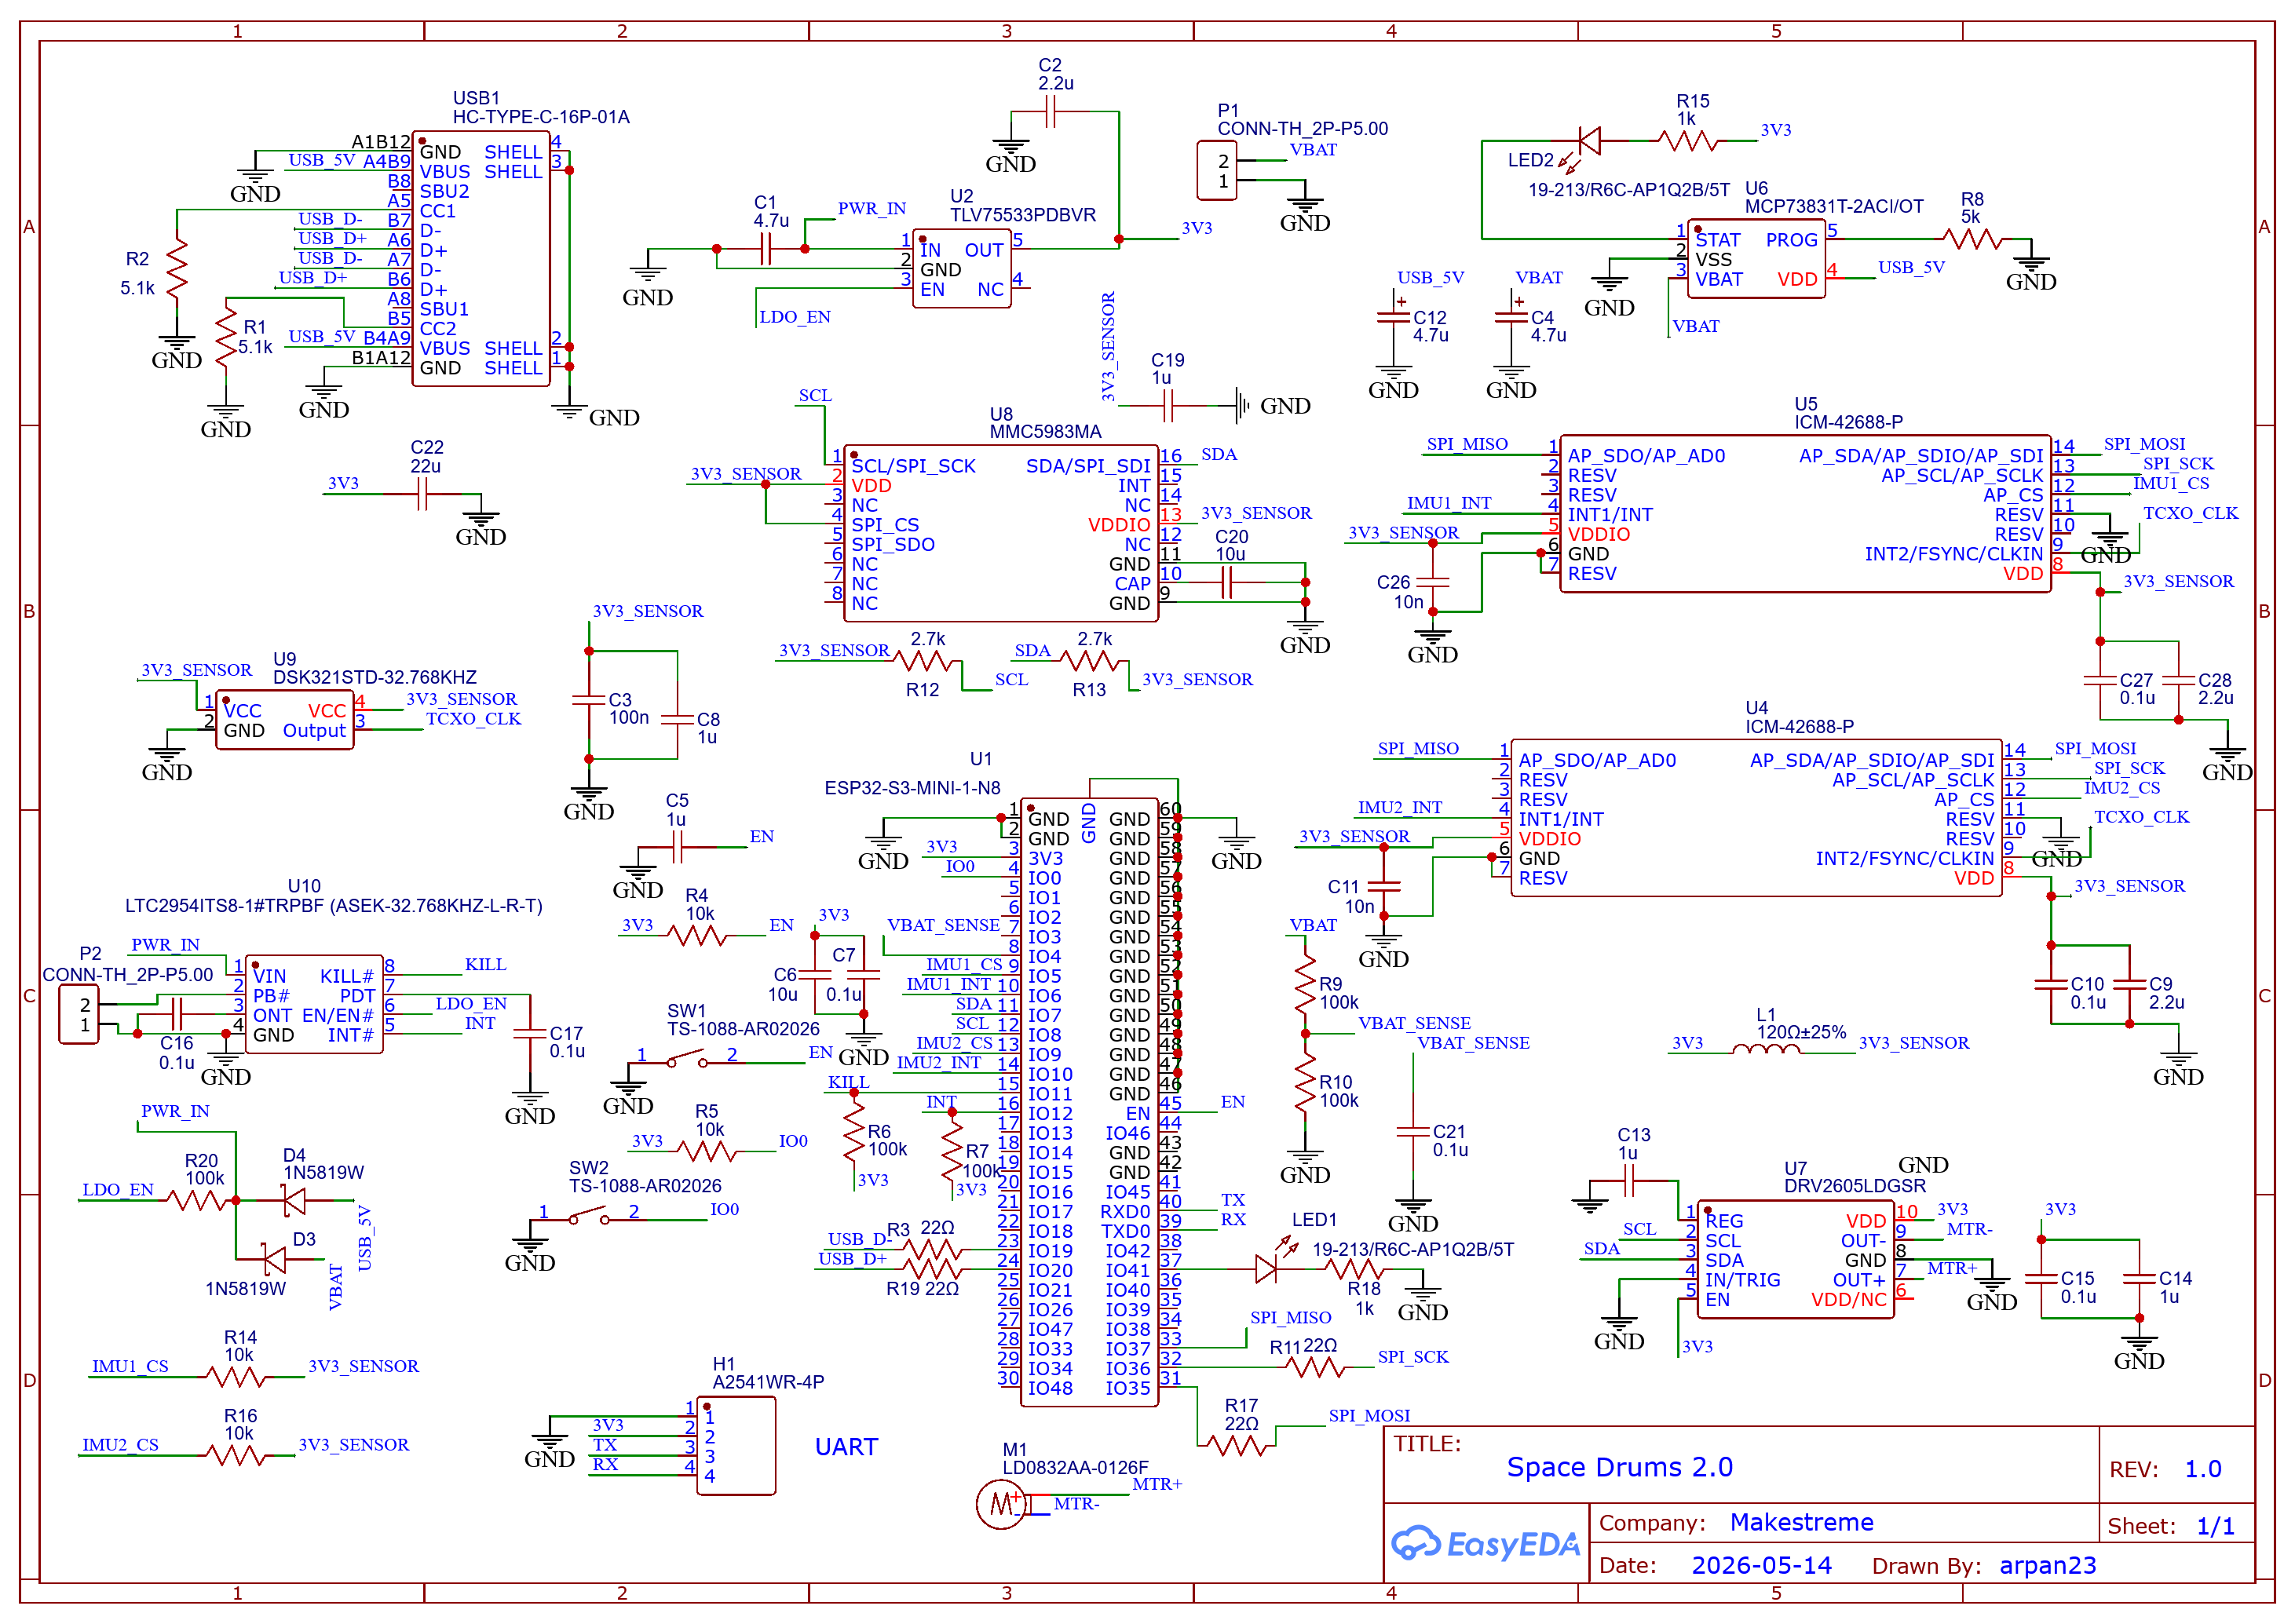
Each stick contains two ICM-42688-P motion sensors, along with an MMC5983MA magnetometer and a DRV2605L haptic driver.
When you calibrate the sticks, you point them toward the location where you want the snare to be. That direction becomes the reference point for the virtual drum kit.
From there, the firmware continuously tracks the stick's orientation. When you swing the stick, it detects the swing and determines which virtual drum corresponds to the direction you're pointing.
The drum layout is divided into two rows:
The upper row is selected when the stick is angled above 35 degrees, while the lower row is selected below 35 degrees horizontal playing. Within each row, the stick's yaw determines which drum zone you're pointing toward. Outside the defined angular zones, no drum is triggered.
Detecting the hitThe firmware uses the motion data to detect a swing and the resulting deceleration. Once a hit is detected, it produces a drum ID and a velocity value. The velocity is represented as a value from 1 to 6 loudness values.
The stick can also trigger its haptic actuator, giving you physical feedback when the virtual hit occurs.
The foot-pedal hubThe foot pedals are connected directly to a separate Xiao ESP32-S3, which acts as the receiving hub for both sticks.
The left pedal is connected to GPIO 1 and the right pedal to GPIO 2. The switches are wired between the GPIO pins and ground, with the ESP32's internal pull-ups making the inputs active-low.
The right pedal always acts as the kick drum.
The left pedal can be configured either as a second kick drum or as a hi-hat controller. In hi-hat mode, pressing the pedal closes the hi-hat and releasing it opens it. This assignment is handled by the application (PC/Android), so changing the left pedal's function doesn't require reflashing the hub.
Parts, Files & 3D PrintingBefore we start assembling anything, let's get all the hardware and printed parts ready.
Space Drums 2.0 consists of three physical assemblies: one drumstick and two foot pedals. The drumstick is made up of a printed base and tip, while the foot pedals are based on the Adafruit USB foot-switch design.
What you'll needFor the drumsticks:
- Space Drums 2.0 custom PCBs — 2
- ESP32-S3-MINI-1-N8 on each stick
- Battery for each stick
- Momentary power switch for each stick
- 3D-printed stick base and tip
- 3M double-sided tape for mounting the PCB
The custom PCB contains the electronics for motion sensing, orientation tracking, haptic feedback, power management, haptic motor, and battery monitoring. The PCB pinout includes the two ICM-42688-P IMUs, MMC5983MA magnetometer, DRV2605L haptic interface, status LED, power-management controls, and battery-sense circuit.
For the foot-pedal hub:
- XIAO ESP32-S3 (Or any Esp32s3)
- 2 × foot-pedal assemblies
- 2 × momentary switches
- Connecting wires
- USB cable
The left pedal connects to GPIO 1 (D0) and the right pedal to GPIO 2 (D1). Each switch is connected between its GPIO pin and GND.
Get the project filesAll the files required to build Space Drums 2.0 are available in the project's GitHub repository, including the firmware, software, PCB files, BOM, and 3D-printable parts.
For the PCBs, the repository also contains the Gerber files and BOM, so you can have the custom stick PCBs manufactured directly from the provided design files.
3D-print the enclosuresThere are three assemblies to print:
1 × Drumstick assembly
- Stick base
- Stick tip
- Power-button cover (Optional)
2 × Foot-pedal assemblies
- This design was taken from an Adafruit project. Follow their guide here.
Print all the parts before beginning the electronics assembly. The stick enclosure is designed around the custom PCB, with openings for the USB-C connector and power button, so make sure the printed parts are clean and the relevant openings are unobstructed.
Build the DrumsticksMount the PCB
Start by placing the Space Drums PCB into the printed stick base.
Use strong 3M double-sided tape to secure the PCB in position. Make sure the board sits correctly in the enclosure and that the USB-C connector lines up with the opening in the printed housing.
The USB-C port is accessible from the outside so you can use it both for charging the battery and uploading new firmware without having to open the stick.
Connect the battery
The stick is powered by a rechargeable battery.
Solder the battery wires to the BAT pads on the PCB, making sure to observe the correct polarity.
Install the power button
Next, solder a momentary switch to the dedicated switch pads on the PCB.
The printed stick housing has a mounting location for this switch, allowing the button to be operated from the outside. I also designed a small 3D-printed cover for the switch, which can be fitted once the switch is in place.
Close the stick
Once the PCB, battery, and switch are installed, fit the printed tip onto the base to complete the drumstick assembly. You'll need 3 m2 screws to connect them together.
Repeat the same process for the second stick.
The foot pedals can be built with adafruit's guide: https://learn.adafruit.com/usb-foot-switch-circuit-python/overview
Then the switches can be connected to the hub esp32 as mentioned before.
Flash the Firmware and Set Up the SoftwareWith the hardware assembled, it's time to load the firmware and set up the software that will turn the drum events into sound.
There are two firmware programs involved:
- Stick firmware — runs on both drumsticks and handles motion sensing, hit detection, calibration, and battery monitoring.
- SpaceDrums2Hub— runs on the XIAO ESP32-S3 and handles ESP-NOW communication, the foot pedals, and the USB serial connection to the computer.
Start with the ESP32-S3 hub.
Open the hub firmware in the Arduino IDE and upload it to the XIAO ESP32-S3. Once it has booted, open the Serial Monitor at 500000 baud.
The hub will print its MAC address at startup. Make a note of this address, because both drumsticks need it to know where to send their wireless data.
Configure the drumsticks
Open the stick firmware and make two small changes for each stick.
First, assign a unique ID:
Left stick  → STICK_ID = 0
Right stick → STICK_ID = 1
Then enter the MAC address printed by the hub into the hubAddress[] setting.
Both sticks should use the same hub address, but each must have its own STICK_ID.
Now flash the firmware onto each stick.
Arduino IDE settingsFor the ESP32-S3-MINI-1-N8 used on the sticks, use the following settings:
At this point, the sticks should be able to send their events wirelessly to the hub.
Set up the PC application (Optional)
The PC version of Space Drums uses Python for the audio engine and user interface.
First, install the required Python packages:
pip install -r requirements.txtThen start the application:
python audio_hub.pyBefore running it, set COM_PORT near the top of audio_hub.py to the serial port belonging to the hub, not either of the drumsticks.
The audio application expects the drum samples to be in the same folder. The default sample names are:
crash.wav
snare.wav
tom1.wav
tom2.wav
ride.wav
hihat.wav
floor_tom.wav
kick.wav
hihat_pedal.wav
If a sample is missing, the application falls back to a buzz rather than crashing.
If you're using Android instead, the provided SpaceDrums.apk can be used in place of the PC application. Both applications perform the audio playback, kit UI, and battery display functions.
The hardware and software are ready. Before you start drumming, there are just a couple of calibration steps to complete.
Calibrate the sticks
First, turn on both drumsticks by long-pressing their power buttons.
When a stick powers up, point it toward the position where you want the snare to be and hold it still. The calibration process uses this direction as the zero point for the virtual drum kit.
The stick goes through a short settling and calibration sequence. Keep it steady while the calibration is running. If you move during this period, the calibration window restarts, so simply hold the stick still until it finishes.
Once calibration is complete, that position becomes your reference for playing.
The calibration also re-measures the gyro bias and establishes the stick's attitude using gravity. It sets the pitch and yaw zero at the direction you're pointing, so it works regardless of which direction you're facing in the room.
One-time magnetometer calibration
There is also a separate magnetometer calibration that needs to be performed once per stick after a fresh firmware installation.
This compensates for magnetic distortion caused by components within the stick itself, including the battery, haptic actuator, and PCB.
To perform it:
- Move away from speakers, computers, steel furniture, and other sources of magnetic interference.
- Open the stick's serial connection.
- Type
magcal. Press enter - For the next 18 seconds, slowly move the stick in figure-8 patterns.
- Check the calibration result.
Failed calibration data is not saved, so a failed attempt won't overwrite a previous good calibration.
Recalibrate while playing
As you play for long durations, you may occasionally feel that the virtual drum positions have shifted slightly.
If that happens, simply point the stick back toward the snare position and short-press the power button.
The stick runs the same short zeroing sequence again. Once calibrated, the space in front of you becomes your drum kit.
Tune, Troubleshoot and Go Under the HoodAt this point, you should have a working pair of air-drumming sticks. But because the entire system is open source, you don't have to stop there. You can tune the way the sticks feel, modify the drum layout, or dig into the communication between the hardware and software.
Fine-tuning the playing experience
Most of the parameters that affect how the sticks feel are grouped near the top of stick_firmware.ino.
For example, you can adjust the boundaries of the virtual drums using parameters such as TOP_ROW_PITCH, TOP_YAW_CRASH, TOP_YAW_RIDE, and the bottom-row yaw limits. This lets you change how far you need to move the stick to reach each drum and how large each virtual playing zone is.
You can also adjust the hit-detection thresholds:
SWING_START_THRESHOLDcontrols how hard a swing needs to be before it is armed.HIT_DECEL_THRESHOLDcontrols how much deceleration is required to register the hit.
If you're getting accidental hits, increasing these thresholds can make the system less sensitive. If hits aren't registering reliably, you can experiment with lowering them.
There are also parameters controlling orientation correction and gyro-bias learning, as well as pedal debounce and pedal velocity.
A note about latency
One of the things that makes the system feel responsive is keeping the communication path lightweight.
The sticks send compact ESP-NOW packets to the hub. A hit packet contains the event type, stick ID, drum ID, velocity, and battery information. The hub then converts these events into simple serial messages for the audio application.
For example, a hit is represented as:
H,<stick_id>,<drum_id>,<velocity>Pedal events use P, while battery updates use B.
If you're playing through the PC application, keep CONSOLE_LOG disabled during normal use. Printing every hit to the terminal adds measurable latency on Windows.
The sticks don't connect to the hub
Make sure the hub was flashed first and that its MAC address is correctly entered into hubAddress[] on both sticks. Also check that the left and right sticks have different STICK_ID values.
Calibration keeps restarting
The stick needs to remain still during the calibration window. If you move it, the calibration process restarts automatically.
The drum positions feel rotated
Simply point the sticks toward your desired snare position and short-press the power button to re-zero them.
Magnetometer calibration fails
Perform the one-time magcal procedure away from speakers, computers, steel furniture, and other sources of magnetic interference. Make sure you're rotating the stick through different orientations during the figure-8 movement.
A pedal triggers repeatedly
The hub uses a software lockout for pedal debouncing. The default PEDAL_LOCKOUT_MS is 35 ms; Increase it toward 50 ms if a press produces repeated triggers, while keeping it below roughly 75 ms for fast double-bass playing.
The sticks don't need to know anything about audio samples. They simply detect an event and report which stick hit which drum and with what velocity.
The hub similarly doesn't decide which sound to play. It receives the wireless events, reads the pedals, and passes everything to the application.
This separation makes the project easier to modify. The current protocol already distinguishes between hit, battery, and pedal events, and the application can decide how those events should be presented or sounded.
Why open source this?Space Drums 2.0 took me almost a year to get to this point. From researching whether something like this was possible, to building the first version, learning PCB design, developing the electronics and firmware, and iterating on the design.
I didn't build it with the intention of turning it into a commercial product. It started as a curiosity that I wanted to satisfy.
And that's ultimately why I'm open-sourcing it.
The complete project is available so that you can build your own version, modify it, improve the tracking, experiment with the firmware, design your own enclosure, or simply use it as a starting point for something completely different.
You don't need to already know how to build something before you try.
So if you've been thinking about building something that seems a little beyond your current skills, give it a shot.
Stay curious, keep experimenting, and have fun building.


Comments