

Hardware components | ||||||
 |
| × | 1 | |||
 |
| × | 1 | |||
 |
| × | 1 | |||
 |
| × | 1 | |||
| × | 1 | ||||
 |
| × | 1 | |||
Software apps and online services | ||||||
 |
| |||||
| ||||||
| ||||||
Hand tools and fabrication machines | ||||||
 |
| |||||
The study estimates that 5 million people die every year because of poor-quality health care in low- and middle-income countries. That's significantly more than the 3.6 million people in those countries who die from not having access to care. source
So we can solve almost all the problem with utilizing technology, As we mentioned earlier based on the report people die without getting proper medical attention, and the most of them don’t have access to medical equipment to determine the disease, so they don’t know the seriousness of the disease, and eventually, it will make big problems.
MalariaMalaria is a life-threatening disease. It’s typically transmitted through the bite of an infected Anopheles mosquito. Infected mosquitoes carry the Plasmodium parasite. When this mosquito bites you, the parasite is released into your bloodstream.
Once the parasites are inside your body, they travel to the liver, where they mature. After several days, the mature parasites enter the bloodstream and begin to infect red blood cells.
Open-source hardware has the potential to revolutionise the way we build scientific instruments; with the advent of readily available 3D printers, mechanical designs can now be shared, improved, and replicated faster and more easily than ever before. However, printed parts are typically plastic and often perform poorly compared to traditionally machined mechanisms. Open MicroScope is cheap, an open-source microscope that can easily build from a MakerSpace, the main goal is to give quality health checkup to poor people and societies to get medical attention when it's needed.
There are many projects available on the internet regarding malaria detection, here I am not going to reinvent the wheel but utilizing resource for time-saving
Goals- Build Fabable Cheapest Open-Source Microscope that can perform the blood test to find out common diseases
- Fully Fabable and Cheap cost
- Automatically detect diseases Using Image Processing
The most widely used method (so far) is examining thin blood smears under a microscope, and visually searching for infected cells. The patients’ blood is smeared on a glass slide and stained with contrasting agents to better identify infected parasites in their red blood cells.
Then, a clinician manually counts the number of parasitic red blood cells — sometimes up to 5, 000 cells (according to WHO protocol).
With this mixture of these problems, we must keep some things in mind when building our model:
- There may be a lack of a reliable power source
- Battery-powered devices have less computational power
- There may be a lack of Internet connection (so training/storing on the cloud may be hard!)
and as a conclusion Jetson nano is perfect for this scenario as Edge Computing device.
Proposed SolutionThe proposed solution will benefit the people who live in a rural area, and they need to travel long distance for any medical situation, whether emergency or not. people have malaria parasites only need to visit a doctor for getting medical attention, and they can test anytime with the open scope.
Software and DatasetWe used Jetpack SDK with Python and Tensorflow to inference the data model also we found an article on medium that describes the Malaria Dataset: Source
NIH has a malaria dataset of 27, 558 cell images with an equal number of parasitized and uninfected cells. A level-set based algorithm was applied to detect and segment the red blood cells. The images were collected and annotated by medical professionals; more information can be found here. Also, download the data from the page: the file is named cell_images.zipHardware
We used OpenFelxure design to build the Microscope and used a Modified version of Raspberry Pi Cam.
An open-source, 3D-printed microscope, including a precise mechanical stage to move the sample and focus the optics.Required MaterialsHardware
- Nvidia Jetson nano
- Pi cam v2.0/later
- OpenFelxure Scope Base
- M3 Screws and Nuts
- NVIDIA JetPack SDK
- SD card 32 GB Class 10+
- OpenCV
- Tensorflow
These Instructions Go through very minimalist way to build the Open MicroScope
Step 1: 3D Print the Microscope BaseWe met a team from China during the GOSH -Open Hardware Summit 2018, they built an open-source microscope as part of there PhD project, paper in Review of Scientific Instruments . also saw some amazing microscope from the internet, but most of them lack documentation.
Instead of building the microscope from scratch, We were planning to try out and implement the best one out there and modify it’s and make them better by utilizing FabLab and release a newer version.
For the base, We chose OpenFelxure Model, (The OpenFlexure Microscope is a 3D printable microscope, including a precise mechanical stage to move the sample and focus the optics. There are many different options for the optics, ranging from a webcam lens to a 100x, oil immersion objective.)
1.1 Download the Design files and 3D Print without Support
- Main Body.stl
- Optics.stl
- illumination.stl
Note : These files are licenced under CERN by OpenFlexure team.
The file can be found in the download section.
1.2 Assembling the part
We 3D Printed all the required part by the support of the OpenFexlure team and utilizing the FabLab Kochi, where Salman worked as an Instructor.
Setup 2: Modify Raspberry Pi CamWe are getting the zoom by increasing the focal length between the pi cam and stock lens, for that first, we need to remove the lens form the sensor and add 3D printed optics part in between the lens and sensor.
try to use Raspberry Pi Cam V2.0, other version is little bit difficult to remove the lens and it break the cam, like we did in past :-(
2.1 Remove Pi Cam lens
With the help of (Lens Adjustment Spanner)[https://www.thingiverse.com/thing:1574661] from Thingiverse,
First we removed the Pi cam 2.0 lens
- Removed the lens, make sure that keep the bare sensor from dust.
2.2 Installing into Optics Model
- After removing the lens from the sensor we need to install it on the 3D printed optics part.
- next, attach the camera sensor in the other end, this will help to increase the focal length and we can obtain microimaging
Light is very important when it comes to microscopic images, we are using 5mm LED to give the illumination for our Scope. Simply insert the 5mm LED on the 3D printed Illumination Part.
The Final Part Assembling all the parts together.
Step 4.1: Adding Camera module on Base Part
Add the extended camera module on the base part from the bottom.
- carefully insert the camera module from bottom to top
Step 4.2 Adding the Illumination on Base Part
- Insert the illumination part from bottom to top.
Step 4.3 Attaching Camera Module with Jetson nano.
Attach the CSI cable from Modified Pi CAM to Jetson Nano.
We used Jetson nano getting started guide to setup the jetson nano. it was a good tutorial.
Step 1: Download the Jetson Nano Developer Kit SD Card Image.
Step 2: Download the SD Memory Card Formatter for Windows. and Format the SD Card.
Step 3: Download, install and launch Etcher.
Insert SD Card and Selected the Jetson nano SDK and click flash, it will take around 5 min to complete the burning.
Step 4: First Boot
Insert the card and PowerUp device. We used 5.0 V 2A power adapter and that will be 10W in total, Jetson 5W mode which only requires a 2.5A supply and 10W mode which needs a 4A (non-USB) supply. so we need to switch to 5 W mode, otherwise, the Jetson will stick middle in the inference.
Setup 5: Testing Jetson Computer Vision Capabilities
We followed the Real-Time Object Detection in 10 Lines of Python on Jetson Nano, tutorial and it works very well, only problem I faced with the power adapter, we switched 5W mode, then everything works perfectly as the tutorial.
Step 1: Collecting Malaria Database
The dataset itself can be found on the official NIH webpage:
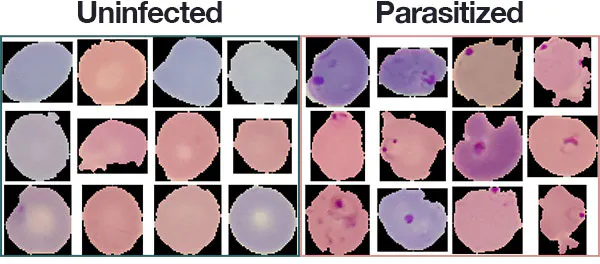
A subset of the Malaria Dataset provided by the National Institute of Health (NIH). We will use this dataset to develop a deep learning classification model.
The malaria dataset we will be using in today’s deep learning and medical image analysis tutorial is the exact same dataset that Rajaraman et al. used in their 2018 publication.
The dataset consists of 27, 588 images belonging to two separate classes:
- Parasitized: Implying that the region contains malaria.
- Uninfected: Meaning there is no evidence of malaria in the region.
Step 2: Train the model
For the Jetson, nano will take ages to train the model, and I don't have access to the Powerful computer, so we couldn't complete the training process. :(
(We know that is just an excuse!) So we used a pre-trained data model and complete the prediction.
We got the pre-trained data from the Pyimagesearch.
Step 3: Predictions
Pyimagesearch used a Keras Model, so I converted the Keras model into TensorRT model by following the https://github.com/Tony607/tf_jetson_nano repo.
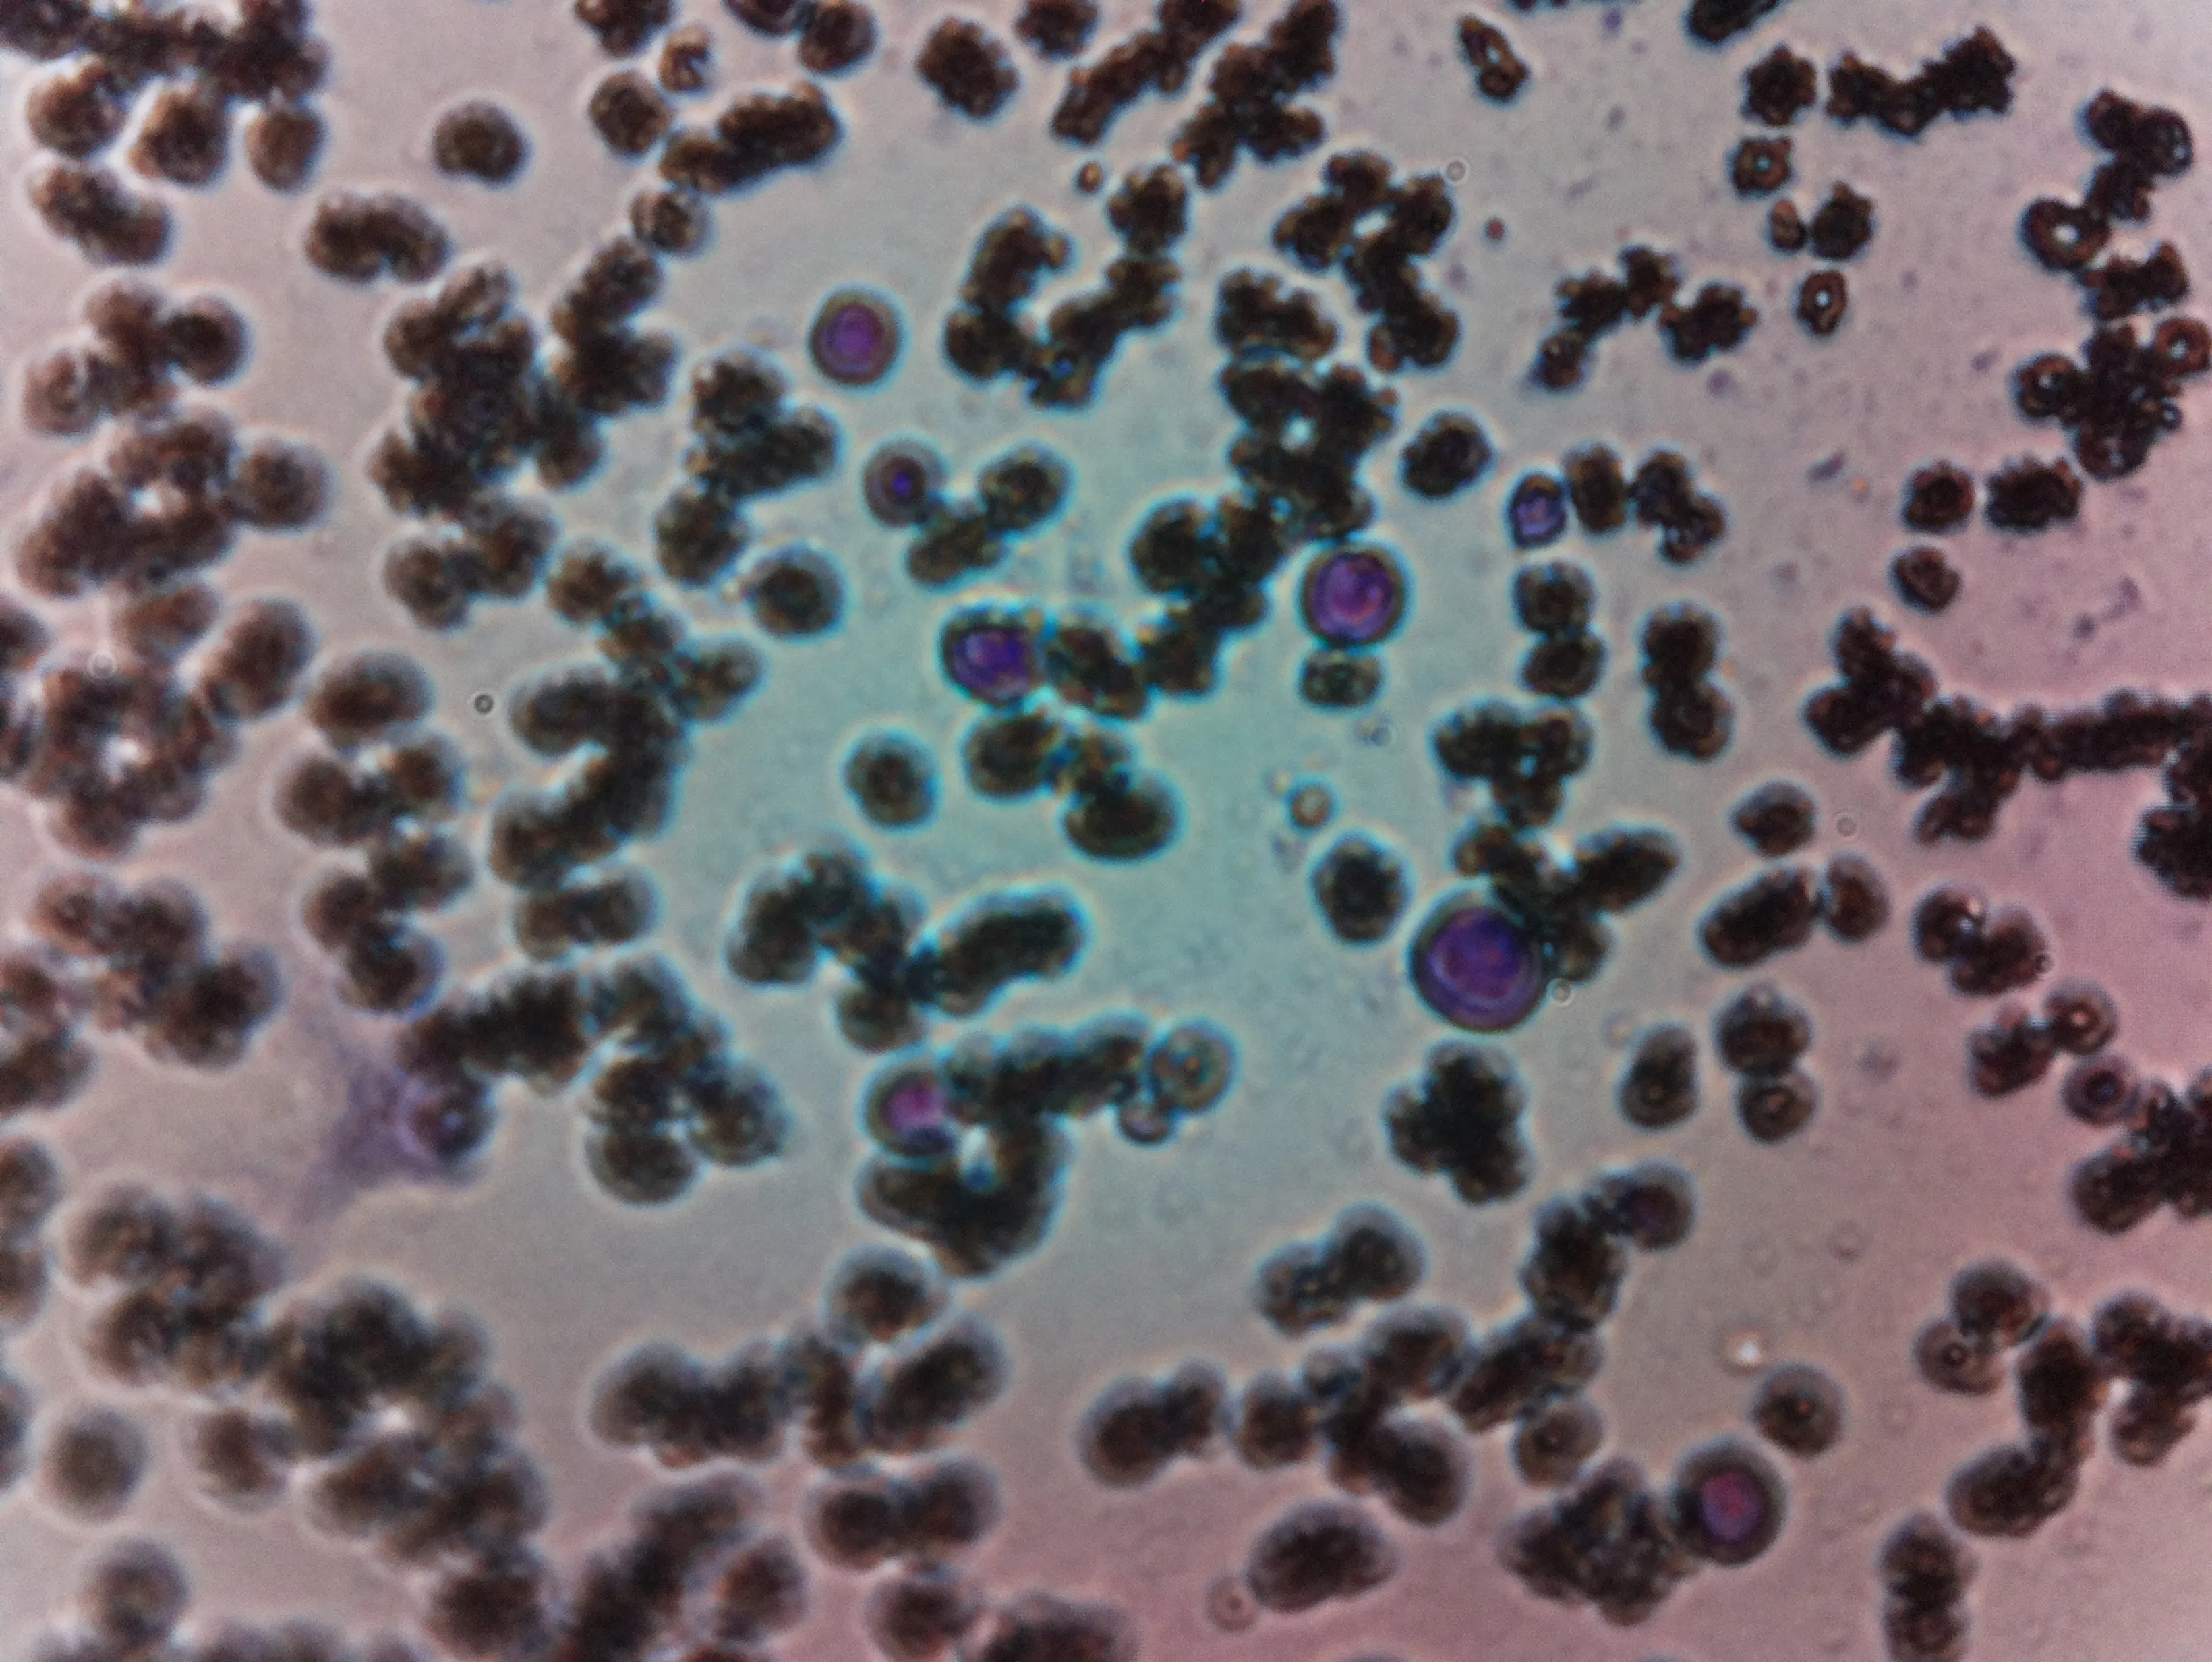
Final Test.We tried to get malaria-affected blood cell for actually testing it, but couldn't get one, and Finally, we tested with normal blood to test the microscopic vision.
The project is fully open-source and We believe this project can make big changes in society by helping to give health and proper treatment to the poor. And with more data models and training, we can improve the accuracy and better fight with diseases like Malaria. if we have a powerful GPU system we could train more datasets and provide models, will try that in future. Finally, we have a complete end-to-end malaria classification system, Thank You all.
Thank You, Nvidia for the Jetsonnano and Thanks Hackster for this platform.
Special thanks to Dr Adrian Rosebrock at PyImageSearch and Gracelyn Shi for the blog and tutorials.
Thank You.
Update: Thanks to Avinash bro for the spelling and grammar correction. 🤗
_EqWI1Xg8KK.png)


_t9PF3orMPd.png?auto=compress%2Cformat&w=40&h=40&fit=fillmax&bg=fff&dpr=2)


_EqWI1Xg8KK.png)
Comments