
Hardware components | ||||||
 |
| × | 1 | |||
| × | 1 | ||||
 |
| × | 1 | |||
| × | 1 | ||||
 |
| × | 1 | |||
 |
| × | 1 | |||
| × | 1 | ||||
| × | 1 | ||||
In our everyday life, everybody uses RFID Technology, most of the times without knowing it. RFID history dates back to the 1940s, It has vast range of applications, widely used in various industries/fields like Logistics, Supply Chain, Security/Access Control, Healthcare etc. and many more.
RFID stands for Radio-frequency identification. It uses electromagnetic fields to automatically identify and track tags attached to objects. An RFID system consists of a tiny radio transponder, a radio receiver and transmitter.
Every RFID system consists of three components:
- a scanning antenna, a transceiver and a transponder.
- When the scanning antenna and transceiver are combined, they are referred to as an RFID reader or interrogator.
- The transponder is in the RFID tag itself.
In this article we are going create one common/typical prototype application used in Access control. Which is Locking system. We're going to make simple DIY project of RFID based Lock.
- So, to implement this project's concept/prototype, we'll need RFID/NFC Module which can be easily interfaced with any MCU Board, like (Arduino/ESP32 etc.)
We'd like to extend our sincere gratitude to Reyax Technology for providing us their excellent hardware (RYRR10S Multiprotocol Fully Integrated 13.56MHz RFID & NFC Antenna Module) for making prototype implementation of this Project.
The RYRR10S antenna module is a 13.56-MHz RFID and Near Field Communication (NFC) system.
It has following features
- ST CR95HF NFC/RFID Engine.
- Supports Near Field Communication (NFC) ISO/IEC 18092.
- Completely Integrated Protocol Handling for ISO/IEC 15693, ISO/IEC 14443A, ISO/IEC 14443B
- NXP MIFARE® Classic compatible
- Designed with PCB integrated antenna.
- UART / SPI Interface optional.
We have explained detailed review in following video. We have explicated in detail, unboxing, features, specification, Datasheets, Application Interface, AT commands configuration guide etc. You can go through for more information.
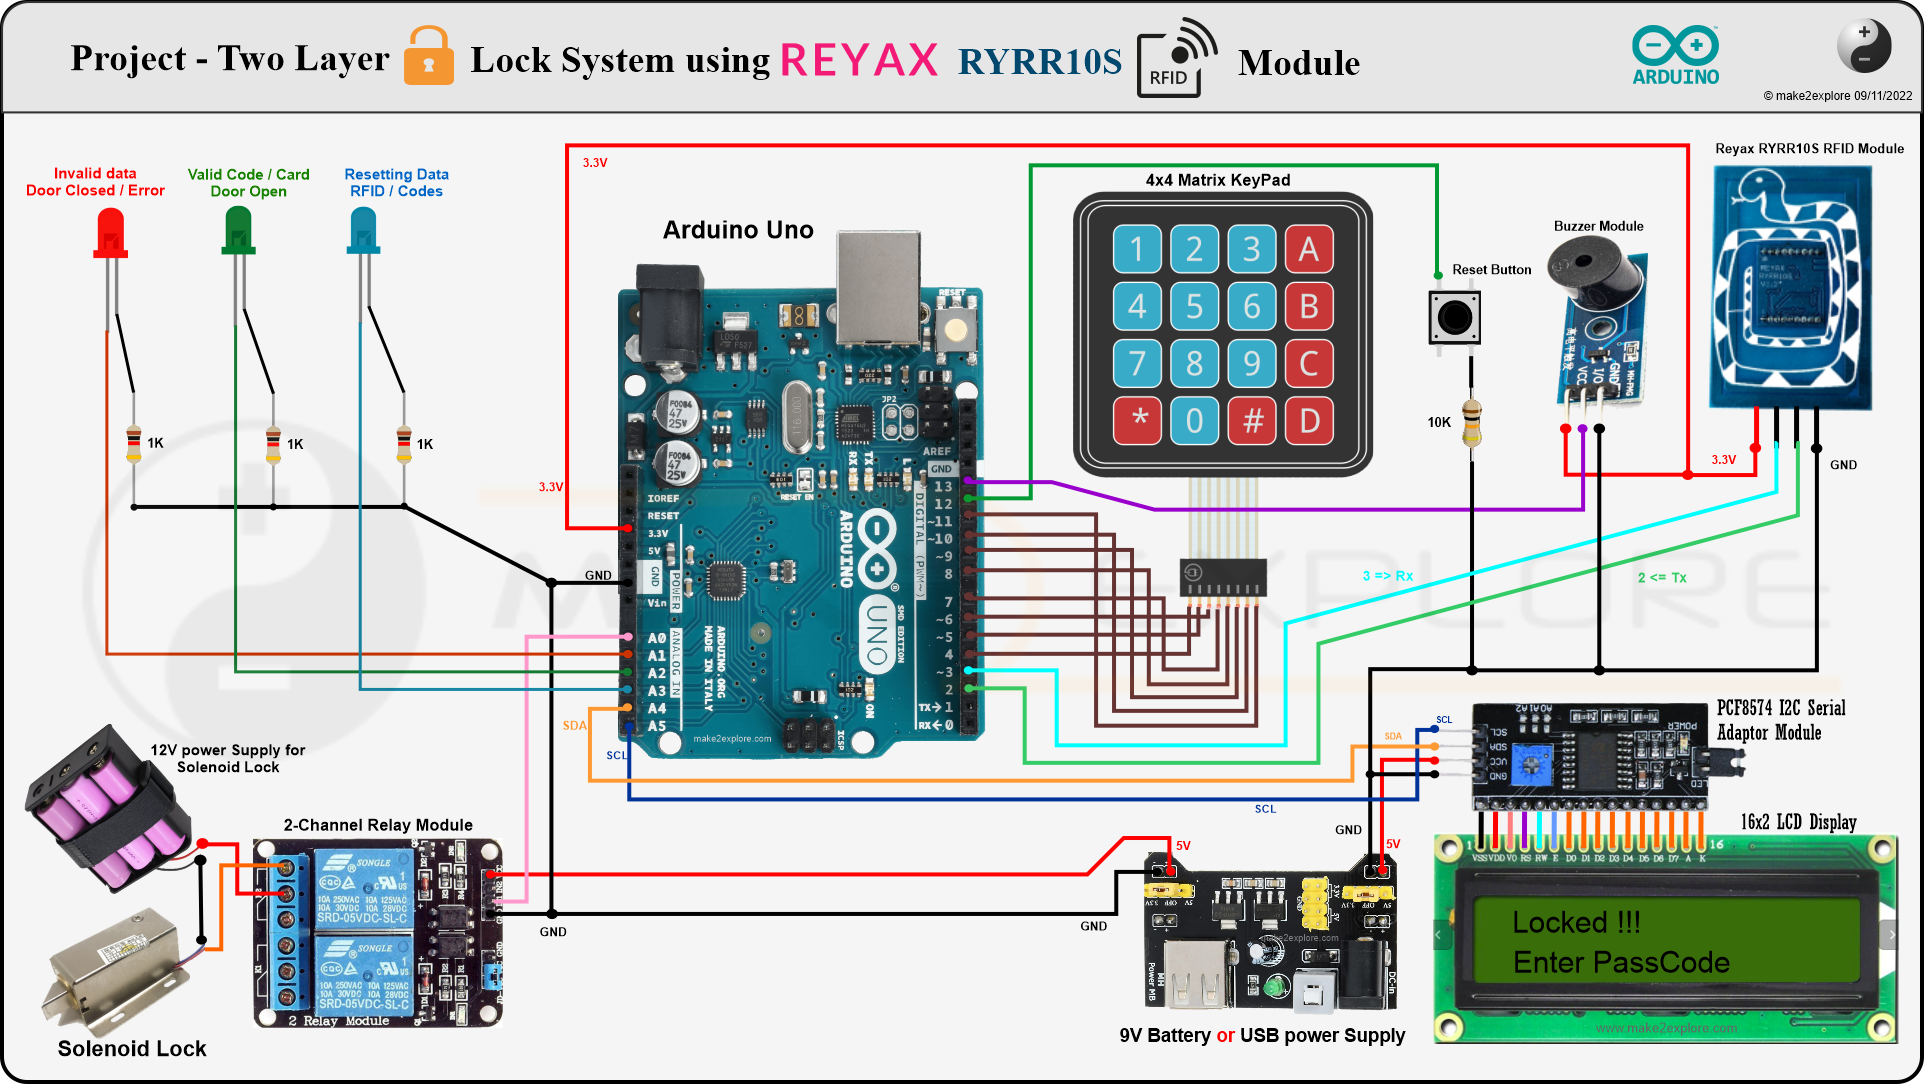
DIY project - Two level RFID Lock -Now, lets see one small DIY project using this RYRR10S RFID reader module. Which will be having, two levels or layers, of locking system. In which, user have to use valid RFID card to unlock the Lock. You can see below is the functional block diagram of the project. It consist of, RFID module and Keypad as an input.
Detailed circuit diagram is given below in circuits and schematics, you can also get it from GitHub Repo of the project.
There will be Two levels or layers of authentication. One will be, of course, the RFID and other one will be Passcode. If both levels completed successfully, then and only then, lock will get unlock. So, in order to enter pass code, the matrix keypad will be used. Here, we will see, two different programs. Two different versions of this DIY project.
DIY project version 1 -- First version, will be simple and basic in which all the authorized users data. Means, their RFID’s and their respective passcodes are pre-programmed at the time of programming. User can not change it afterwards in application mode.
- RFID will be the first level of authentication and triggering point for this version of project. System will be continuously scanning for RFID card or tag to be placed on RYRR10S Reader
- If suppose, user places his RFID card on the reader. System will detect it. read its UID. unique Identification code, specific to that card. And then, compare it with Authorized cards, available in the database, which we have saved into microcontroller, at the time of programming. If it is found that, card’s UID is Valid and authorized, then and only then, it will goes to next level. Other wise, it will display access denied, on the LCD screen and will go back to its home screen. Lock will remain locked.
- In another case, suppose, If system finds RFID card's UID is valid and the authorized one. Then, it goes to next level or layer of authentication. Which is nothing but, the pass code method. Here, using 4x4 matrix keypad, user have to enter the correct pass code. This passcode will also be unique to each user. So, if user has Valid RFID and enters correct passcode, only then, Lock will get opened. Otherwise not.
- In second version of this DIY project, We will use keypad as an HMI device to interact with the project. Means, using Keypad and LCD display, user can set up or configure the lock's "settings". Like adding or enrolling new user RFID. Then, we also can delete or reset all the data, by entering specific code using keypad.
- Here, in this version, like previous one, Both methods or layers of unlocking, will be used. But, the first stage will be the Entering the code, instead of RFID. Here, as we said earlier, We will use keypad, as an HMI device, to interact with the project. Means, using Keypad, and, LCD display, user can set up the Lock configuration. Like, adding, or, enrolling new user RFID. Then, we can also delete, or, reset all the data, by just entering specific code using keypad
- There will be three main program flows. Like First, in which user enters his passcode to enter into second stage, which will be RFID. If he enters correct passcode, then he will be asked to place his RFID card on the Reader. And if that card also valid, and, authorized, only then, lock will get unlocked. Other two codes or program flows, will be for resetting the user data and adding enrolling new user. Here, UID of new user will be stored into EPROM memory of Arduino, hence, even though power goes off, all the user data will be stored safely.
- User has to enter specific code, to enter into these modes. Reset and the Enroll modes. You can change these codes, and their digits or characters, in the main program.
RFID module RYRR10S is powered by ST's CR95HF 13.56-MHz multi-protocol contactless transceiver IC. There are three communication interfaces facility with a host Controller as shown in following diagram,
RYRR10S RFID reader module comes with UART breakout board, on which its UARTs pins Tx and Rx are taken out. Therefore this module an be configured via serial AT commands. Means, to use this module for RFID detection we need to,
- Interface this RFID reader module with main MCU via serial/SPI interface
- And then We have to send certain sequence of AT commands serially to RFID Reader for performing typical RFID operations like Reading RFID tag
- All these command sequences are given in datasheet of RYRR10S as following,
- You can check this Firmware quick start guide to know more about this command sequences and its response.
- Documents like Datasheets of RYRR10S and CR95HF are shared in GitHub Repo of the project.
- In Source code we have added brief comments for wherever these AT commands and its hex number arrays are used.
In following video you can see demo and detailed explanation of working of the DIY project
Future Expansion Ideas -
Making this DIY project headless, An Access control system via Web UI. by replacing Arduino Uno, with NodeMCU ESP8266 or any other Wi-Fi capable MCU board. Then using Wi-Fi manager firmware we're planning to provide a facility to add/remove user data by accessing. Access Control system, just flash and everything can be configured via Web UI
CreditsThank you Reyax Technology, for supporting this project with their amazing hardware. Furthermore we'd like to thanks to all the peoples, websites and entities who helped us (directly/indirectly) in this project.
Suggestions about Project design, Circuits, source code modifications, Optimization, Errors/Bugs findings and queries are most welcomed. Please feel free to comment or give feedback.


Comments