


Hardware components | ||||||
 |
| × | 1 | |||
 |
| × | 1 | |||
 |
| × | 1 | |||
 |
| × | 1 | |||
 |
| × | 1 | |||
Software apps and online services | ||||||
 |
| |||||
| ||||||
This is very simple project to do but useful at the same time. We are going to use bolt iot wifi module for this project. After completion of this project you will be able to control any digital output devices like buzzer, LED etc. By Google assistant. So lets start.
Step 1 :bolt cloud setting
You have to visit bolt iot platform first to enable API key as shown below.
Click on API tab and press enable under the generate key.
Now you have your own API key which will something like f1f918e9-d9c2-4e5b-aed0-b7cb743f74cf.
Step 2 : Hardware setting
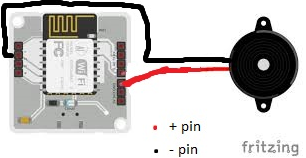
GatheAG Assemble the components take the buzzer and mount on the breadboard then connect one leg of resistor to short leg of buzzer. The remaining leg of resistor is connected to the ground pin of the module. Long leg of the buzzer is considered to be positive, plug it into digital 0 pin of the Bolt wifi module. Now power up the module. Check whether if its both ( green and blue) led are glowing blue led shows that your wifi module is turned on now and green led shows that it is connected to the Internet.
Now just small software setup is remaining.
Step 3 : Creating the GPIO Control CommandSince LED is a digital output device, we will need to get a Digital Write command that can be sent to Bolt over the Internet to switch on the LED.
Click here Bolt Cloud go to Docs Tab -> API Documentation -> GPIO Commands API -> Write Digital Output, to understand how to create a API command link to turn on or turn off a pin of the Bolt.
The structure of the command is:
https://cloud.boltiot.com/remote/API_KEY/digitalWrite?pin=PIN_NUMBER&state=HIGH/LOW&deviceName=DEVICE_ID
The parameters that you need to replace are:API_KEY: You can get it from API tab on cloud dashboard.PIN_NUMBER: Pin to which you have connected the LED. Values can be either 0, 1, 2, 3 or 4HIGH/LOW: This value indicates if you want to turn on/off the LED. HIGH will turn it on, LOW will turn it off.DEVICE_ID: The id of your device. You can get it from cloud dashboard.
The sample command to turn the led ON connected to device having ID BOLT13819450 to PIN 0 is:
https://cloud.boltiot.com/remote/f1f918e9-d9c2-4e5b-aed0-b7cb743f74cf/digitalWrite?pin=0&state=HIGH&deviceName=BOLT13819450
Make sure that you change the API Key to your own API Key and device ID which you got in the previous step.If you have connected the LED to any other pin other then Pin 0 then make a suitable change in the pin no in your code.
Step 4 : IFTTT linking with webhook and Google assistantVisit the IFTTT website. Login there by using your gmail account and make sure it is the same account on which your Google assistant is running.
Click on +this tab
Search for Google assistant and select "specific phrase"
type the phrases which are used to control your led, you can write any three phrases as given below :-
1) please turn on buzzer
2) let the buzzer turn on
3) turn on buzzer
Click on 'Create Trigger'
Click on '+That'
Now search for "webhook"
After doing this much you will use the API created in the previous step. and fill up other details as given.
- Method - GET
- Content type - Application/json
Click on 'Create Action' and then Click on 'Finish'
Till now we set up to turn the buzzer on
now to turn off buzzer, follow same steps. don't forget to change state=LOW.
https://cloud.boltiot.com/remote/f1f918e9-d9c2-4e5b-aed0-b7cb743f74cf/digitalWrite?pin=0&state=LOW&deviceName=BOLT13819450
Now on your google assistant and say one of the phrases you given to turn the buzzer on and off.
That's it yourproject is ready.


Comments