

Hardware components | ||||||
 |
| × | 1 | |||
 |
| × | 1 | |||
 |
| × | 1 | |||
Software apps and online services | ||||||
| ||||||
 |
| |||||
Each day, more and more devices are getting connectivity functionalities to acquire data in real-time and transmit that information to a database. Cloud platforms gained a lot of popularity over the last few years for the simplicity of these services and the interesting pricing based on client needs. Optimize your workplace, set up security systems or even automate your home, there are countless opportunities for makers and developers to create awesome projects without having to do everything by themselves.
Big data, IoT, Cloud computing and real-time analytics are some of the concepts that are now being used to explain new technology integration in the industry. It can be quite confusing at first but this tutorial will try to give you a better understanding of IoT concepts so you can start using these tools to create your own system.
What's the Internet of Things (IoT)?In simple terms, the internet of things is a data exchanging system that works over the internet to interconnect devices who are also called "Things". These devices can be any sensors, home appliances or industrial machines that can send data over the internet. Many experts believe that the number of connected devices will continue to grow exponentially over the next years so it might be a good idea to play around with this technology to see how it works.
The power of using IBM CloudIBM Cloud is one of the main cloud service providers in the market. I'm sure that you are well aware of other providers like Amazon Web Services (AWS), Google Cloud Platform or Microsoft Azure. You might be wondering why I chose the IBM platform. First of all, all these platforms offer similar cloud services that would respond to any basic user needs like myself but IBM has one thing that I wanted to use in a future project and it's called Watson. Watson Assistant is an AI service that uses machine learning to interact with users. Another great thing that I liked with IBM is the Lite version of IBM Cloud which offers the services that I was looking for without having to pay anything.
How does everything work?*Each of these steps will be detailed below.
Starting with your home sensors, you simply connect them to your raspberry pi that already includes Node-RED natively then write basic python scripts for getting the sensors to work and to obtain the data in a JSON format. Using Node-RED, it is now a piece of cake to use the IBM nodes to connect to your cloud service and send over your data. IBM Watson IoT platform utilizes MQTT connectivity protocol which is simple of understanding and lightweight (http://mqtt.org/). MQTT uses a broker and clients where clients are either subscribing or publishing on different topics. You can imagine the IBM platform as a broker to buy stocks and you are the client. Publishing would mean that you send a request to your broker to buy X stocks from Y company. Subscribing would be your watchlist of stocks where your broker sends you over the data regularly so you know the current price of stocks. Once your IBM Watson IoT platform receives all the data as the MQTT broker, you can manage everything by using the Node-RED start kit running in the Cloud.
Initialize instances in IBM Cloud- Create your IBM Cloud account
- Sign in to your account
You should now be in your dashboard :
As you can see, I have 1 Cloud foundry app and 4 cloud foundry services running. Let's dive in the steps to create those:
- Get to the catalog
- Create an instance for the Internet of things platform
- Create an instance of Node-RED starter kit with Cloudant DB (NoSQL)
- Launch the service
- Create a device type: sensor
- Add your device, mine is called DHT11-01
- Skip the authentification token so IBM will generate one
- Write down all the information in a spreadsheet
If your Raspberry Pi is not already set up and running, follow this tutorial. Once it's done, SSH to the Pi. If you are like me, getting everything done using SSH is a great way to minimize cables and getting used to work with a terminal. Node-RED should already come with the installation of Raspian but if not, follow this quick tutorial.
- Run Node-RED as a service using the command:
node-red-start*Using "node-red" instead of "node-red-start" command will only run it locally which results in disconnecting the service after an hour or two.
- You can now access the Node-RED programming environment from your laptop's browser using the IP address of your Pi followed by ":1800" (192.168.0.XXX:1880). Your laptop needs to be connected to the same Wi-Fi network.
Follow this great tutorial to wire your sensor to your Pi.
There are many possibilities to program this sensor. In my case, I used an Adafruit Library and a simple python script.
- SSH to your Pi
- Install Adafruit Library using pip3
pip3 install adafruit-circuitpython-dhtYou should now have a folder named Adafruit_DHT in your root file directory
- Get to your project folder ** Cloning a GitHub repository is a great option to quickly update everything and it also saves you from programming inside the SSH terminal which can be frustrating compared to an IDE.
- Create your python script using
nano DTH11.py- Start programming the sensor
I used a code from Adafruit and just modified the output format to get a JSON format to easily interpret the data on Node-RED.
#!/usr/bin/python
# Copyright (c) 2014 Adafruit Industries
# Author: Tony DiCola
# Permission is hereby granted, free of charge, to any person obtaining a copy
# of this software and associated documentation files (the "Software"), to deal
# in the Software without restriction, including without limitation the rights
# to use, copy, modify, merge, publish, distribute, sublicense, and/or sell
# copies of the Software, and to permit persons to whom the Software is
# furnished to do so, subject to the following conditions:
# The above copyright notice and this permission notice shall be included in all
# copies or substantial portions of the Software.
# THE SOFTWARE IS PROVIDED "AS IS", WITHOUT WARRANTY OF ANY KIND, EXPRESS OR
# IMPLIED, INCLUDING BUT NOT LIMITED TO THE WARRANTIES OF MERCHANTABILITY,
# FITNESS FOR A PARTICULAR PURPOSE AND NONINFRINGEMENT. IN NO EVENT SHALL THE
# AUTHORS OR COPYRIGHT HOLDERS BE LIABLE FOR ANY CLAIM, DAMAGES OR OTHER
# LIABILITY, WHETHER IN AN ACTION OF CONTRACT, TORT OR OTHERWISE, ARISING FROM,
# OUT OF OR IN CONNECTION WITH THE SOFTWARE OR THE USE OR OTHER DEALINGS IN THE
# SOFTWARE.

import sys
import time
import Adafruit_DHT
import json

sensor = Adafruit_DHT.DHT11

pin = 19 # GPIO Raspberry Pi

# Try to grab a sensor reading.  Use the read_retry method which will retry up
# to 15 times to get a sensor reading (waiting 2 seconds between each retry).

humidity, temperature = Adafruit_DHT.read_retry(sensor, pin)

# Un-comment the line below to convert the temperature to Fahrenheit.
# temperature = temperature * 9/5.0 + 32
# Note that sometimes you won't get a reading and
# the results will be null (because Linux can't
# guarantee the timing of calls to read the sensor).
# If this happens try again!

if humidity is not None and temperature is not None:
data = {"Temperature":temperature, "Humidity":humidity}
dataJSON = json.dumps(data)

print(dataJSON)

else:
print('Failed to get reading. Try again!')
sys.exit(1)- Go back to your laptop's browser in the Node-RED programming environment of the Pi.
- Build the flow
- A few things to know before, the Node-RED is divided into 3 windows, the first at the left is the Node palette, it shows all the nodes available. You might need to add some nodes. To do so, follow this tutorial. In the middle, it's the flow programming interface where you drag nodes and connect them together. The right side is for node information and debug. To get a debug message, it's required to use the debug node where you want to verify the information.
- It's required to create an API key with the IBM Watson IoT Platform for the last node used (IBM IoT out). To do so, just goeo back to your IoT platform.
You are done with the Raspberry Pi! Every time the temperature in the room changes more than 5%, the sensor will send the data again to your Pi. Take a look at recent events in the IoT platform.
**Note: The status says disconnected but the device is in fact connected. I'm still looking to solve this issue. One possibility that I found was to use another IBM Watson Node package but I preferred the flexibility of the current nodes that I use.
Linking everything togetherFinally, the last step is to use the Node-RED instance that runs on the IBM Cloud. This is probably the biggest advantage of using Node-RED because you can now work on your flows from anywhere in the world as long as you have an internet connection.
- Get to your Node-RED instance
- Add connections to your other running apps
- Visit the URL
Now let's build your flow to connect the IBM Watson IoT platform to your application.
- Create one more API Key to run in your Node-RED.
- The IBM node is currently set up to listen to all messages coming from the IoT platform so it's required to use a split node to select the exact topic that you want to listen to.
iot-2/type/sensor/id/DHT11-01/evt/data/fmt/json- Having the topic selected, you can change the message payload so the output will be a number only. It is possible to use two functions nodes to send the number for the temperature and the humidity individually.
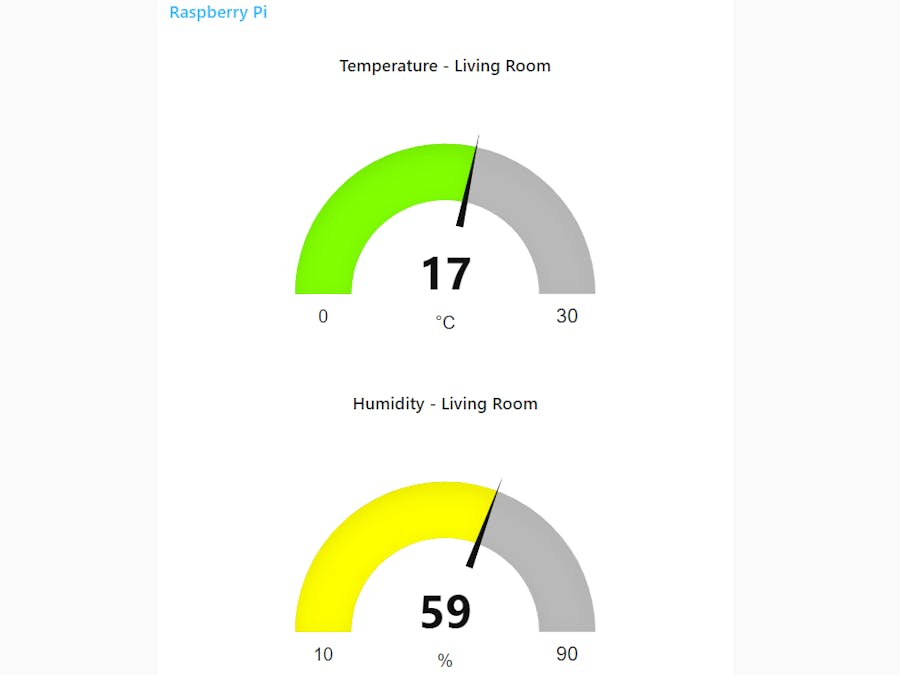
- Install the dashboard node package and connect your output to a gauge node.
This project is just an introduction to use IBM Cloud as an IoT Platform. I strongly recommend to test different flows and try to optimize this flow. Having just a little experience with javascript, I think there is much more that you can accomplish with function nodes or even create your own nodes.
What's next?In this tutorial, we only scratched the surface of the IBM Watson IoT Platform. I'll be posting other tutorials soon on :
- Interaction between Google Assistant and Watson Assistant - Ask Google to talk to Watson and then ask Watson about the living room temperature
- Control Philips Hue lights - Send commands and view the status of lights from your dashboard


Comments