

Hardware components | ||||||
| × | 1 | ||||
_ztBMuBhMHo.jpg?auto=compress%2Cformat&w=48&h=48&fit=fill&bg=ffffff) |
| × | 1 | |||
| × | 1 | ||||
 |
| × | 1 | |||
| × | 1 | ||||
 |
| × | 1 | |||
Software apps and online services | ||||||
 |
| |||||
I decided to build this project because I haven't found any detailed project around the web about radio controlling a 3Pi robot. You'll need to install the 3Pi libraries and drivers for the programmer to be compatibles with the Arduino IDE. After doing this you can start with my tutorial.
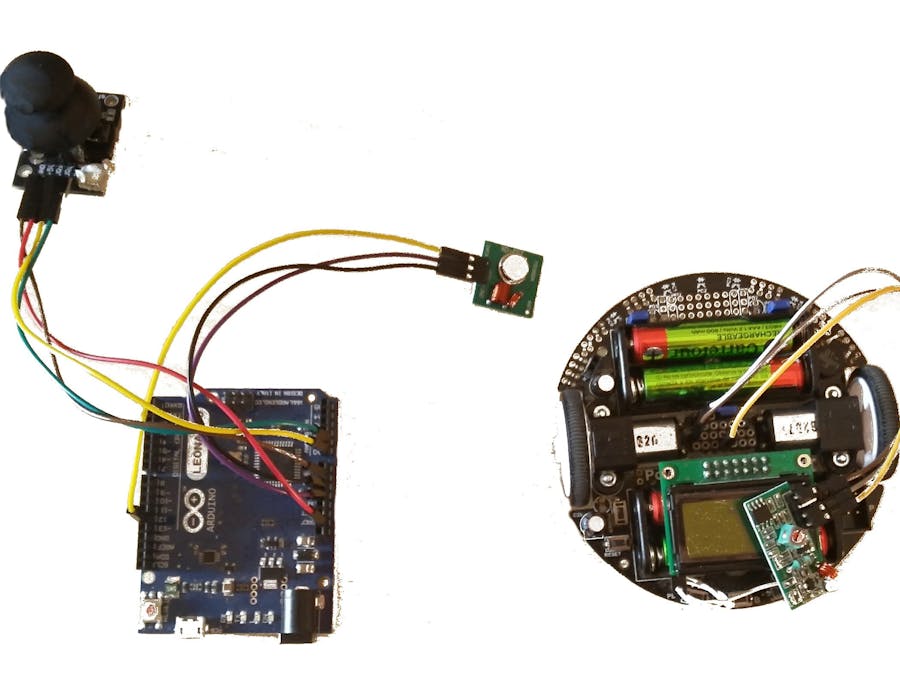
Step 1: WiringOnce you unboxed the components you can wire the modules to the Arduino (any compatibles devices will be fine) and the Pololu Robot.
Arduino Wiring
You can wire the Vcc pin to the Arduino 3.3 or 5 Volts pin. The module can be powered from 3V to 12V. If you want to make the module powerful you only have to increase the voltage by powering the module from an external power source, just make sure the Ground is connected to Arduino.
Then you'll need to connect the Jostick. The 5V Arduino port is used by the radio module so you can use the IOREF Arduino Pin, the output is 5 Volts; commonly this port is used by the external Arduino shields, with this port, they check your Arduino Reference Voltage, so you can safely use this Pin.
The other 2 axes are connected to the A0 and A1 pins, I don't know at which axe they correspond because every Joystick has a different connection, so before using this code check your axe. If you don't want to change the code connect the "forward" or "X axe" to A0. Some joystick also have a button, I haven't connected this button but if you want to add another control like lights or similar you can use this.
Pololu Wiring
The receiver has 2 data pins, they are connected together so you can choose the most convenient to you.
The receiver has 4 connection pins but you'll need only 3 wires. Connect the VCC pin to the Pololu 5V Pin, this module can't be powered by more than 5 Volts.
I suggest to use the free Pololu port named PD0 (also PD1 will be OK). In the code the PD0 port number is 0 (PD1 is 1). You can also use any free port, the port numbering can be found at the Pololu 3Pi site: https://www.pololu.com/docs/0J21/all#9.
If you choose to use other ports you can find the number of the port in the first table, in the column called "Arduino Pin".
Step 2: PoweringThe Arduino can be powered by the computer USB port. ATTENTION: the max. attainable power from a PC USB port is 500mA at 5 Volts. If your circuit uses more than this threshold you may damage your computer, so be sure your circuit uses less than 0.5A or simply check the current consumption with a tester. If you want to stay safe you can connect a 9 Volt battery to the Input jack (positive pole inside and negative outside) alongside the USB cable. The Arduino will detect you have connected an external power source and it will use the external power. If you connect a battery less than 5 Volts the Arduino will get the power from the USB cable so you may damage your PC USB port.
The Pololu 3Pi can be powered from AAA batteries. I suggest to use rechargeable batteries because if you use Pololu motors you will discharge them quickly. They are very comfortable to charge because there's a specific recharge port on the 3Pi that will simplify this work (for more info contact me). There are 2 slots for 2 batteries each; to fill the second slot you'll need to take away the LCD and after you placed the batteries reconnect it. If you think you won't use the 3Pi for a long time, remove the batteries from the robot because they can leak acid and damage permanently your Pololu.
Step 3: Uploading the codeBefore uploading anything you need to download and install the VirtualWire library: https://www.pjrc.com/teensy/td_libs_VirtualWire.html. If you have any problem with the library ask me and I'll send you my version.
You can find the Arduino and Pololu codes under the section "Attachments".
For Arduino the proceeding to upload the code is very easy: you only need to connect the board and select its model, the programmer (commonly AVR ISP) and then select the COM port and finally upload the code. I tested it on many boards: Arduino Uno, Nano, Leonardo and Pololu so if you have any problem contact me.
For Pololu 3Pi it's a little bit more difficult because there isn't a programmer on-board so you'll need to use one. To install the drivers for the programmer and the libraries follow this guide: https://www.pololu.com/docs/0J17/3. First of all connect the Pololu AVR Programmer to your computer and the ISP cable to Pololu, then power it. Next you can continue choosing your Pololu board in the Tools --> Board section. My board name is: "Pololu Orangutan or 3Pi robot w/ ATmega328P" but you have to choose your own if you have another board. You'll need to change the COM Port, you will see 2 other COM PORTs, if you have connected the other Arduino board disconnect it and reconnect it after uploading the Pololu, then select the COM port with the highest value (example: you see COM6 and COM7, select COM7). Then, from the "Programmer" tab select: "Pololu USB AVR Programmer". Then you can upload your Pololu and reconnect the Arduino TX.
Step 4: Using the programPower on first the Arduino and then the Pololu (it won't make difference but maybe the radio module receiver can receive strange values and moving the Pololu crazy) by pressing the "POWER" button placed next the "RESET" button and behind the left wheel. If you move the Joystick the Pololu will move in this direction very fast. I calibrated the Arduino with Joystick so you maybe need to change some values. If you have any problem or question on this contact me.
How it worksThe Arduino, through the A0 and A1 analog inputs will read an analog value from the Joystick's potentiometer. It will convert in a value from 0 to 9 and then store the 2 variables (forward and steering) in a buffer and send them.
The Pololu, using the radio receiver will receive this values and save them as ints, it will process them and will use them as inputs for the motors.
For any suggestion, question or whatever else, contact me!


_3u05Tpwasz.png?auto=compress%2Cformat&w=40&h=40&fit=fillmax&bg=fff&dpr=2)
Comments