Hardware components | ||||||
 |
| × | 1 | |||
 |
| × | 1 | |||
 |
| × | 1 | |||
 |
| × | 1 | |||
Software apps and online services | ||||||
 |
| |||||
( for simpler communicate please check this tutorial )
Because you've opened this tutorial, I guess you want to know how to control your Arduino via the browser. In the video below, I’ve shown little demo what I’ve made. Later in this tutorial, I will write more about what's going on in the video, and why it's working.
Why this tutorial is different than other blinking LEDs:
- Playing with bluetooth - you need to be near your Arduino.
- Using other platforms - you are chain to their solution - here you can do whatever you want - by editing your webpage.
- Storing www at ESP itself - you cannot control it over Internet unless you have public IP, making tunnels and configure your router. And you neeed to worry about ESP space.
- Host your webpage somewhere else - you have made your own two-way message system - here it's ready you call only API functions.
- It's 100% free.
- Why there is no Android/iPhone app - because there's a webpage which can be open at any device.
I want to introduce you to remoteme.org system which offers multiple options to control your Arduino (and not only) through the Internet, and also allows hosting your own webpage that will send messages to your devices. For example, you can build a Rasbperry Pi robot with FPV. But we will start with something simpler – blinking an LED over the Internet.
What Remoteme.org OffersThe main goal of the system is to connect all your devices (RPi, Arduino, webpages) into one service bus, to explain to you as simple as possible I have some trivial real-life example – postman. 😉
The postman can deliver two kinds of letters:
- Asynchronous one – this is a kind of message which we send and don’t wait for the response. The example of this kind of message could be “turn on the light," “turn right” – these messages we call at the system UserMessage.
- Synchronous messages – it’s like calling functions which return state. You send a message and wait for the response. This kind of message you can use, for example, to get the temperature from some sensor or ask if the diode is lighting these kind of messages at remoteme.org we call UserSyncMessage.
There are libraries that help you to communicate with the postman. Below is a JavaScript example:
remoteme.sendUserMessageByFasterChannel (123,[1,1,2,3,5,8]);
at above code, we send the array of bytes (1, 1, 2, 3, 5, 8) to the device with id 123
remoteme.sendUserSyncMessageWebSocket(123,[6],function(data){
	printTemperature(data[0]);
});
and here we will send number 6 in the array, and as return we expect to get the temperature from some sensorAnd how to process messages and reponse to synchronous one. This time Arduino example of code"
void setup() {
  ...
  remoteMe.setUserMessageListener(onUserMessage);
  remoteMe.setUserSyncMessageListener(onUserSyncMessage);

...

}


void onUserSyncMessage(uint16_t senderDeviceId, uint16_t dataSize, uint8_t* data, uint16_t &returnDataSize, uint8_t *&returnData) {
    if (data[0]==6){
    returnDataSize=1;
    returnData=(uint8_t*)malloc(dataSize);
    returnData[0]=readTemperature();

  }
}

void onUserMessage(uint16_t senderDeviceId, uint16_t dataSize, uint8_t *data) {
   doSomething();

}
At the setup function, we set what functions will be called when messages comes into Arduino. In the following part, I will show excatly how to use it.
- Imagine remoteme.org system as a postman. Our postman knows all of your devices and recognizes them by deviceId. DeviceId is also the device address.
- If device A wants to send a message to deviceB it put an array of bytes into an envelope and at the envelope, itself writes deviceId, so the postman knows where this message delivers
Also at the remoteme.org, tou can write your own webpages to communicate with your devices, and host it for free at remoteme.org cloud. The pages you can open at any browser, of course after login.
Additional remoteme.org gives you the possibility to save data in the database – I will show how to do that in another tutorial
You can also run some scripts at the remoteme.org server itself – for example, through this scripts You can connect some weather system took forecast for next days, and send some simple data as temperature or rainfall directly to Arduino which displays at some LCD screen
To send messages to devices You can also use rest Api – this kind of operations I will show at next tutorials. At current one, we will focus on blinking led through the internet using some ESP
At the beginning you need at remoteme.org our own account (it’s free), then you have to generate your own token, and by this token, communicate with the system. So you make sure nobody without your permission will send data to your devices or open your sites. Each token has the name, the name helps you to recognize your token (later you can remove tokens and then all URLs generated with this token will be invalid).
What Remoteme.org Is Doing Under the HoodOur devices are making with remoteme.org websocket/socket/webRTC connections, through these connections remoteme.org is sending and receiving messages from Your devices, webPages. Of course, to made connections, You need the token which will connect your devices only to Your account.
All these connections You are doing using libraries:
source code Arduino library Javascript library
also Check QuickStart here and here
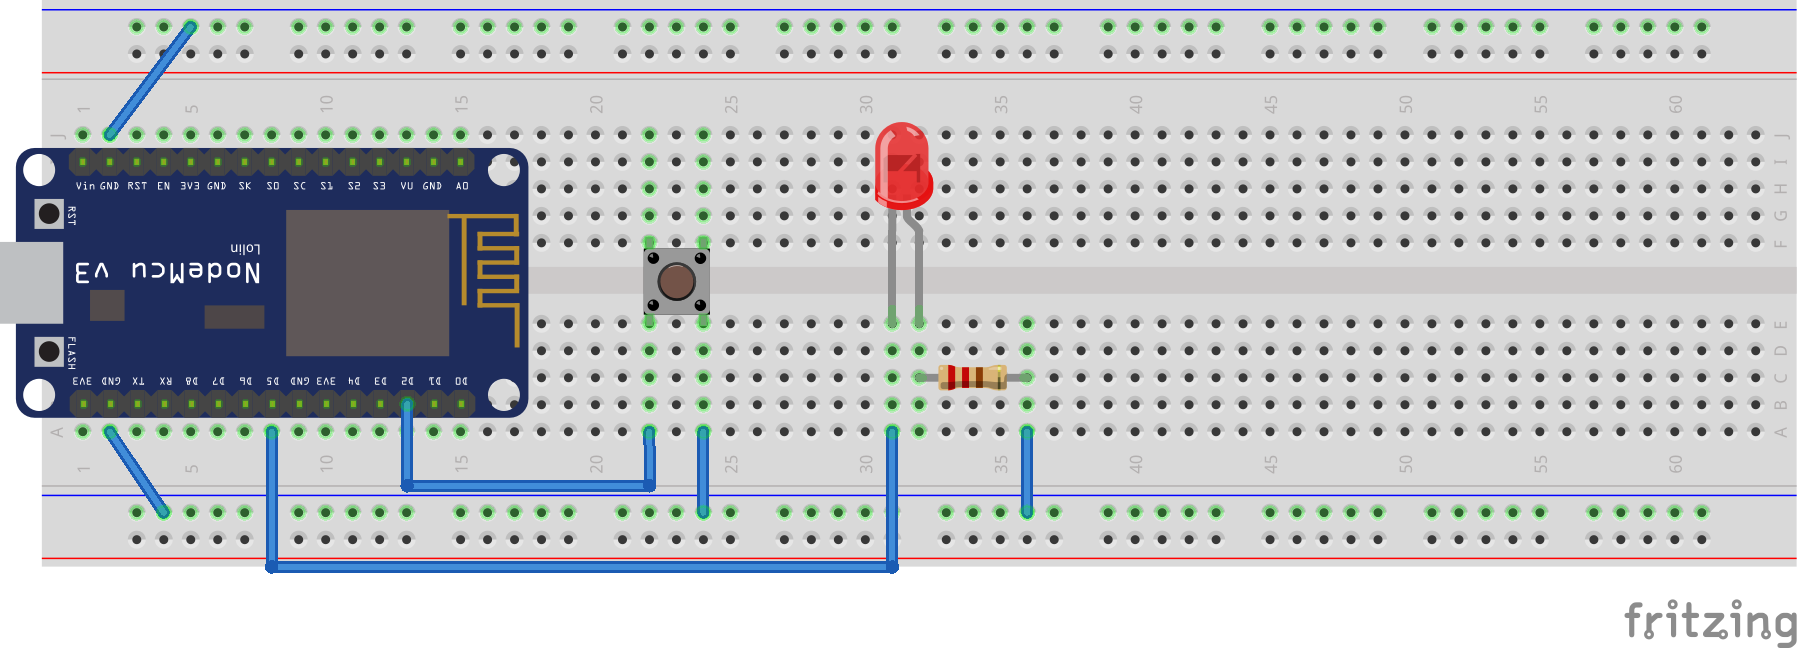
Finally, we will control our led through the internet by some html websiteWhat's Needed- Arduino with ESP8266
- LED diode
- Resistor
- Button
- Knowledge how to program your Arduino tutorial
connections
Each time we pressed the button
- diode change state
- arduino sends to the Arduino actual led state
- webpage receive the message and redraw diode image
When we pressed diode on the webpage
- the webpage is sending the message to the Arduino
- arduino change diode state
- arduino sends the message with actual diode state
- When the page is refreshed its asking Arduino for actual diode state and displays the state at the browser
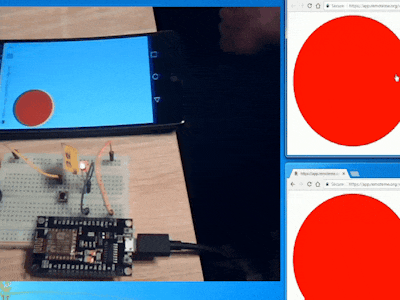
At the movie You can see exactly how it’s going to work, webpage itself is opened at three browsers and all of them shows You actual diode state all the time and allows You to turn on/off the diode
Set Up Remoteme.org and Arduinobefore You start read quickstart about html and arduino
additional libraries (also all libraries described here)
RBD_Timer by Alex Taujenis
RBD_Button by Alex Taujenis
The program below does nothing more than change diode state each time button is pressed
#include <RBD_Timer.h>
#include <RBD_Button.h>


uint8_t LEDpin = D5;
RBD::Button button(D2);


boolean currentState = false;

void setup() {
  Serial.begin(9600);


  pinMode(LEDpin, OUTPUT);
  digitalWrite(LEDpin, LOW);

}


void changeDiodeState(   ) {
  currentState= !currentState;
  digitalWrite(LEDpin, currentState?HIGH:LOW);

}


void loop() {
  if (button.onPressed()) {
    changeDiodeState();
  }

}
donaload it from here
Before You program your devices, there is few lines You have to fill:
#define WIFI_NAME ""
#define WIFI_PASSWORD ""
#define DEVICE_ID 203
#define DEVICE_NAME "diodeWithButtonArduino"
#define TOKEN "~267_ZxoWtJ)0ph&2c"
- WIFI_NAME – Wifi name
- WIFI_PASSWORD – wifi password
- DEVICE_ID deviceId is also a device address at the remoteMe system in our case it’s 203
- DEVICE_NAME name of the device which will be registered at system
- TOKEN – token from token tab in remoteme.org
After filling this fields You can upload the program to Arduino and run it.
When we go to the device tab we will see that our device is already added and green icon means the device is connected right now
RemoteMe& remoteMe = RemoteMe::getInstance(TOKEN, DEVICE_ID);
We need to create object remoteMe we will use it to communicate with our webpage.
The TOKEN constant is the token from Tokens tab, DEVICE_ID is deviceId of our Arduino in our case it’s 203, using this address we will send messages from the webpage into Arduino
there is also
#define WEBPAGE_DEVICE_ID 1001
1001 is the deviceId of our future webpage
setup() function
WiFiMulti.addAP(WIFI_NAME, WIFI_PASSWORD);
	while (WiFiMulti.run() != WL_CONNECTED) {
		delay(100);
	}
we connect to Wifi and waits for the connection to establish.
remoteMe.setUserMessageListener(onUserMessage);
remoteMe.setUserSyncMessageListener(onUserSyncMessage);
we set which function will be called when the message comes to Arduino
remoteMe.setupTwoWayCommunication();
it means we need two-way communication
remoteMe.sendRegisterDeviceMessage(DEVICE_NAME);
and registers our device at app.remoteme.org. After calling this function device will be visible on device Tab, with given name
How it works. Web page will send the message to the device, and this function at Arduino will be run:
void onUserMessage(uint16_t senderDeviceId, uint16_t dataSize, uint8_t *data) {
	changeDiodeState();
}
As You can see we don’t read what was sent at the message. The function changeDiodeState is called always after receiving any message.
void changeDiodeState(   ) {
	currentState= !currentState;
	digitalWrite(LEDpin, currentState?HIGH:LOW);

	uint16_t returnDataSize = 1;
	uint8_t *data = (uint8_t*)malloc(returnDataSize);

	uint16_t pos = 0;
	RemoteMeMessagesUtils::putUint8(data, pos, currentState?1:0);
	remoteMe.sendUserMessage(WEBPAGE_DEVICE_ID, data, returnDataSize);
}
The function above is also called when the button at Arduino is pressed. This function besides changing the diode state is sending new state to the webpage:
uint16_t returnDataSize = 1;
uint8_t *data = (uint8_t*)malloc(returnDataSize);
at the only byte at the message, we put there 1 or 0 based on current diode state.
uint16_t pos = 0;
RemoteMeMessagesUtils::putUint8(data, pos, currentState?1:0);
function putUint8 has parameters:
- the array where we will save our data, which will be sent
- position to where the data (in this case uint8_t ) will be put at the array. Pos parameter is given as reference so after write number, it’s increasing by number memory size. In this case, its increased by 1 but we have several similar functions like put float, double, string
- and the last parameter 0 if the diode is not lighting and 1 if its on
a shorter version of saving parameter to the array will look like
uint16_t returnDataSize = 1;
uint8_t *data = (uint8_t*)malloc(returnDataSize);
data [0]= currentState?1:0
more about RemoteMeMessages utils You can read here: RemoteMeMessagesUtils
and at the end, we send the message to the webpage.
remoteMe.sendUserMessage(WEBPAGE_DEVICE_ID, data, returnDataSize);
Below is a function which is run when the webpage is asking for current diode state
void onUserSyncMessage(uint16_t senderDeviceId, uint16_t dataSize, uint8_t* data, uint16_t &returnDataSize, uint8_t *&returnData) {
	returnDataSize = 1;
	returnData = (uint8_t*)malloc(returnDataSize);
	Serial.println("received sync message");
	uint16_t pos = 0;
	RemoteMeMessagesUtils::putUint8(returnData, pos, currentState ? 1 : 0);

}
The data we want to return we are putting to returnData, and at the returnDataSize we put the size of data we want to send back.
similar like at function to send state here we put the only one byte which represents diode state
and the last function is loop()
void loop() {
	remoteMe.loop();

	if (button.onPressed()) {
		changeDiodeState();
	}

}
remoteMe.loop(); <– it’s checking if there are any messages waiting to process, checking device state, and do some more things – everything that this function is doing You can check at libraries source code.
If You haven’t program your Arduino yet You can do that now
Sending MessagesNow we are ready to save messages to the Arduino. Our Arduino at the devices tab should be visible and has green link icon it means the device is connected right now. Because we don’t have our webpage yet, we will use build in functionality to send messages to our device.
at the device belt click single message icon then
- 3 we need to fill sender device- we have just one device so we choose this one
- 4 messages, as You remember from Arduino onUserMessage implementation we ignore all data sent to Arduino so it doesn’t matter what we will put here
And click “Send” button
The diode at Arduino will be changed each time we send the message 🙂
We can also test syncUserMessage, so let’s ask our Arduino about diode state. To do that click on device belt icon with two conversations and then fill window:
After click “Send” at the place [6] we will get the response from arduino. 1 if led is ON and 0 if it’s not.
Between pressing send button by clicking on Arduino button You can change diode state and check if Arduino is returning proper number.
WebpageAt arduino ino we have, thats why our webpage deivceiId should be 1001
#define WEBPAGE_DEVICE_ID 1001
Finally, we will create our page to control Arduino. at Arduino we set that diode state will be sent to the device with id 1001 so webpage has to have this deviceId
Create new WebPage “New Device” -> “New WebPage” and fill as below
Now lets add files into our webPage open this
then drag three files (index.html, script.js, styles.css )to your webPage into “Drop Your files here”
code analyze
var remoteme;

function setup(){
	remoteme = new RemoteMe({
		automaticlyConnectWS: true,
		automaticlyConnectWebRTC:false,
		webSocketConnectionChange: webSocketConnectionChange,
		webRTCConnectionChange: undefined,
		onUserMessage: onUserMessage,
		mediaConstraints: {'mandatory': {'OfferToReceiveAudio': false, 'OfferToReceiveVideo': false}}
	});
}
we created variable remoteMe and we init it, more about parameters You find here and here
most important parameters
automaticlyConnectWS: true,
creating WebSocket connection automatically
onUserMessage: onUserMessage,
point what function will be called when the Arduino sends something to our webpage
and
webSocketConnectionChange: webSocketConnectionChange,
point function after the state of connection changed
function webSocketConnectionChange(state){
	if (state==WebsocketConnectingStatusEnum.CONNECTED){
		remoteme.sendUserSyncMessageWebSocket(arduinoId,[],function(data){
			var data = new RemoteMeData(data);
			changeDiode(data.popUint8());
		});
	}
}
after WebSocket connection is established we asked Arduino for current diode state
remoteme.sendUserSyncMessageWebSocket
the first parameter is Arduino deviceId, then empty array – because doesn’t matter what will be inside messages, at the end functions which will be called after getting response from Arduino
function(data){
      var data = new RemoteMeData(data);
      changeDiode(data.popUint8());
   }
we took the first byte of return data then based on that turn on/off the diode
function changeDiode(state){
	$("#led").css("background-color",state==0?"white":"red");
}
also when we pressed the button at Arduino it will send the message which at javascript site we will receive by this function
function onUserMessage(sender,data){
	var data = new RemoteMeData(data);
	changeDiode(data.popUint8())
}
similar to a previous function we read first byte and change diode state.
let’s open our webpage
and we will see:
after click on this circle state of the diode will be changed.
You can also refresh the webpage and see if it shows proper diode state.
Now we can open our webpage using phone mobile. Instead of login into remoteme.org system, we will prepare special link which will display our webpage without login, based on tokens:
click at index.html then “get anonymous link…”, then QR icon and scan QR code.
at your mobile, You will see the same webpage, and You can play with it
SummaryI hope that I have brought you closer to the idea of Arduino control via the internet, and explained the remoteme.org system. The system is still developing, so if You have any ideas, questions, or just want to help just follow FB remoteme.org fan page and contact me
Cheers,
Maciek
Comments