Mehal Sharma -19Maya Kesapradist -20
Published © GPL3+

Electronic Components Review Made With Electronic Components

Builders learn about common electronic components used in a circuit and how to use a Liquid Crystal Display (LCD).

IntermediateFull instructions provided2 hours1,233
Electronic Components Review Made With Electronic Components

Things used in this project

Story

Read more

Schematics

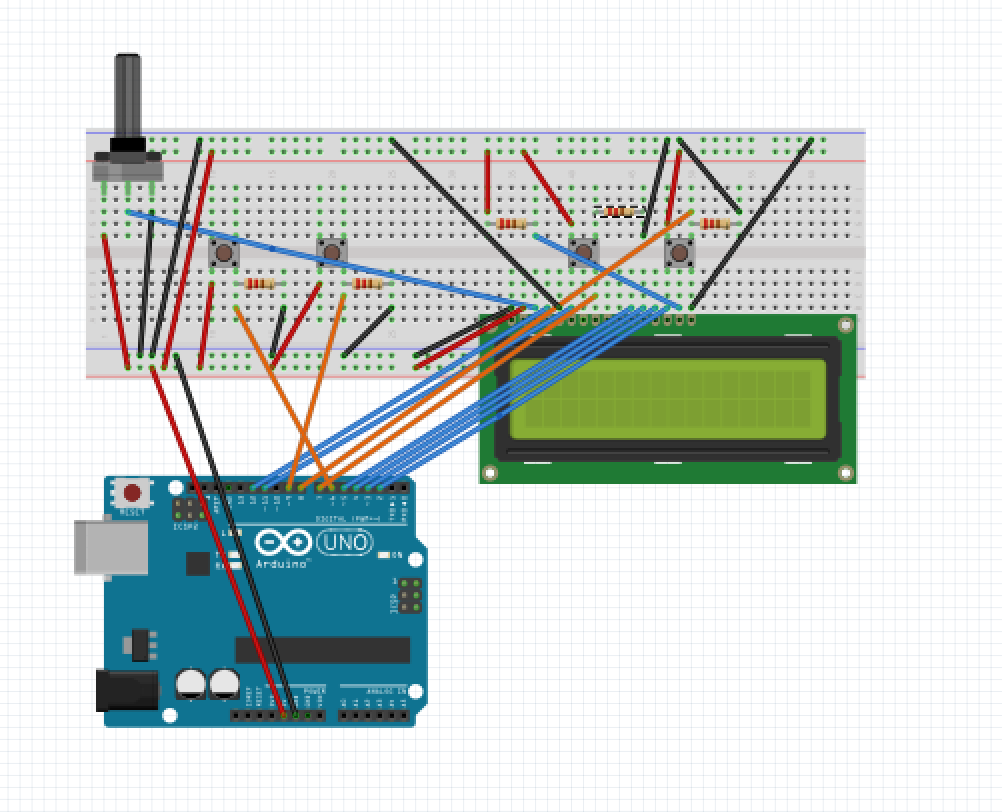
Wiring (Fritzing Diagram)

The wires on the breadboard are color-coded to match the connections made. Red wires represent the positive current going through the circuit and black shows the negative current. The blue wires show connections from different areas on the breadboard that connect with the Liquid Crystal Display. Orange wires demonstrate how the Arduino board is connected to different buttons.

Code

Code

Arduino
In-text comments added for easier understanding
 //download the LCD library in your code
 #include <LiquidCrystal.h>
 LiquidCrystal lcd(12, 11, 5, 4, 3, 2);

// name your variables
const int button1 = 6;
const int button2 = 7;
const int button3 = 8;
const int button4 = 9;
int switchState = 0;
int prevSwitchState = 0;
int reply;
 
 void setup() {
  // put your setup code here, to run once:
  lcd.begin(16, 2);
  
  // identify your buttons
  pinMode(button1, INPUT);
  pinMode(button2, INPUT);
  pinMode(button3, INPUT);
  pinMode(button4, INPUT);
  
  // determine what you want the start screen to say
  lcd.print ("Electronic");
  lcd.setCursor(0,1);
  lcd.print("Components!");
    
}

void loop() {
  // put your main code here, to run repeatedly:
  switchState = digitalRead(button1);
    // this is the button placed at 19e on the small breadboard
  if (switchState != prevSwitchState) {
    // if button1 is pressed...
    if (switchState == LOW) {
      lcd.clear();
        // get rid of the start screen
      lcd.setCursor(0,0);{
        // set your cursor at the first space on the first line 
      lcd.print("Resistor");
          // the display will write "Resistor" 
      lcd.setCursor(0,1);
          // reset your cursor position to the first space on the second line
      lcd.print("Control current");
          // the display will write "Control current"
      }
    }
    prevSwitchState = switchState;
      // assign switchState's value to the variable prevSwitchState. 
      // This enables you to track changes in the switch the next time the loop runs
  }
  
  switchState = digitalRead(button2);
    // this is the button placed at 10e on the small breadboard
  if (switchState != prevSwitchState) {
    // if button2 is pressed...
    if (switchState == LOW) {
      lcd.clear();
        // get rid of the start screen
      lcd.setCursor(0,0);{
        // set your cursor at the first space on the first line 
        lcd.print("Transistor");
          // the display will write "Transistor" 
        lcd.setCursor(0,1);
          // reset your cursor position to the first space on the second line
        lcd.print("Switch signal");
          // the display will write "Switch signal"
      }
    }
  prevSwitchState = switchState;
  // assign switchState's value to the variable prevSwitchState. 
  // This enables you to track changes in the switch the next time the loop runs 
  }
  
  switchState = digitalRead(button3);
    // this is the button placed at 40E on the big breadboard
  if (switchState != prevSwitchState) {
    // if button3 is pressed...
    if (switchState == LOW) {
      lcd.clear();
      // get rid of the start screen
      lcd.setCursor(0,0);{
        // set your cursor at the first space on the first line 
        lcd.print("Capacitor");
          // the display will write "Capacitor" 
        lcd.setCursor(0,1);
          // reset your cursor position to the first space on the second line
        lcd.print("Stores current");
          // the display will write "Stores current"
      }
    }
  prevSwitchState = switchState;
    // assign switchState's value to the variable prevSwitchState. 
    // This enables you to track changes in the switch the next time the loop runs
  }
  
  switchState = digitalRead(button4);
  // this is the button placed at 49E on the big breadboard
  if (switchState != prevSwitchState) {
    // if button4 is pressed...
    if (switchState == LOW) {
      lcd.clear();
        // get rid of the start screen
      lcd.setCursor(0,0);{
        // set your cursor at the first space on the first line 
        lcd.print("Battery");
          // the display will write "Battery" 
        lcd.setCursor(0,1);
          // reset your cursor position to the first space on the second line
        lcd.print("Provides current");
          // the display will write "Provides current"
      }
    }
  prevSwitchState = switchState;
    // assign switchState's value to the variable prevSwitchState. 
    // This enables you to track changes in the switch the next time the loop runs
  }
}

Credits

Mehal Sharma -19

Mehal Sharma -19

1 project • 1 follower
Maya Kesapradist -20

Maya Kesapradist -20

1 project • 0 followers

Comments