

Hardware components | ||||||
| × | 1 | ||||
Software apps and online services | ||||||
 |
| |||||
| ||||||
Regardless if you are entrepreneur, government official or just don’t like when neighbors are sticking their noses in your business, it's always good to have a tool that lets you sending private messages and be sure that only your recipient will read them.
Here I will show you how to setup encrypted peer-to-peer chat and make your communication private and secure with use of Husarnet, Avahi and Pidgin.
To setup encrypted connection between computers we will use Husarnet - a secure P2P VPN network that allows you to connect your devices without any central server forwarding traffic that might have access to your data.
Avahi is a service discovery protocol for local networks. It allow to detect and setup connection with print servers, media devices or communicators connected to the same network.
Pigdin is a web communicator supporting various protocols, in this instructable we will use Bonjour - messaging system based on Avahi service.
Network setupLog in to Husarnet Dashboard or create an account if you don't have it yet. Creating an account and connecting up to 5 devices is free, you do not need to worry for any charges. You should see Husarnet Dashboard with no networks nor elements.
Push button "Create network" and in dialog window type desired network name into field Network name. In this case name is my_chat but you can give it any name you want.
After pushing button "Create", you will be redirected to network view.
You can use button "Add element" to add to your network cloud elements, mobile app or any linux device, but now we will use terminal method.
Installing Husarnet client and adding device to networkHusarnet client comes as precompiled package for Linux. There is a script for setting up and installing required packages. Open terminal and execute command:
curl https://install.husarnet.com/install.sh | sudo bash
After installation it is required to enable Husarnet interface with support for Avahi services:
sudo systemctl enable husarnet-l2 && sudo systemctl restart husarnet-l2
To connect device to network execute command:
sudo husarnet websetup
You will get response similar to:
Go to https://app.husarnet.com/husarnet/fc94cd22622bf708b9bb22d5589275fa8832943ffdb0175bff7e16ce to manage your network from web browser.
Open the provided link in web browser, you will see device configuration dialog. Type desired name of the device into field Name for this device, you will use this name to distinguish your devices in dashboard. From Add to network dropdown menu choose name of network that you created in previous step.
Repeat the installation and adding procedure on other devices that you want to connect.
Your first Husarnet network is configured and ready, all devices have encrypted peer-to-peer connection established.
You may notice, there is a warning like ROS master (roscore) is not running on laptop. This warning is for Robot Operating System developers only, and you don’t need to worry about it.
Avahi setupTo enable messaging with use of Pidgin communicator and Bonjour protocol plugin, we need to setup avahi service discovery.
Install avahi and pidgin with command:
sudo apt install avahi-daemon avahi-utils pidgin
Edit avahi configuration:
sudo nano /etc/avahi/avahi-daemon.conf
Find line:
#allow-interfaces=eth0
and change it to:
allow-interfaces=hnetl2
Above step is crucial for communication security. By default Avahi is announcing and searching for services on all network interfaces. This behavior is potential vulnerability, thus it is required to disable it. Parameter allow-interfaces let us define which network interfaces will be enabled to broadcast services, we specify only one interface, hnetl2 which is Husarnet interface providing encrypted connections to other devices in Husarnet. This way we are making sure that all Avahi and as a result chat communication will be carried out on encrypted transmission layer.
Restart avahi:
sudo systemctl restart avahi-daemon.service
You can check if avahi is active:
avahi-browse -avt
You should get output similar to:
Server version: avahi 0.6.32-rc; Host name: laptop.localE Ifce Prot Name Type Domain: Cache exhausted: All for now
There should be no services in the list, as we did not start any. If you can see here any services, this means that they are detected on local network and your configuration is compromised.
Chat client setupYou can start chat client from command line with:
pidgin
Or you can search in system menu for pidgin icon.
You will be welcomed with account configuration window, select Add... button and proceed to new window.
In Add account window you can set up your personal data.
From Protocol drop down menu choose: Bonjour and in Username field type your desired username.
You can proceed to Advanced tab. Do not modify Local port value, you can fill other fields if you wish.
When you are done with account settings push Add button to finish. Your account is now visible in Accounts window, you can close it.
Open new terminal window and scan for avahi services with command:
avahi-browse -avt
You should get output similar to:
Server version: avahi 0.6.32-rc; Host name: laptop.localE Ifce Prot Name Type Domain+ hnetl2 IPv6 JohnnyExample@laptop iChat Presence local: Cache exhausted: All for now
Your account is ready to go. When other chat users configure their accounts, you will see them in Buddy list window.
You can also use avahi-browse to detect users available in the network:
Server version: avahi 0.6.32-rc; Host name: laptop.localE Ifce Prot Name Type Domain+ hnetl2 IPv6 AndyS@esktop iChat Presence local+ hnetl2 IPv6 JohnnyExample@laptop iChat Presence local: Cache exhausted: All for now
Second column in above output is interface, here you should see only hnetl2 as this is the interface providing the encrypted connection. In case you can see here services on other interfaces, consider your privacy as compromised.
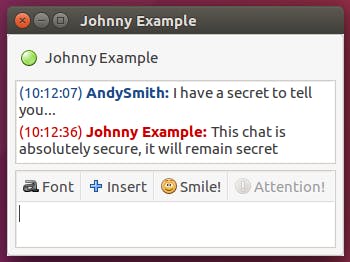
Start conversationTo start conversation, double click user name, you will see conversation window.


Comments