


Hardware components | ||||||
 |
| × | 1 | |||
 |
| × | 1 | |||
 |
| × | 1 | |||
Software apps and online services | ||||||
 |
| |||||
I feel certain mystery and enchantment in creating complex patterns from basic and repetitive elements, and I think this feeling has been shared by many, through all of human history, from mosaic and embroidery arts to modern vintage video games.
I believe that once you understand these block systems in many disciplines, it starts unveiling a way of understanding and having fun in learning, and at the same time practicing a useful patternist approach for solving problems.
Here you will find how to create a device and use it in a very accessible way to start creating pixel art with colorful LEDs. In the process you may find many possibilities for pixel drawing and maybe other potential uses for the device.
First we're going to make a device based on Seeed Studio® XIAO boards and neopixel technologies, and later we're going to use MicroBlocks®, a Scratch-like block-coding software, for individual control of the color of each neopixel.
Happy prototyping!
Part I: Making the deviceThis is a one-time-only process, and depending on the XIAO MCU, the instructions may be different. In this list you will find the MCUs that are supported; click on the one you have to see the detailed instructions:
Notice that for now, these versions are not supported:
- XIAO ESP32C6
- XIAO RA4M1
- XIAO MG24 (Sense)
So, be careful when choosing your board. Apart from this software support, there are differences between each board, that can drive you to explore other possibilities of use, like the built-in sensors, communication capabilities, memory size, etc.
You can click on the link of each version to see their specific installation instructions. And in the same article you can dig deeper to know more details and specifications of each board.
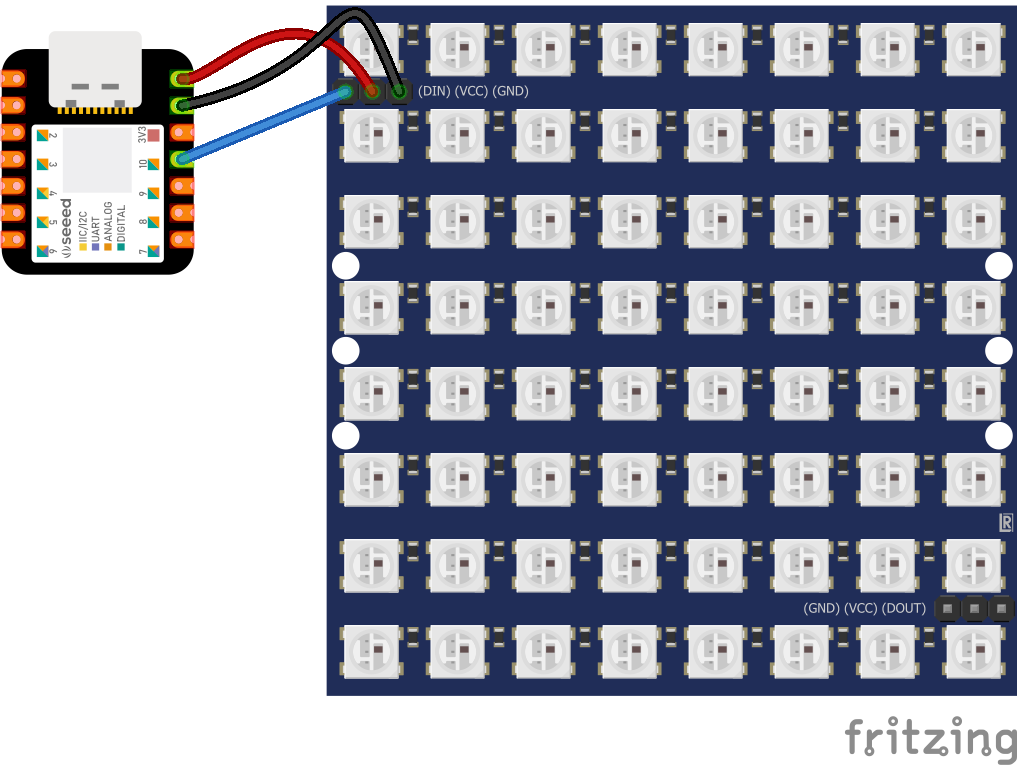
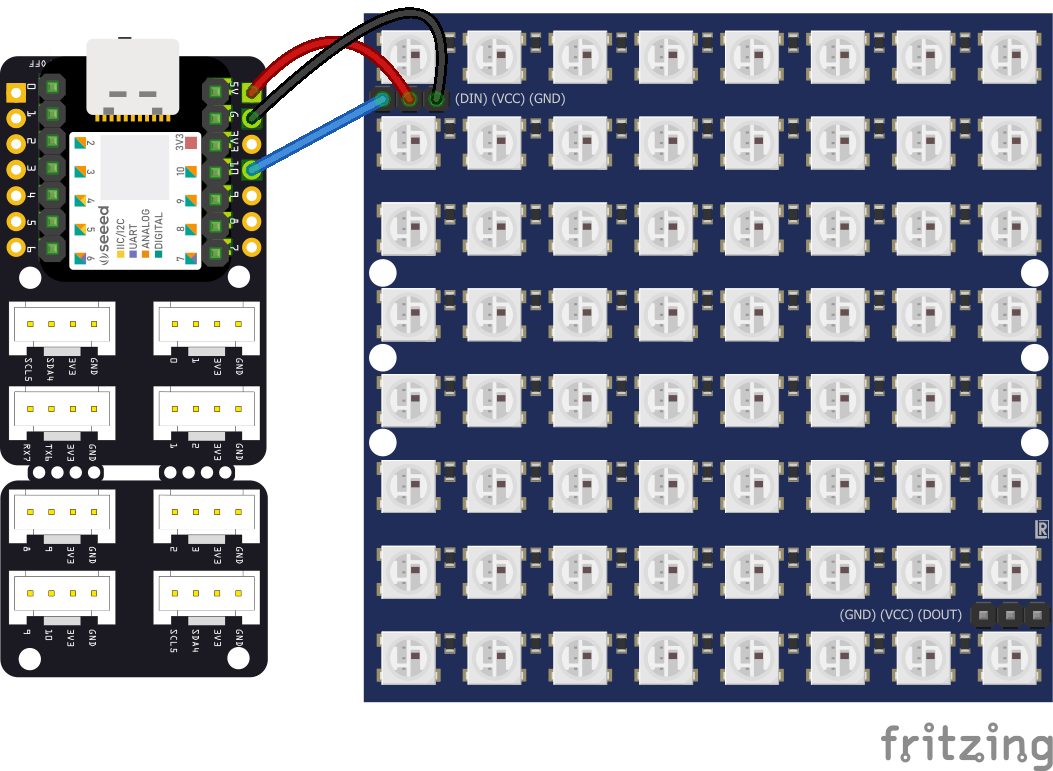
2. Make the hardwareFor a stable energy feed for the LEDs, we recommend soldering the matrix to the board/shield or using a stable connector of your preference.
Using the Grove shield opens widely the possibilities of adding multiple sensors, actuators, or other components via the Grove ecosystem, apart from having other available soldering pinholes and the built-in battery management.
The circuit diagrams are the following (without and with shield):
In any case, we recommend double-checking the isolation and continuity of the unions, avoiding mistakes and dead shorts.
3. Optional: Make a caseWe like this system so much that we decided to design a case for him. Currently this case and the educational services around the kit are part of our economical working model, so if you are interested in getting the case and supporting our work, you can always contact us and reach out for collaborations.
On the internet we've found some similar cases that maybe you can get or be inspired by to create your own. With the LEDs there are always opportunities for light effects with a diversity of materials; for example, a square grid and a sheet of paper can make your lights look great.
Part II Create with MicroBlocks ®1. Install MicroBlocks ®On the software side, you can use the MicroBlocks browser version with no setup needed, and even though it can run on any browser, you will need Edge or Chrome on a desktop, laptop, or Chromebook (no mobile devices).
Also, there are complete installable applications for the most common operating systems. If you get any questions or trouble, you can always see the "Computer setup" section in the MicroBlocks Get Started tab.
Once installed, you can explore some of the features, like the size of the blocks, advanced blocks, or the dark-view mode. Anyway, in this link you can find the complete IDE user guide.
2. Connect the board- Plug the hardware into your computer with a data-transmission USB cable.
- In the MicroBlocks IDE right-upper corner, click on the connect (plug icon) button.
- Choose connect via USB, from the displayed menu.
- In the new pop-up window, choose the port (It may be the only one that appeared) and then click the connect button of this window
- If everything is right, it may take no more time than some seconds to change the label of the button into the "name of the board" and the plug icon into a green-colored background. Now it's all set up for block coding!
You can always see the original instructions for detailed and updated information.
3. Pixel paintingOnce you have plugged in and connected your device to your MicroBlocks computer, I recommend making a quick test:
- Click on the Add Library button, down of the Blocks categories
- Select the "Neopixel" Library in the pop-up window, and click in the "open" button
- Drag and drop the following blocks taken from the NeoPixel Library, type the right numbers, and execute them by clicking in the blue area of any of the blocks.
Right after the click, all the neopixels of the matrix should light and keep the green color. If it doesn't happen, verify you are clicking in the blue area of the blocks (the blocks' perimeter should get a white color for around 1 second). If it still doesn't work, verify the connection of the board and the connection of the circuit.
In this story we're not getting deep in the Neopixel library, but if you are interested in knowing more about it, you can review the description of the NeoPixel library in this link.
After this quick test, now let's try our special library for pixel drawing:
- Download the library file "pixel_drawing.ubl" from the code attachments
- Click on the Add Library button, then click on "Computer" button, find the file in the explorer window and click "open."
- Once the library is loaded, drag and drop the following block
- Type a letter for each neopixel, according to the color you want to have. Spacebar and Enter spaces are not taken into account, but they may be used as visual help. You can discover by yourself the letters of some basic colors, but here is the list anyway:
r = red, g = green, b = blue, y = yellow, m = magenta, c = cyan, w = white, p = pink, a = gray, o o= orange, n = brown, e = beige. Any other letter or symbol will be taken as an off led.
As an example, here we have a famous Latin American television character:
and his corresponding block:
The square shape of the neopixel was achieved with a MDF grid and a piece paper
We designed this library as an intuitive way for a fast and straightforward play with colors and selection of lighted neopixels, but in this process we try different approaches and get much feedback, so if you have a comment or suggestion, please let us know. Enjoy your creations and Thank you for the reading.


Comments