

Hardware components | ||||||
| × | 1 | ||||
Software apps and online services | ||||||
| ||||||
| ||||||
 |
| |||||
| ||||||
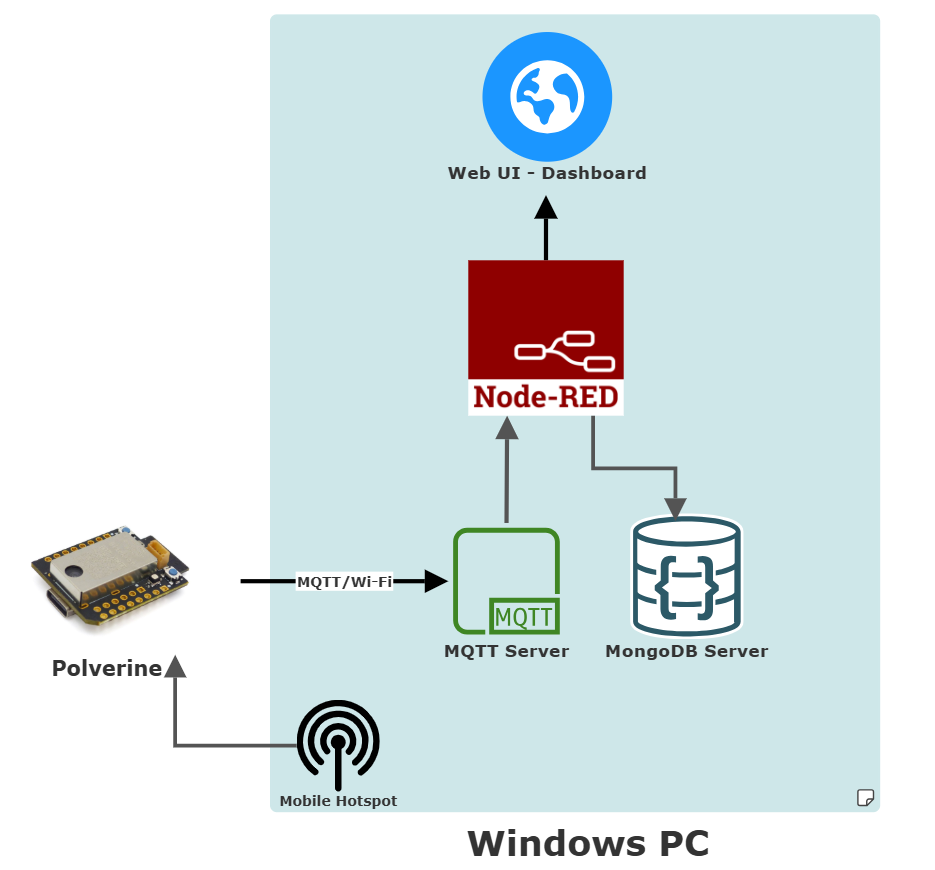
I have been following the Polverine project on CrowdSupply and got the boards recently. The project offers a lot of documentation and open source examples which helped me to get started quickly. Most instructions are straightforward to follow, but I found one specific example to be more involved due to many components it relies on. The example is hosted on github here: https://github.com/BlackIoT/Polverine/tree/main/POLVERINE_FULL_MQTT_DEMOwhich is about streaming the data of particular matter sensor (BMV080) and VOC gas air quality sensor (BME690) through the MQTT protocol via Wi-Fi to a dashboard which is a web-based UI for data visualization. The example project serves as a great reference solution for building an end-to-end wireless IoT solution for air quality monitoring. For some more seasoned developers who are familiar with all the components involved, it should be not too difficult to bring up the example and make it work end-to-end, but I found it could be more demanding for people who are less familiar with some of the components/concepts, and the fact that some components on the Windows system require extra configuration steps would make the whole journey potentially bumpy.
This tutorial aims to help people to get the example up and running more quickly w/o being blocked by some obstacles, specifically on Windows.
1.1 - Install the Mosquitto software
Download and install the Eclipse Mosquitto from here
1.2 - Add the mosquitto into the Path Environment Variable
Add the installation path of mosquitto.exe to the environmental variable Path. By default, the mosquitto's installation path is: "C:\Program Files\mosquitto".
1.3 - Create a password (optional)
C:\Polverine> mosquitto_passwd -c mosquitto/passwd.db polv_apub1.4 - Create a config file
Create a config file: C:\Polverine\mosquitto\mosquitto.conf with the following content (if no password is needed):
listener 1883
allow_anonymous true
if password is needed, use the content below instead:
listener 1883
allow_anonymous false
password_file mosquitto/passwd.db
1.5 - Change the Firewall Rules
- Step 1.5.1 - Open "Windows Defender Firewall with Advanced Security"
Press the Windows button and search for "Windows Defender Firewall with Advanced Security" to locate the app and open it (administrator rights might be required).
- Step 1.5.2 - Create a New Inbound Rule
- Step 1.6 - Terminate existing "mosquitto" process
Launch the Task Manager, and locate the "mosquitto" process and select "End task" from the context menu.
- Step 1.7 - Launch the mosquitto server
Open a Command Prompt, cd to the folder: "c:\Polverine" and run the following
command:
C:\> cd Polverine
C:\Polverine> start mosquitto.exe -v -c .\mosquitto\mosquitto.conf
The following output should appear in the command window:
2.1 - Install the MongoDB software
Find the latest release for the community-edition MongoDB Windows version at: https://www.mongodb.com/try/download/community-edition/releases, and install it (with the option "Install MongoDB Compass" selected).
2.2 - Add the MongoDB's bin folder into the Path Environment Variable
By default, MongoDB's installation path is: "C:\Program Files\MongoDB\Server\8.0\bin", add this path to the environmental variable Path.
2.3 - Launch the mongdb server
Open a Command Prompt, and run command:
C:\Polverine> mkdir c:\data\db
C:\Polverine> start mongod
Check if there is a background process named: “MongoDB Database Server” in the Task Manager.
If there is no such process, something is wrong.
Troubleshooting tips:
Check if the folder “C:\data\db” exists, if not, please create one manually and rerun the above step
2.4 - Launch MongoDB Compass
- 2.4.1 Connect to the MongoDB Server
Add a new connection by clicking the "+" button on the "CONNECTIONS" panel of the UI. Name the connection as: "Polverine_database_local" while keeping the default value for other fields, click Save & Connect to continue.
If there is any problem with the connection, go to the previous step 2.3 for troubleshooting tips.
- 2.4.2 Create a Database
Click the Create database or the “+” button next to the connection Polverine_database_local:
In the pop-up Window, put in “Polverine” for Database Name, “DataEnvironment” for Collection Name and tick the “Time-Series” box, and put in “timestamp” for timeField. Click Create Database to continue.
- 2.4.2.1 Create Data Collection - DataParticulate
Then create another Time-Series data collection called DataParticulate under the database Polverine by following the steps below:
- 2.4.2.2 Create Data Collection - Weather
Then create another Time-Series data collection called Weather under the database Polverine by following the steps below:
- 2.4.2.3 Create Data Collection - Devices
Then create another regular (Time-Series not ticked) data collection called Devices under the database Polverine by following the steps below:
Eventually, the structure of the database Polverine should look like below:
3.1: Install Node.js
Download and install Node.js from https://nodejs.org/.
Verify installation inside Command Prompt window:
C:\Polverine> C:\node -v
C:\Polverine> npm -v
3.2: Configure npm Proxy (only if needed)
- 3.2.1 Check Current Proxy Settings
C:\Polverine> npm config get proxy
C:\Polverine> npm config get https-proxy- 3.2.2 Set Proxy
- For HTTP Proxy:
C:\Polverine> npm config set proxy http://myusername:mypassword@proxy-server.com:port- For HTTPS Proxy:
C:\Polverine> npm config set https-proxy http://myusername:mypassword@proxy-server.com:port3.3: Install Node-RED
Open a Command Prompt and install Node-RED globally:
C:\Polverine> npm install -g --unsafe-perm node-red3.4: Run Node-RED
Start Node-RED inside Command Prompt window:
C:\Polverine> Node-red -vWait until the message shows:
Server now running at http://127.0.0.1:1880/
Like below:
Open a browser (Microsoft Edge or Chrome) and enter http://127.0.0.1:1880 in the address bar and go.
The main Node-RED page should be presented like below:
- Step 3.4.1: Install Modules
Follow the Menu->Manage Palette or use keyboard shortcut “ALT+ SHIFT + P” to bring up the Palette Management page,
In the search box, enter:
“@prescient-devices/node-red-node-mqtt-in-json”
Click the Install button to install the module matched.
Repeat the steps for modules with the following keywords for the search box one by one:
@prescient-devices/node-red-node-mqtt-out-json
Node-red-contrib-mongodb4
node-red-dashboard
Node-red-node-openweathermap- Step 3.4.2: Download the Flow File
In the browser, go to the page: Polverine/nodered/server_with_dashboards.json at main · BlackIoT/Polverine · GitHub, and download the file by clicking the button “Download raw file”, and save the file as: C:\Polverine\flows-polverine-dashboard.json
- Step 3.4.3: Import Flow
In the Node-RED home page, follow Menu->Import or use keyboard shortcut: “Ctrl+I” to bring up the nodes import page:
Click the “select a file to import” and select the download file: “C:\Polverine\flows-Polverine-dashboard.json”
- Step 3.4.4: Deployment
On the top of the Node-RED’s main page, click the “Deploy” button.
Enter “http://localhost:1880/ui” in the browser and go, and you should see the Dashboard presented like below:
4.1: Before Turning on Mobile hotspot
In command window, run the following command:
C:\Polverine> ipconfig4.2: Configuration Mobile hotspot
In Windows, open the Settings, and go to: “Settings” > ”Network & internet” > “Mobile hotspot”, and turn on the “Mobile hotspot”.
And click the “Edit” button to bring up the network info page, put the network’s name and password of your choice which would be used for steps later (used in the FW of Polverine board), make sure the Network band is 2.4 GHz and save the settings.
4.3: After Turning on Mobile Hotspot
In Command Prompt window, run the following command again:
C:\Polverine> ipconfigNotice there is a new connection “Wireless LAN adapter Local Area Connection* 2”, relative to the output from Step 1.
Note down the IPv4 Address which is: 192.168.137.1 (in this case) which would be needed by the Polverine’s FW in steps later.
5. Setup - Polverine Devices5.1 - Code Download
Clone the repo from: GitHub - BlackIoT/Polverine or download the zip file of the source code directly here.
5.2 - Configurations in Code
5.3 - Configurations of MQTT
Open the file “mqtt_main.c” using any preferred editor (such as VS Code), and change the highlighted parts:
const char *TEMPLATE_POLVERINE_MQTT = "{\"uri\":\"mqtt://mqttserver.local\",\"user\":\"username\",\"pwd\":\"userpassword\",\"clientid\":\"%s\"}";to:
const char *TEMPLATE_POLVERINE_MQTT = "{\"uri\":\"mqtt://192.168.137.1\",\"user\":\"polv_apub\",\"pwd\":\"IAaAPLVNPD\",\"clientid\":\"%s\"}";Note that the IP address above was acquired in the last step (step 4.3) for “Mobile Hotspot” setup.
Since we don't require username/password to login to MQTT, the user and pwd settings can be arbitrary.
5.4 - Configurations of Wi-Fi
Open the file “wifi_connect.c” using any preferred editor (such as VS Code), and change the highlighted parts highlighted parts:
const char *DEFAULT_POLVERINE_WIFI = "{\"ssid\":\"XXXXXXXX\",\"pwd\":\"XXXXXXXX\"}";to:
const char *DEFAULT_POLVERINE_WIFI = "{\"ssid\":\"iot-network\",\"pwd\":\"Polverine\"}";Note that the actual values for “ssid” and “pwd” need to match the settings in the steps “Mobile Hotspot” (step 4.2).
5.5 - Firmware Upload
Compile and Upload the firmware to the Polverine device. For details, please follow instructions on PolverineFAQ page.
Note: remember to reset the board by pressing the Reset button on the board after the upload is done.
6. ResultsAfter a few seconds, it could be noticed that the Polverine board is connected to the Mobile hotspot like below:
And the Dashboard (Node-RED Dashboard) should now be able to stream data from the Polverine board lively like below:


Comments