



Hardware components | ||||||
 |
| × | 1 | |||
 |
| × | 1 | |||
 |
| × | 1 | |||
| × | 1 | ||||
| × | 1 | ||||
 |
| × | 1 | |||
| × | 4 | ||||
 |
| × | 1 | |||
| × | 1 | ||||
Software apps and online services | ||||||
 |
| |||||
Hand tools and fabrication machines | ||||||
 |
| |||||
I've recently posted a tutorial about this project on YouTube explaining everything you can read on this article. You can watch it right below.
IntroductionTesting brushless motors is an essential part of building drones and other robotics projects. However, you don't necessarily need an expensive motor tester to get the job done.
In this project, I'll show you how to build a simple brushless motor tester using an Arduino board, a potentiometer, and an Electronic Speed Controller (ESC).
The idea is straightforward: rotate a potentiometer to control the motor speed. This allows you to test different brushless motors directly on your workbench using components you probably already have.
I'm using the new Arduino UNO Q, but the same concept can be adapted to other compatible Arduino boards.
ComponentsTo build this project, you'll need the following components:
- Arduino UNO Q
- 10kΩ potentiometer
- Breadboard
- 30A ESC (or another ESC compatible with your motor)
- LiPo battery to power the brushless motor
- Battery holder for four 18650 Li-ion cells
- Four 18650 Li-ion batteries
- Jumper wires
- Brushless DC motor
The Arduino reads the position of the potentiometer through its analog input.
Based on this reading, it generates a control signal that tells the ESC how fast to spin the brushless motor.
The ESC receives this signal and regulates the power delivered to the motor.
For this project, I'm using the Arduino Servo library and its writeMicroseconds() function to generate the control pulses.
The control pulse width ranges from 1000 to 1300 microseconds. This is a conservative throttle range for testing, rather than the full range typically supported by an ESC.
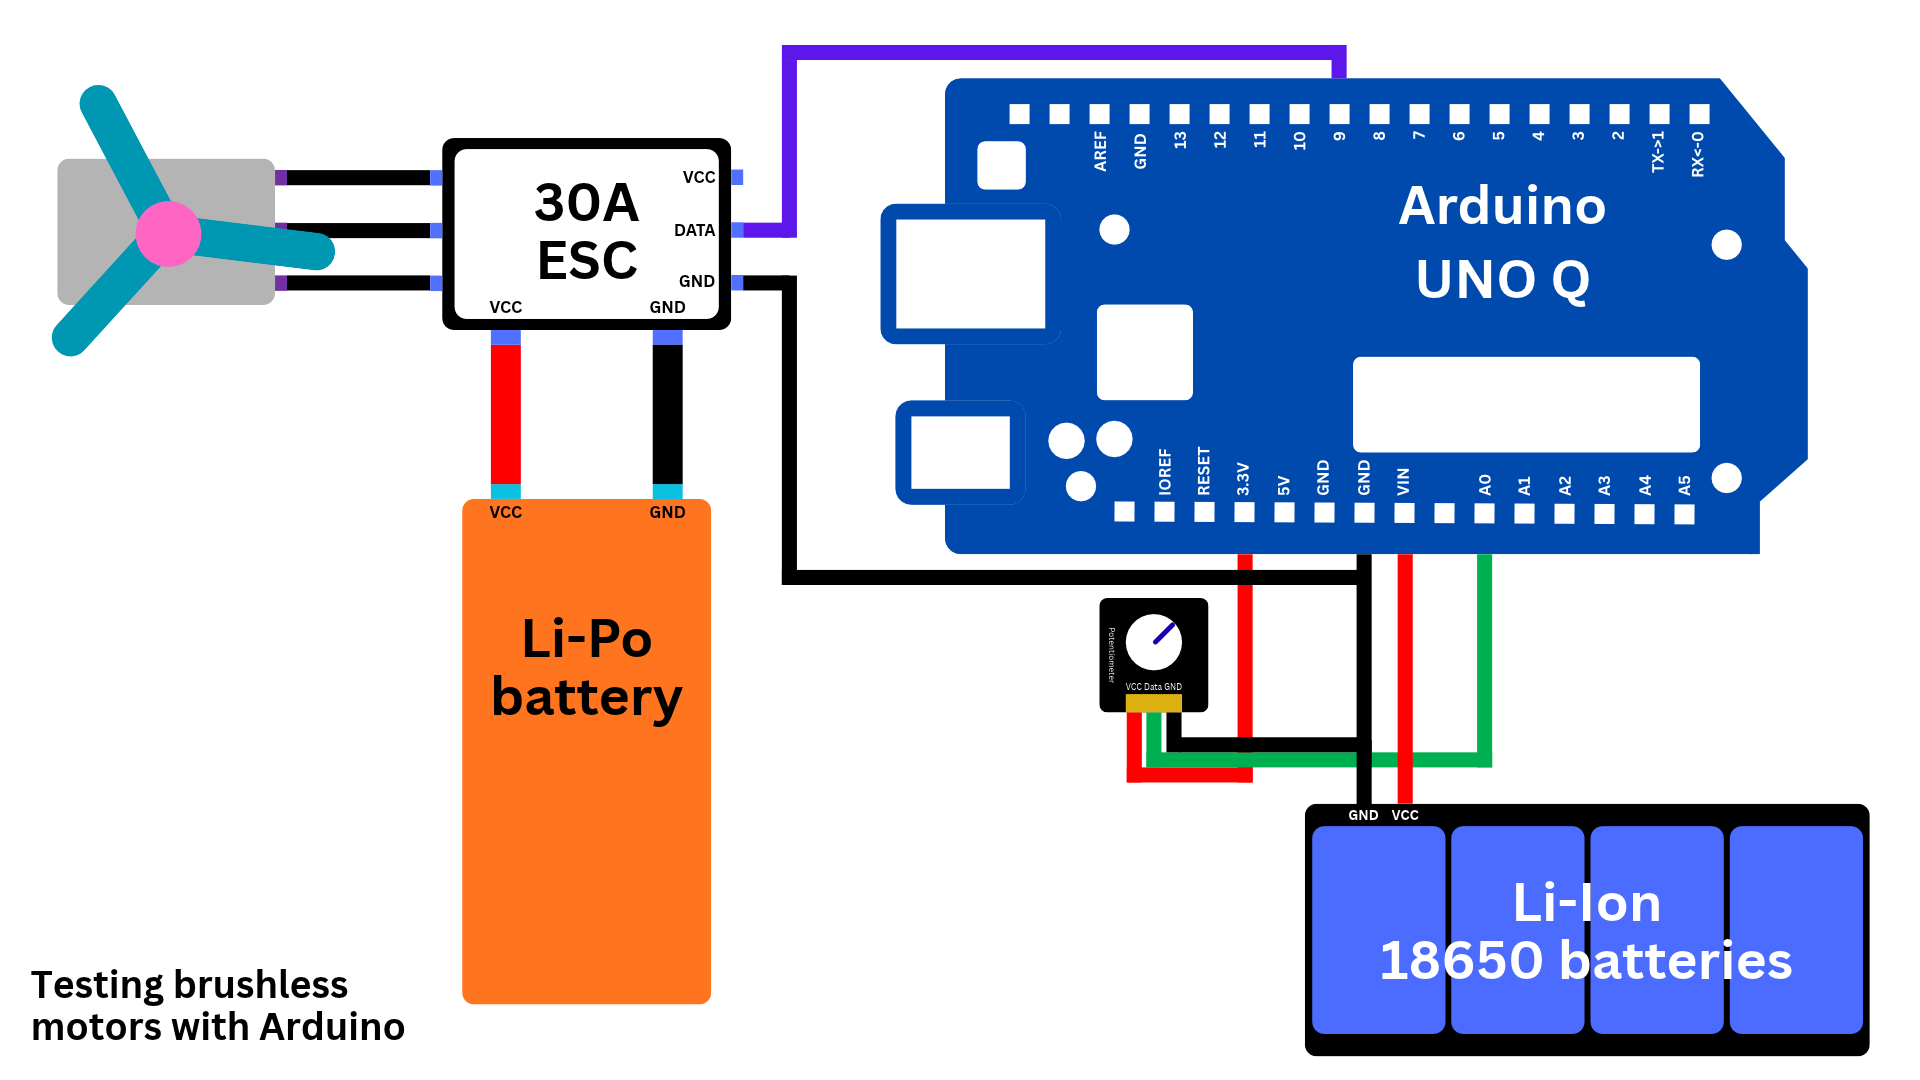
To get this project, assemble the components in following way.
1. Prepare the Battery PackFirst, place the four 18650 Li-ion batteries inside the battery holder.
The holder connects the cells in series, creating a 4S battery pack. This provides a nominal voltage of 14.8V and reaches 16.8V when fully charged.
We'll use this battery pack to power the Arduino UNO Q through its VIN pin.
WARNING
According to the Arduino UNO Q documentation, its VIN pin supports input voltages between 7V and 24V.
Always make sure your battery voltage is within the supported range of the board or microcontroller you're powering.
Remember that battery voltage changes depending on its charge level. Always consider the maximum fully charged voltage, not just the nominal voltage, when selecting your power supply.2. Connect the Potentiometer
Grab the breadboard and attach the 10kΩ potentiometer to it.
Connect its terminals as follows:
Potentiometer | Arduino UNO Q
First outer leg | 3.3V
Middle leg | A0
Last outer leg | GND
The potentiometer will act as a throttle controller.
WARNING
The Arduino UNO Q uses 3.3V logic on its GPIO pins, and its analog inputs are not 5V tolerant.
Never apply a voltage higher than 3.3V to these pins, as you could damage the board.3. Connect the ESC
Now, connect the ESC's control wires to the Arduino:
ESC wire | Arduino UNO Q
White (signal) | Digital pin 9
Black (ground) | GND
The ESC's power wires connect directly to the LiPo battery.
Make sure the Arduino and ESC share a common ground so the control signal works correctly.
Important: Check your ESC's wiring instructions before connecting anything. Wire colors and configurations may vary between manufacturers.
Connect the positive wire from the 4S Li-ion battery holder to VIN and the negative wire to GND on the Arduino UNO Q.
The Li-ion battery pack powers the Arduino, while the LiPo battery powers the brushless motor through the ESC.
These are two separate power supplies serving different purposes.
Check the wiring schematic belowfor a complete overview of all the connections.
Before turning on the system, we need to upload the code that converts the potentiometer position into control signals the ESC can understand.
You can find the complete Arduino sketch in the GitHub repository.
Download the file named test_brushless_motors.ino and open it using the Arduino IDE.
Make sure you have installed the following:
- Arduino Servo library.
- Arduino UNO Q board support.
Select the correct board and port, then upload the sketch.
The code reads the potentiometer value using analogRead().
The analog reading ranges from 0 to 1023 and is converted into a control pulse using the map() function.
int throttle = map(
  potValue,
  0, 1023,
  THROTTLE_MIN,
  THROTTLE_MAX
);
The minimum and maximum throttle values are defined as:
const int THROTTLE_MIN = 1000;
const int THROTTLE_MAX = 1300;
The Arduino then sends this value to the ESC using:
esc.writeMicroseconds(throttle);This function generates the control pulse used by the ESC to determine the requested motor speed.
The sketch also includes a five-second startup delay, during which the ESC receives the minimum throttle command.
Once the upload is complete, open the Serial Monitor at 115200 baud.
As you rotate the potentiometer, you'll see the analog readings and corresponding throttle pulse widths being updated.
- 0: Minimum throttle (1000 µs).
- 1023: Maximum configured throttle (1300 µs).
Before powering on the system, always make sure the potentiometer is set to its minimum position.
Testing the Brushless MotorNow that the circuit and code are ready, it's time to test a brushless motor!
First, connect the motor's three wires to the ESC. There's no particular order for these connections.
If the motor spins in the wrong direction, you can reverse it by swapping any two of the three motor wires. Make sure the power is disconnected before doing this.
Next, connect the 4S battery holder to the Arduino and power on the ESC by connecting its LiPo battery.
You'll hear the ESC beep during startup. This is normal, as ESCs use beeps to indicate their status. The exact beep sequence depends on the model.
The Arduino UNO Q will also start running the sketch. You can see this on the small LED matrix on top of the board. Once the sketch starts running, the default Arduino logo animation will disappear.
The sketch sends the minimum throttle command during startup and waits five seconds before allowing potentiometer control.
Once initialization is complete, slowly rotate the potentiometer to increase the motor speed.
The more you turn the knob, the faster the motor spins!
For this demonstration, I'm using a 2212/920KV brushless motor. It's designed for relatively large drones, but this technique can also be used to test motors of different sizes and brands, provided you use a compatible ESC and power supply.
Safety PrecautionsTesting brushless motors can be dangerous if proper precautions aren't taken.
Here are a few important recommendations:
CAUTION
Always remove the propeller before testing a brushless motor.
Even at relatively low throttle settings, a brushless motor can generate significant force.
- Securely attach the motor to a sturdy structure before powering it on.
- Keep your hands and other objects away from rotating parts.
- Make sure the ESC, battery, and motor are electrically compatible.
- Check battery polarity before connecting the power supply.
- Never exceed the voltage limits of the Arduino board or ESC.
- Never apply more than 3.3V to the Arduino UNO Q's GPIO and analog input pins.
- Use appropriate battery protection and charging equipment.
- Always disconnect the power before changing any wiring.
That's it for this tutorial. You've now got a simple brushless motor tester that you can build using an Arduino board and a few inexpensive components.
This is particularly useful when working on drones because you can quickly test your motors without having to assemble the entire aircraft.
You can find the complete Arduino sketch and wiring schematics in the GitHub repository.
If you're interested in drones, you might also enjoy my other project, where I designed a custom flight controller for drones.
Thanks for reading and happy building!


Comments