


Hardware components | ||||||
| × | 1 | ||||
_ztBMuBhMHo.jpg?auto=compress%2Cformat&w=48&h=48&fit=fill&bg=ffffff) |
| × | 1 | |||
| × | 1 | ||||
 |
| × | 1 | |||
 |
| × | 1 | |||
 |
| × | 1 | |||
 |
| × | 1 | |||
 |
| × | 1 | |||
| × | 1 | ||||
| × | 1 | ||||
| × | 1 | ||||
| × | 1 | ||||
 |
| × | 1 | |||
Software apps and online services | ||||||
 |
| |||||
I've recently posted a tutorial about this project on YouTube explaining everything you can read on this article. You can watch it right below.
IntroductionWhat if you could build your own smart home using just Arduino and cardboard?
In this guide, I'm going to show you exactly how to do that. This small house may look simple, but it's packed with features:
- You can rotate a knob to automatically open and close the front door.
- Monitor temperature and humidity in real time on an LCD screen.
- And even trigger an alarm system if someone tries to break in through the window.
And the best part? It's cheap, beginner-friendly, and perfect for a school science fair project.
If you're new here, welcome! This is lesson 21 of a 24-part series called Arduino for Beginners, where we build projects step by step.
Alright, let's get started.
ComponentsTo build this project, you'll need:
- Arduino UNO
- I/O expansion shield
- I2C LCD module
- Rotation sensor (potentiometer)
- Servo motor
- DHT11 sensor
- Push button
- Blue LED
- Red LED
- Digital buzzer
- Infrared proximity sensor
- Jumper wires
Don't worry if this looks like a lot - we're going to connect everything step by step.
SponsorBefore we start wiring, you might be wondering where all these plug-and-play components came from. I'm using the MindPlus Arduino Coding Kit, which is designed specifically for beginners who want to learn Arduino in a practical way.
This kit was kindly provided by DFRobot, the sponsor of this series. They're one of the leading companies in open-source hardware, and their store has a huge variety of components - from simple sensors to more advanced modules.
If you want to follow along with this course more easily, I highly recommend checking out this kit. And of course, feel free to explore their store for your own projects.
Big thanks to DFRobot for supporting this series and helping make STEM education more accessible.
Now, let's jump into the wiring.
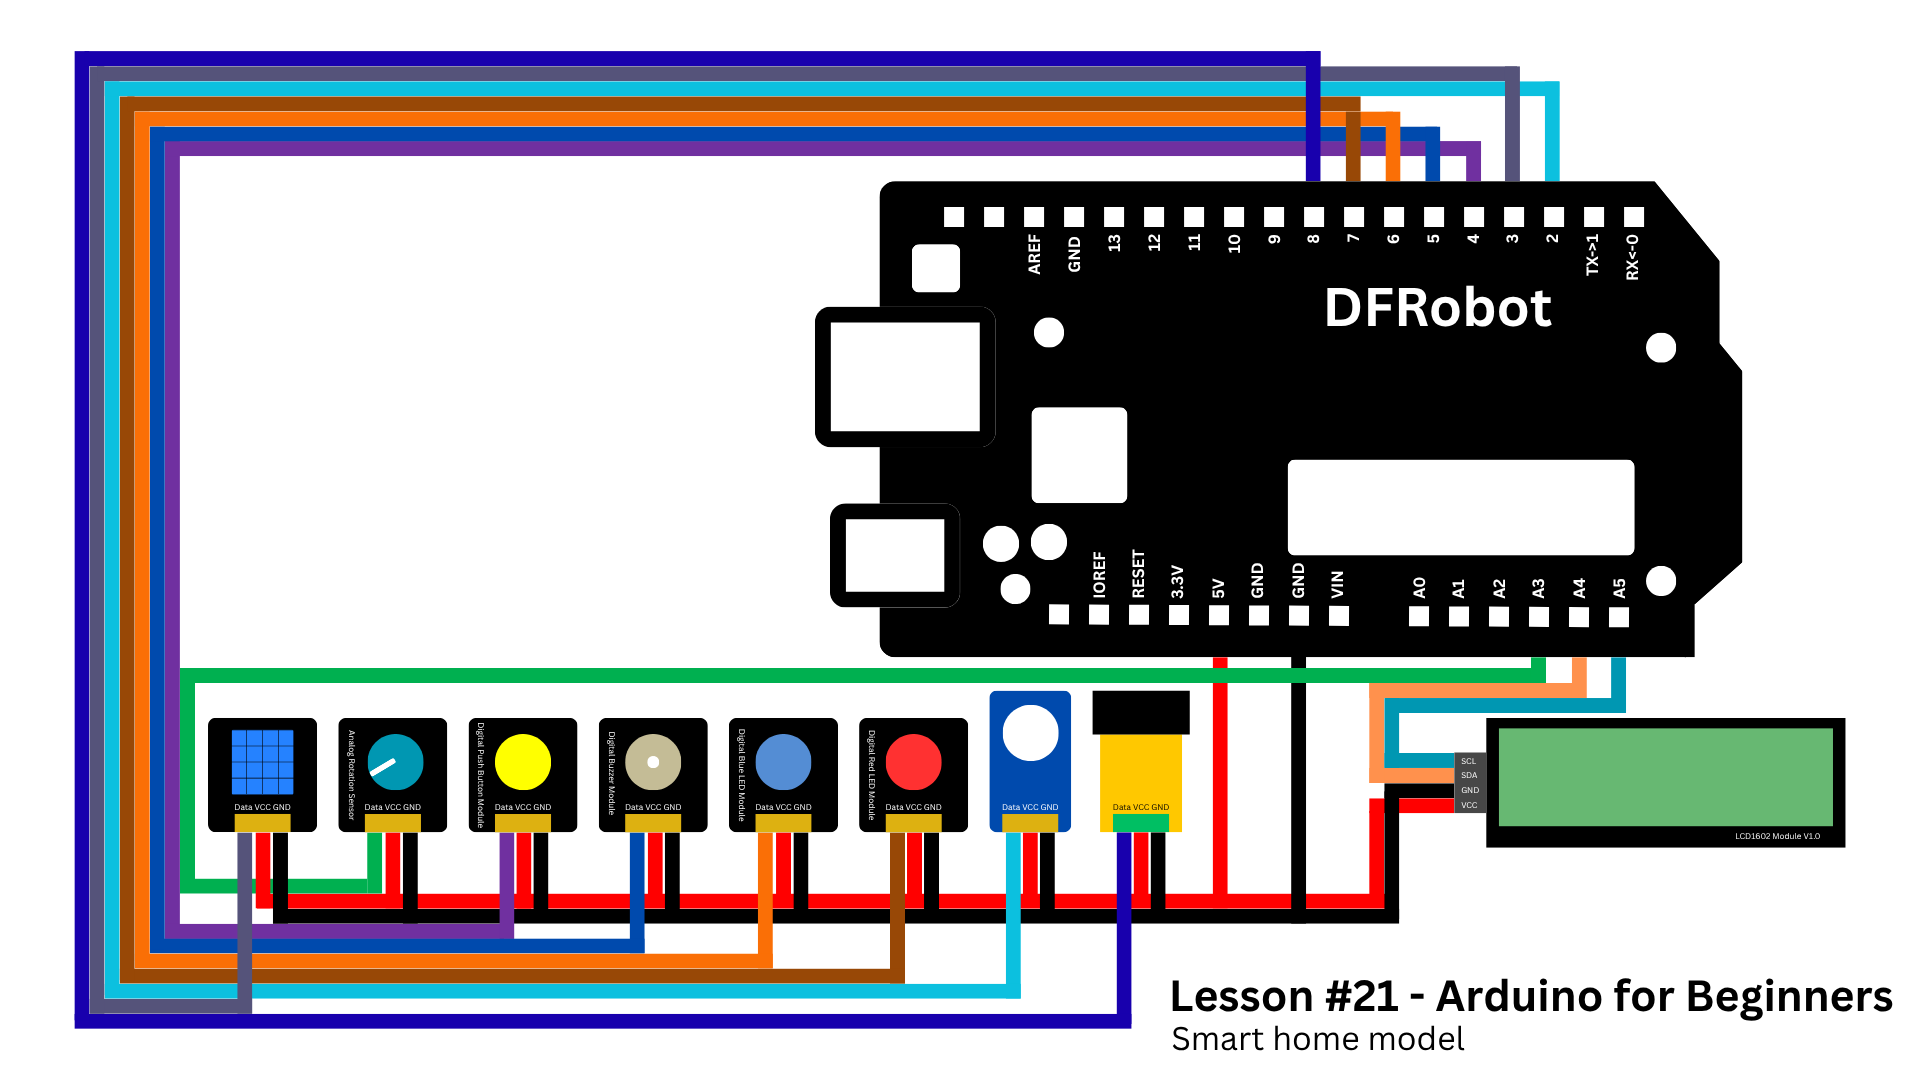
WiringWe're going to connect everything in small groups so it's easier to follow.
Let's start with the display.
Connect the LCD module:
- SCL → A5
- SDA → A4
- VCC → 5V
- GND → GND
Next, the input sensors.
Connect:
- Rotation sensor → A3
- Infrared sensor → digital pin 8
Now the output components.
Connect:
- Servo motor → pin 2
- Buzzer → pin 5
- Blue LED → pin 6
- Red LED → pin 7
And finally, the remaining components:
- DHT11 sensor → pin 3
- Push button → pin 4
Take your time here - this is usually where mistakes happen. If something doesn't work later, the first thing you should check is your wiring.
Also, feel free to use the schematic below if you need a visual reference.
Once everything is connected, we're ready for the next step.
BuildNow comes the fun part: turning this into an actual house.
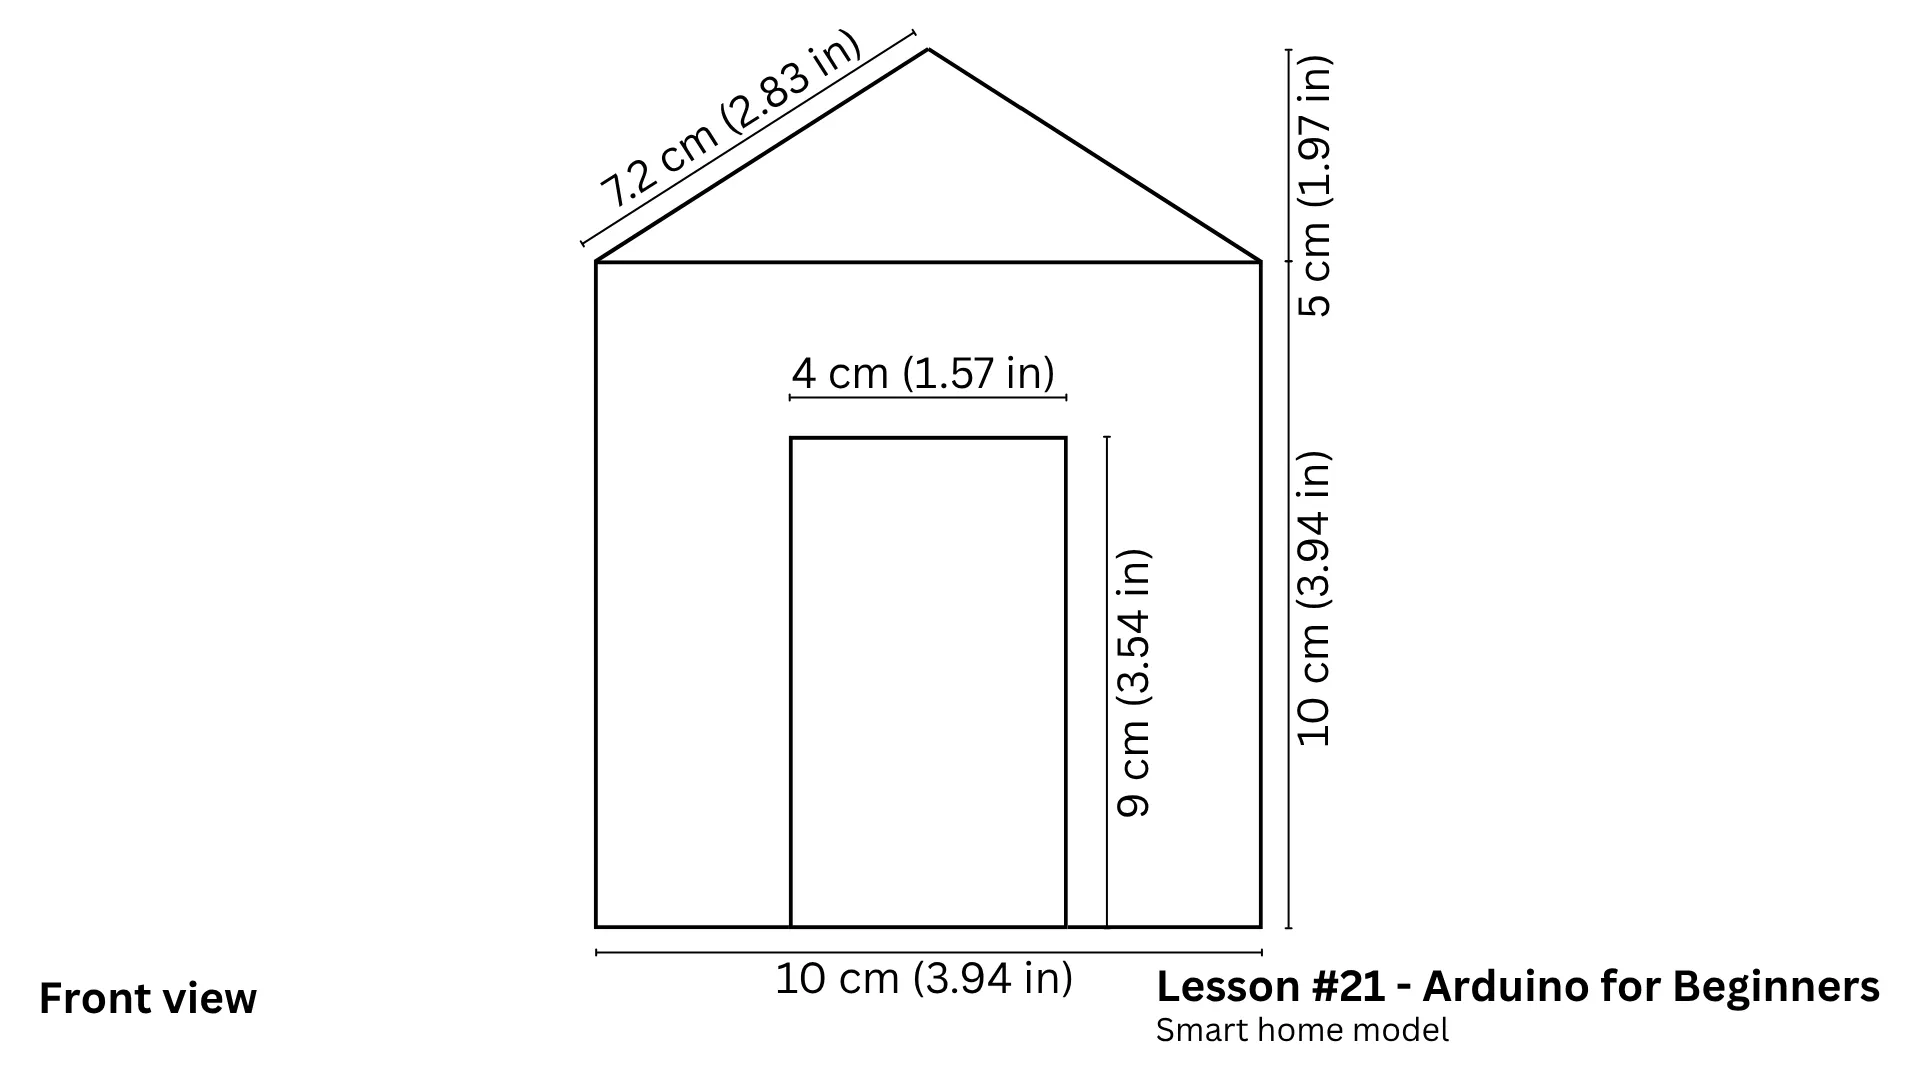
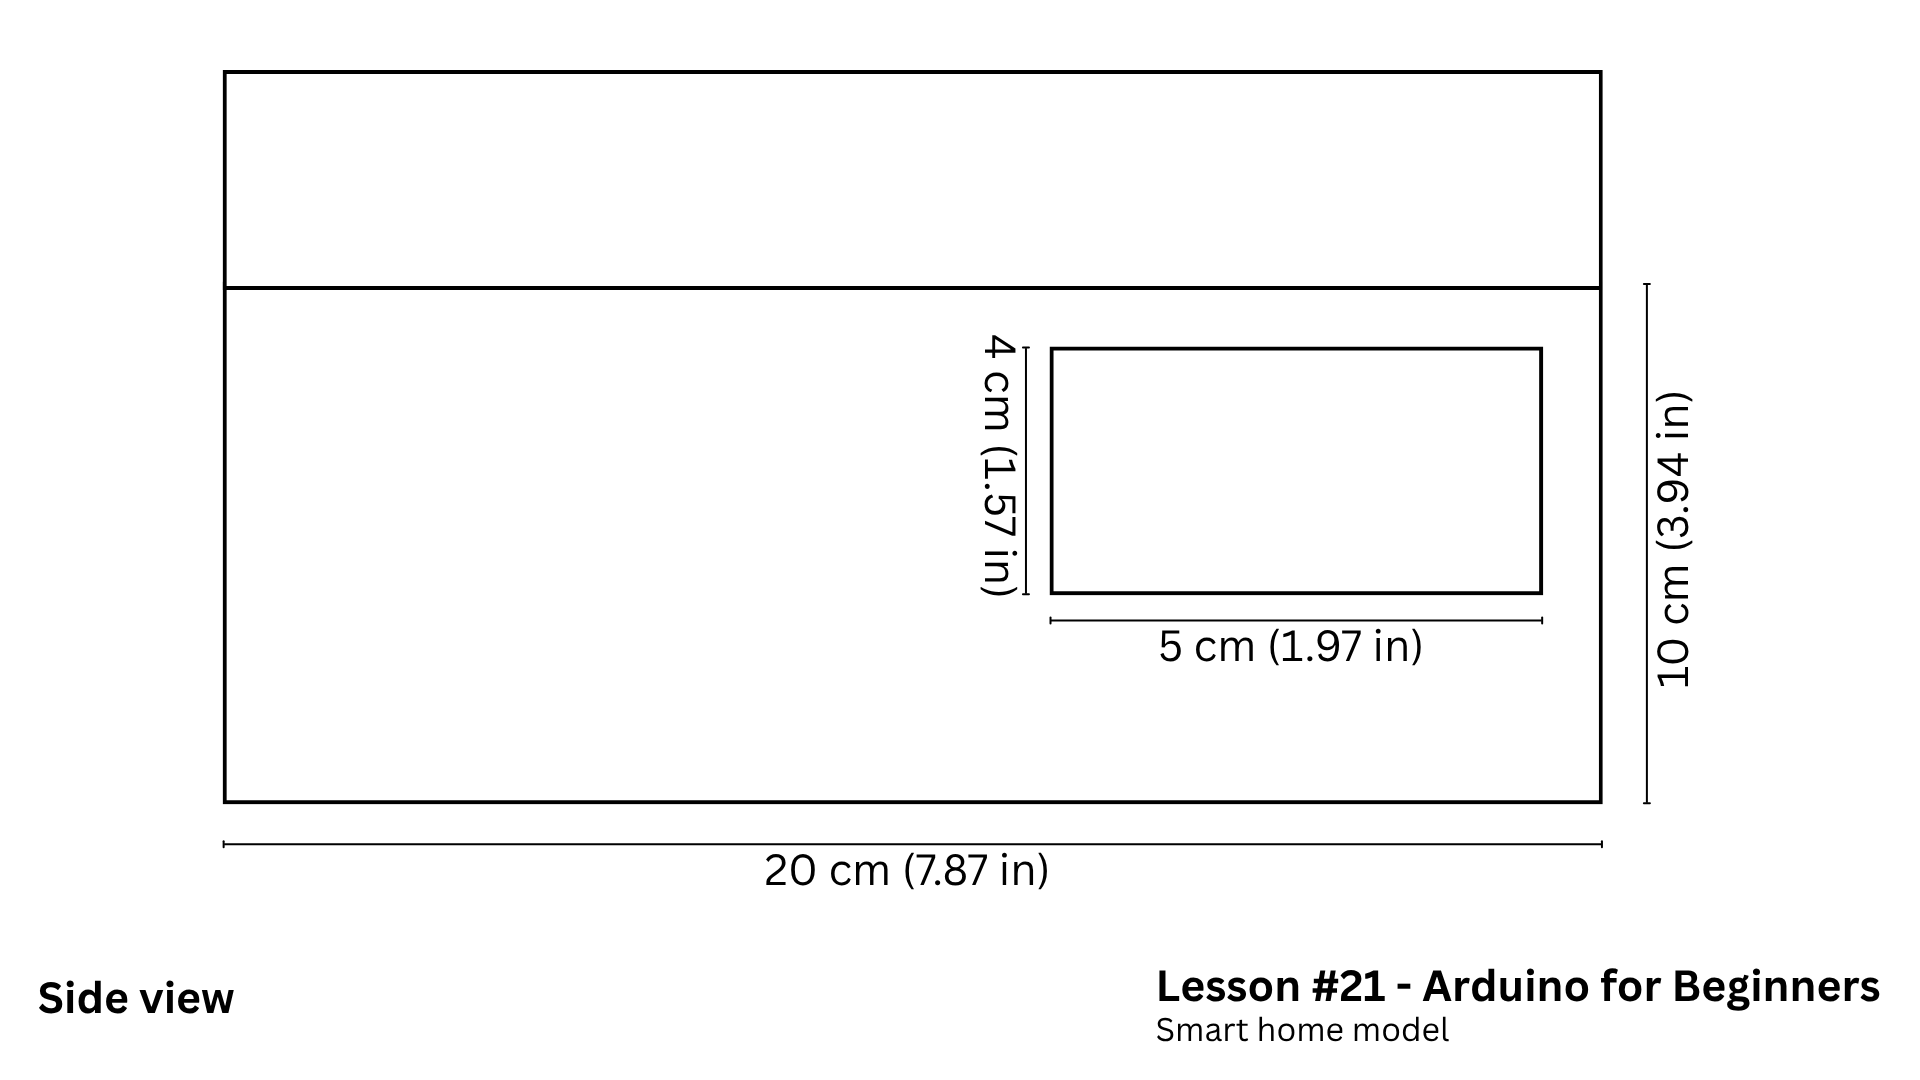
I grabbed a few cardboard boxes and carefully opened them up to get flat sheets. Then I started sketching the walls, roof, and door directly on the cardboard. This is where you can get creative - your house doesn't have to look exactly like mine.
After drawing the shapes, I used a utility knife and scissors to cut everything out. Take your time here and try to keep the cuts clean. It makes a big difference in the final result.
To make things easier for you, I created a template with all the dimensions I used. You can find it below.
Once everything was cut, I started assembling the structure.
- The servo motor goes near the front door, so it can physically open and close it. Right next to it, I placed the rotation sensor, so turning the knob feels intuitive.
- Then I moved to the window area. I installed the infrared sensor right above it, and placed the LEDs and buzzer nearby (this is our alarm system).
- Inside the house, I mounted the DHT11 sensor on one of the walls to measure temperature and humidity.
- Finally, I placed the LCD screen and push button on the roof, so the readings are easy to see and interact with.
After connecting an USB cable, everything came to life.
Here's the cool part:
when you rotate the knob, the door smoothly opens and closes. But if you try to break in through the window, the alarm instantly triggers - LEDs flashing, buzzer sounding. You can also check the temperature and humidity values on the LCD module.
That's your smart home in action.
CodeNow let's understand what's happening behind the scenes. The code of this lesson is available on the GitHub repository of the series.
At the top of the sketch, we import the required libraries and define all the pins and variables. As projects get more complex, this section naturally grows - and that's completely normal.
Inside the setup() function, we initialize everything:
- Set pin modes
- Start communication with the LCD and servo
- Configure the button logic to avoid false triggers
Then comes the loop() - this is where the system continuously runs.
- First, we read the rotation sensor and map its value to a servo angle. So when you turn the knob, the door moves accordingly.
- Next, we handle the push button. Each press toggles between Celsius and Fahrenheit, which updates what's shown on the display.
- For the DHT11 sensor, we don't just take one reading. We take multiple readings over time and average them. This makes the data more stable and reliable.
Then we monitor the infrared sensor. If it detects something nearby, the system immediately activates the alarm:
- Then we monitor the infrared sensor. If it detects something nearby, the system immediately activates the alarm
- LEDs blink alternately
- Buzzer turns on
- Finally, we update the LCD with the latest temperature and humidity values in a clean format.
If something isn't working as expected, open the Serial Monitor. It's a great way to debug and see what the system is doing internally.
And if you're still not confident with Arduino code, I have a full beginner tutorial about Arduino programming - make sure to check it out.
ConclusionAnd just like that, you built your own smart home system.
You combined sensors, actuators, and user interfaces into a single project, and that's exactly what real engineering looks like.
If something didn't work perfectly on your first try, that's completely normal. Debug it, tweak it, improve it - that's how you learn.
In the next lesson, we're going to keep building on these concepts, so make sure you're subscribed.
And before you go, check out this another tutorial. It'll help you understand some of the components we used today in more detail.
Thanks for reading, and I'll see you in the next one.


Comments