


Hardware components | ||||||
 |
| × | 1 | |||
| × | 1 | ||||
| × | 1 | ||||
| × | 1 | ||||
| × | 1 | ||||
Software apps and online services | ||||||
 |
| |||||
https://www.donluc.com/?p=4651
Facebookhttps://www.facebook.com/share/v/1KXSR152ht/
YouTubeDFRobothttps://learn.dfrobot.com/makelog-315090.html
#DonLucElectronics #DonLuc #MQ135 #ArduinoUNOR4 #Display #IoT #Project #Fritzing #Programming #Electronics #Microcontrollers #Consultant
The gas sensing material used in the MQ135 gas sensor is tin dioxide (SnO2), which has low conductivity in clean air. When there is polluted gas in the environment where the sensor is located, the conductivity of the sensor increases with the increase of the concentration of polluted gas in the air. The MQ135 gas sensor has a high sensitivity to ammonia, sulfide, and benzene-based vapors, and is ideal for monitoring smoke and other harmful gases. This sensor can detect a variety of harmful gases and is a low-cost sensor suitable for a variety of applications.
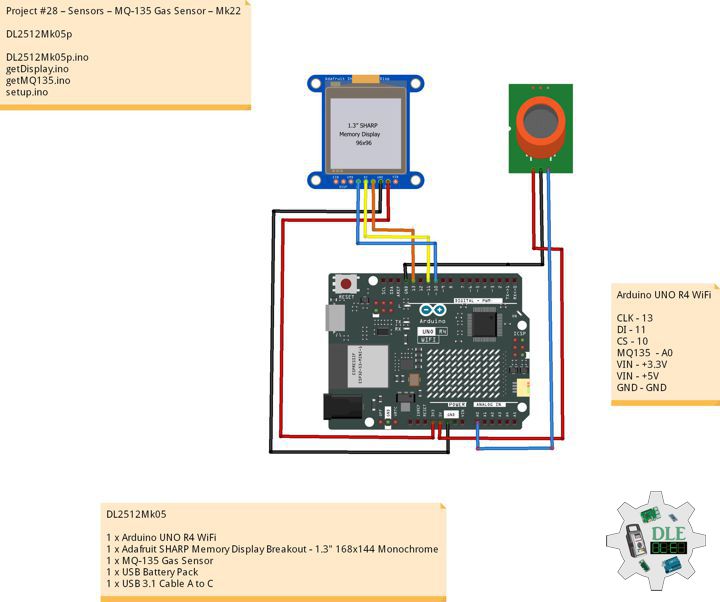
DL2512Mk051 x Arduino UNO R4 WiFi
1 x Adafruit SHARP Memory Display Breakout - 1.3" 168x144 Monochrome
1 x MQ-135 Gas Sensor
1 x USB Battery Pack
1 x USB 3.0 to Type-C Cable
DL2512Mk05pDL2512Mk05p.ino
getDisplay.ino
getMQ135.ino
setup.ino
People can contact us:http://www.donluc.com/?page_id=1927
Consultant, R&D, Electronics, IoT, Teacher and Instructor- Programming Language
- Microcontrollers (PIC, Arduino, Raspberry Pi, Arm, Silicon Labs, Espressif, Etc...)
- IoT
- Wireless (Radio Frequency, Bluetooth, WiFi, Etc...)
- Robotics
- Automation
- Camera and Video Capture Receiver Stationary, Wheel/Tank, Underwater and UAV Vehicle
- Unmanned Vehicles Terrestrial, Marine and UAV
- Machine Learning
- Artificial Intelligence (AI)
- RTOS
- Sensors, eHealth Sensors, Biosensor, and Biometric
- Research & Development (R & D)
- Consulting
- Etc...
Web:https://www.jlpconsultants.com/
Facebook:https://www.facebook.com/neosteam.labs.9/
YouTube: https://www.youtube.com/@thesass2063
DFRobot:https://learn.dfrobot.com/user-10186.html
Elecrow:https://www.elecrow.com/share/sharepj/center/no/760816d385ebb1edc0732fd873bfbf13
TikTok:https://www.tiktok.com/@luc.paquin
Hackster:https://www.hackster.io/luc-paquin
LinkedIn: https://www.linkedin.com/in/jlucpaquin/
Don Luc


Comments