


Hardware components | ||||||
 |
| × | 2 | |||
 |
| × | 1 | |||
 |
| × | 1 | |||
 |
| × | 1 | |||
| × | 1 | ||||
 |
| × | 2 | |||
Software apps and online services | ||||||
 |
| |||||
 |
| |||||
| ||||||
Introduction:
How many times have you wondered whether or not your mail has arrived yet? Especially when you're expecting something important... like a college acceptance letter, a check, a birthday card? Well what if I told you that your wait is finally over. We found the solution! Shining Bright in the Mailbox is our innovative way to notify you as soon as your mail arrives. This innovative idea began as we pondered on common problems that people face today. The idea came to us as we decided that important mail is necessary to keep track of, especially when we are expecting it. However, the best part about this design is that it will track every time the mailbox is opened, during the day, and the time it is opened. This can potentially prevent mail theft as it is also a growing problem in the world today. There have been multiple records of mail theft in the US and we want to prevent this from happening!!! Therefore, we have decided this is the next step to mail theft prevention, and another exciting way to know when your mail arrives! The photon used inside the mailbox senses different light variables, which then sends to another photon that turns on a speaker. Guess what the speaker says... "You've Got Mail!" And the best part about this project, it will notify your phone as soon as it is opened, by email or text! This innovation will bring photon use to the next level!
We will be going step-by-step to show you how to build you're very own mail notification system.
Video:
Watch this short video to understand how this project works.
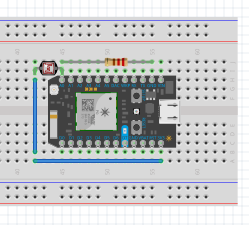
Light Sensor:
The first photon particle will be used as a light sensor, which will be placed inside of the mailbox to detect light when the mailbox is opened.
The light sensor, shown below, was constructed with a photon, a breadboard, a photon-resistor, a 3.3k ohm resistor, a jumper wire, and a portable charger. The photon-resistor is pinned at A0 (analog read) and is jumped to the 3V3 pin and a resistor that goes from A0 to ground on the photon. The photon is then plugged in to the portable charger to supply power while it is in the mailbox. The code constructed on build.particle.io, for this photon publishes three events. The third event that the code publishes is the number of times the mailbox is opened. The second event is to publish the event "LightSensed" when it senses a light value greater than 100. It also publishes the third event, "LightNotSensed", when the light value is less than or equal to 50. The values used were determined by checking the light value inside the mailbox when it is closed and tracking the light value when the mailbox is opened through out the day. To check the light value you can type the following link in your web browser:
https://api.particle.io/v1/devices/Device ID/lightValue?access_token=Access Token
Make sure you change what is in bold to fit your own photon distributions. The Device ID is found under Devices, which is on build.partcile.io under your photon name. The Access token is also on buil.particle.io and is under settings.
Make sure to tape this setup in the back of your mailbox to avoid mail from blocking the light sensor.
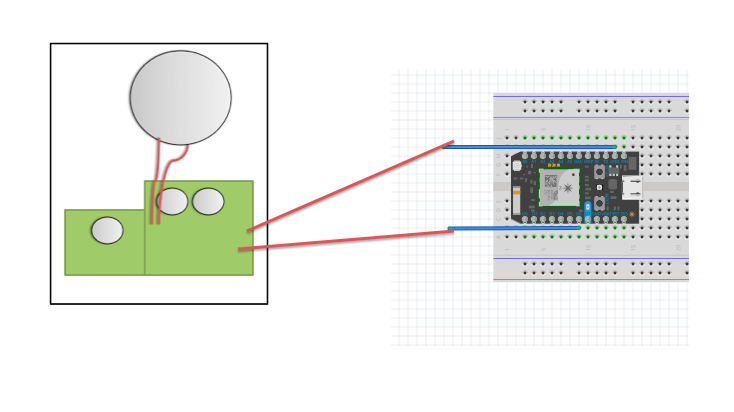
Speaker:
The second photon particle subscribes to the first photon and will be used as a trigger. When the light sensor publishes "LightSensed," it turns the LED (D7) on and triggers the EZSound Module (speaker). However, when the light sensor publishes "LightNotSensed," it turns the LED and speaker off.
This was constructed of one photon, a breadboard, two jumper wires, and a recordable speaker. This recordable speaker is push button activated and comes with a jack adapter for recording purposes. We cut the button off to connect it to the photon so the photon can act as a switch. We measured the voltage in the wires with a millimeter to see which wire was positive and which one was ground. We then taped the wires to jumper wires with electrical tape so we can connect them to the breadboard. We connected the positive wire to the D6 (digital write) on the photon, and the other to ground.
Plug the photon into a wall outlet for a power supply.
IFTTT:
Four IFTTT programs were constructed using the three publishes from Light Sensor code. The first picture, below, is an SMS message that used the LightSensed publish, shown in the second picture. Instead of an SMS, you can also have it send emails instead, using the same publish, third picture. We also used IFTTT to record data, that we later graphed. The fourth picture, is of the program we used to record the light value. The fifth picture is of the program we used to record the number of times the mailbox was opened.
Graphs:
For the graphs below, the mailbox was opened about every 30 minutes on a partially cloudy day to collect data for the project.
The first figure, below, is a graph of the light value over time. We chose a partially cloudy day to set a better cut off value for the code. The highest value recorded is 3791 while the lowest is 149. From this data we made the code publish "lightSensed" at a 100.
The second figure is a graph of the number of times the mailbox was opened over time. Since the mailbox was opened about every 30 minutes, it is visible that the value increases by one about every 30 minutes.
Photosensor Photon


Comments