

Hardware components | ||||||
 |
| × | 1 | |||
 |
| × | 1 | |||
 |
| × | 1 | |||
 |
| × | 1 | |||
 |
| × | 1 | |||
 |
| × | 1 | |||
| × | 5 | ||||
Software apps and online services | ||||||
| ||||||
 |
| |||||
| ||||||
| ||||||
| ||||||
Morse code is a method used in telecommunication to encode text characters as standardized sequences of two different signal durations, called dots and dashes, or dits and dahs. Morse code is named after Samuel Morse, one of the inventors of the telegraph.
Below is a chart that can come in handy for you if you want to encode to Morse by hand…
But, for the sake of modern technology, I have created Bolt IoT powered Text/Voice to Morse encoder and I am going to show you how to create it as well. Let us get started then!
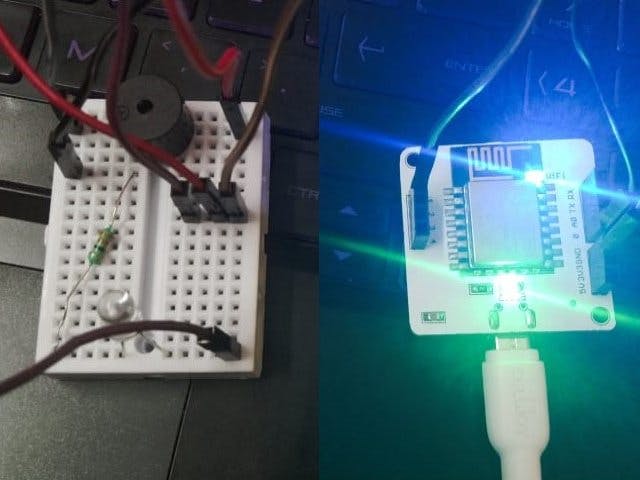
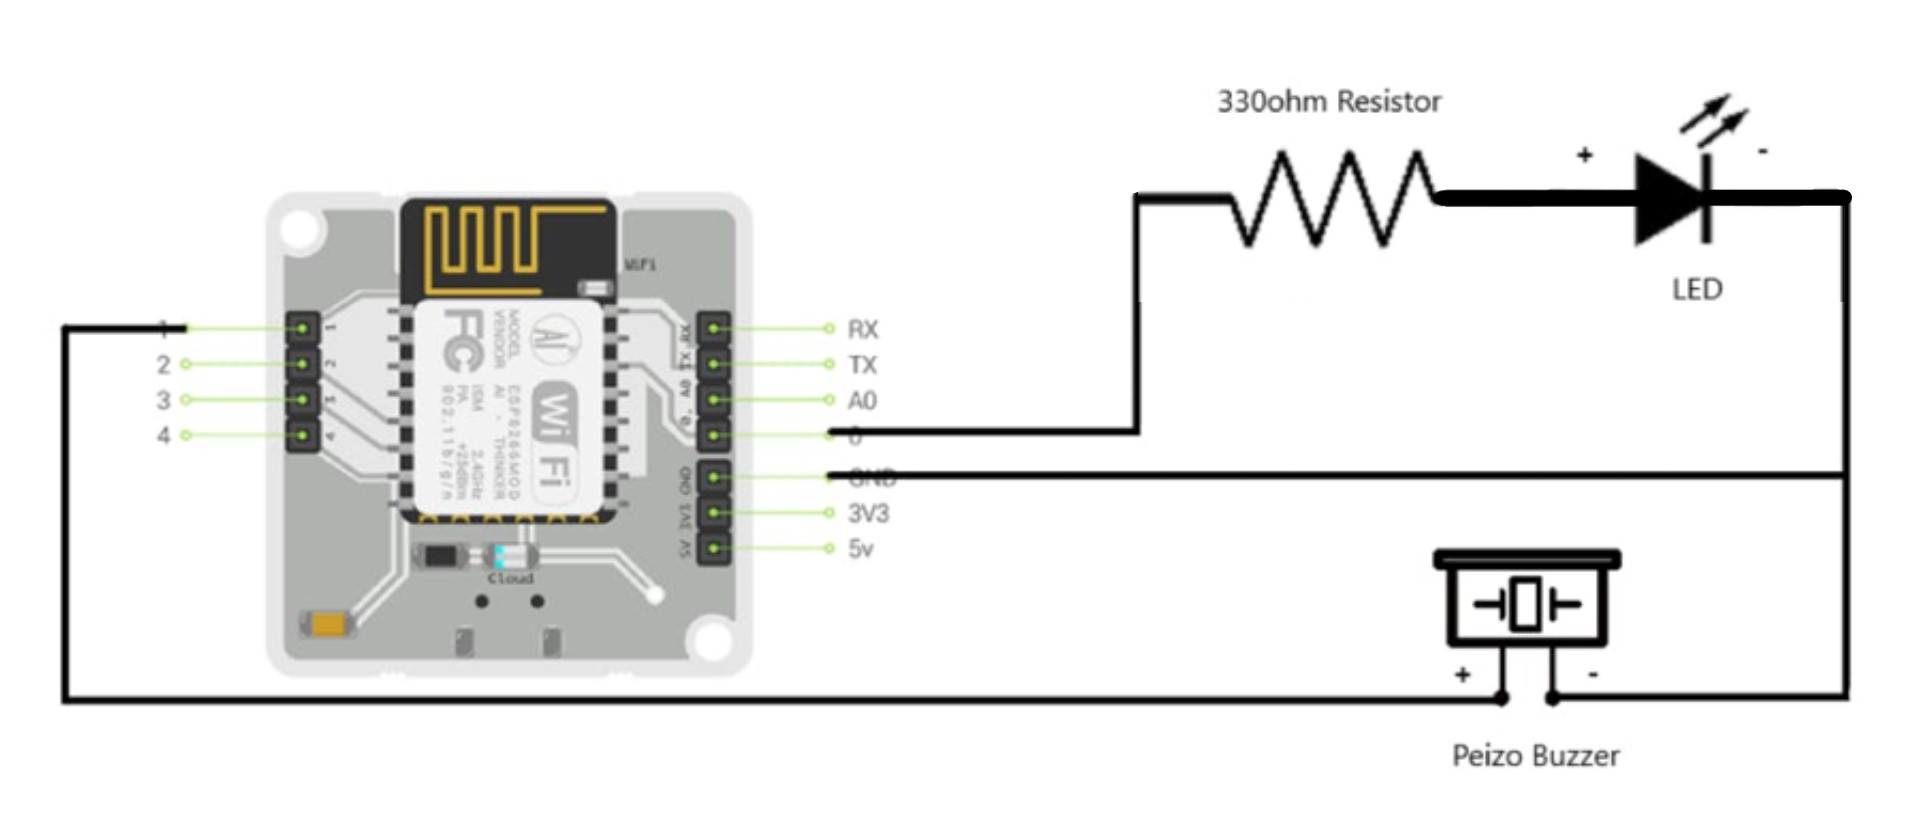
Circuit ConnectionThis is how you need to make your circuit connections...
Step 1: Put the board on a flat surface.
Step 2: Connect the resistor in the following manner.
Step 3: Connect the positive leg of the LED to the resistor and the negative leg to the other side of the board.
Step 4: Connect the positive leg of the Piezo buzzer to the positive side of the board and the negative leg to the negative side.
Step 5: Now we have to make the connections in the following way so that we can connect the negative pins of both the Buzzer and the LED to the GND pin of the BOLT Wi-Fi Module.
Step 6: Use a jumper cable to connect the positive pin of the Buzzer to the Pin-1 on the Bolt Wi-Fi Module.
Step 7: Connect the positive pin of the LED which is in series with the resistor to the Pin-0 of the BOLT W-Fi Module.
Step8: Connect the Wi-Fi module to a 5V power supply and let it connect to the cloud.
The next is the programming part for which you need PyCharm.
Connecting to the Code (Running the Web App on your Local Machine)For this, make sure you have PyCharm installed and steps remain the same irrespective of the Operating System but this has only been tested on Windows 10 and Kali Linux.
Step1: Make a folder on your computer and enter it.
Step 2: Clone the Morser repository inside that folder.
Use the command:
git clone https://github.com/lankabhedi/morser.gitStep 3: Open this directory in PyCharm.
Use the command:
pycharm .Step 4: Open Pipfile and select install plugins.
Step 5: Select the Terminal and run the following command.
pip install -r ./morser/requirements.txtStep 6: In the same terminal, run the following command.
python ./morser/app.pyStep 7: Click on the IP address in blue and your application will open in your default web browser.
Enter your details and press "Send to Bolt".
If your bolt device is offline, it will show the error screen.
For testing purposes, I have deployed this application on Heroku.
Website: http://morser-app.herokuapp.com/
I have developed an API for this which we need to connect as Webhook on IFTTT's website. Since my application is hosted on the 'Free Tier', your API requests might get timed out.
The format for the API request is:
https://morser-app.herokuapp.com/api?api_key=bolt-api-key&device_id=bolt-device-id&message=your-message
You need to replace the 'bolt-api-key', 'device-id', and 'your-message' with your own values.
Depending upon the device status, it will give you the following output.
{
"device_status": "offline",
"message_passed": "no",
"morse_code": ""
}{
"device_status": "online",
"message_passed": "yes",
"morse_code": ".. "
}Please note that the "morse_code" will return nothing unless the device is on.
For using it with Google Assistant, follow the given steps.
Step 1: Login into your IFTTT account and click on "Create".
Website: https://ifttt.com/home
Step 2: Click 'Add'.
Step 3: Click on "Google Assistant".
Step 4: Select the following option.
Step 5: Enter the following values.
Step 6: Click 'Add'
Step 7: Select 'Webhooks'.
Step 8: Select "Make a web request".
Step 9: Replace the 'bolt-api-key' and 'device-id' with your own.
Step 10: Select "Continue".
Step 11: Review and click on "Finish".
You will see your applet like the following.
In case you do not want to use any Web Application and want to run this from just a single python script, you can use the following code.
from boltiot import Bolt
import time as t

api_key = input("Enter your API key:")
device_id = input("Enter your Bolt Device ID:")
mybolt = Bolt(api_key, device_id)

MORSE_CODE_DICT = { 'A':'.-', 'B':'-...',
                    'C':'-.-.', 'D':'-..', 'E':'.',
                    'F':'..-.', 'G':'--.', 'H':'....',
                    'I':'..', 'J':'.---', 'K':'-.-',
                    'L':'.-..', 'M':'--', 'N':'-.',
                    'O':'---', 'P':'.--.', 'Q':'--.-',
                    'R':'.-.', 'S':'...', 'T':'-',
                    'U':'..-', 'V':'...-', 'W':'.--',
                    'X':'-..-', 'Y':'-.--', 'Z':'--..',
                    '1':'.----', '2':'..---', '3':'...--',
                    '4':'....-', '5':'.....', '6':'-....',
                    '7':'--...', '8':'---..', '9':'----.',
                    '0':'-----', ', ':'--..--', '.':'.-.-.-',
                    '?':'..--..', '/':'-..-.', '-':'-....-',
                    '(':'-.--.', ')':'-.--.-'}


def encrypt(message):
    cipher = ''
    for letter in message.upper():
        if letter != ' ':
            cipher += MORSE_CODE_DICT[letter] + ' '
        else:
            cipher += ' '

    return cipher

def main():
    message = input("Enter you message:")
    result = encrypt(message.upper())
    print(message.upper())
    print(result)

    mybolt.digitalWrite("1", "LOW")
    mybolt.digitalWrite("1", "HIGH")
    t.sleep(0.01)
    mybolt.digitalWrite("1", "LOW")
    mybolt.digitalWrite("1", "HIGH")
    t.sleep(0.01)
    mybolt.digitalWrite("1", "LOW")
    mybolt.digitalWrite("1", "HIGH")
    t.sleep(0.01)
    mybolt.digitalWrite("1", "LOW")
    mybolt.digitalWrite("1", "HIGH")
    t.sleep(0.01)
    mybolt.digitalWrite("1","LOW")

    for char in result:

        if(char == "-"):
            mybolt.digitalWrite("0", "LOW")
            mybolt.digitalWrite("0", "HIGH")
            t.sleep(3)
            mybolt.digitalWrite("0", "LOW")

        elif(char == "."):
            mybolt.digitalWrite("0", "LOW")
            mybolt.digitalWrite("0", "HIGH")
            t.sleep(1)
            mybolt.digitalWrite("0", "LOW")

        elif(char == " "):
            mybolt.digitalWrite("1", "LOW")
            mybolt.digitalWrite("1", "HIGH")
            t.sleep(0.2)
            mybolt.digitalWrite("1", "LOW")
            t.sleep(0.1)

        else:
            continue


if(__name__ == '__main__'):
    main()
Please make sure to install the boltiot module using the following command in the Terminal window.
pip install boltiotHigh Five if you followed through!


Comments