

Hardware components | ||||||
 |
| × | 1 | |||
| × | 1 | ||||
| × | 1 | ||||
| × | 1 | ||||
| × | 1 | ||||
| × | 2 | ||||
| × | 1 | ||||
 |
| × | 1 | |||
 |
| × | 1 | |||
 |
| × | 1 | |||
| × | 1 | ||||
 |
| × | 1 | |||
Software apps and online services | ||||||
 |
| |||||
 |
| |||||
Hand tools and fabrication machines | ||||||
 |
| |||||
 |
| |||||
For a few weeks, I have been working with Twilio’s API, especially for WhatsApp messaging, and even created a project sending the variables coming from NodeMCU to my phone, which you can find here. But, my former project was merely sending data packets to my phone as WhatsApp messages periodically. And, I was determined to take my nascent idea and improve it by using WhatsApp response messages and a MySQL database and thus created this project. In that way, NodeMCU transfers variables to the phone as WhatsApp messages when the user requested them or gets commands from the user through WhatsApp. To manage that, I created a web application in PHP, which detects whether a WhatsApp message was sent or not and response the message depending on the keyword in the body. The application, named WhatsApp Two-Way Connection Hub, saves all variables transferred from NodeMCU and commands received from WhatsApp to a dedicated MySQL database and therefore communicates the user and NodeMCU instantly when something requested. I shared the source code of the application below if you want to use the localhost or your server instead of TheAmplituhedron to create a connection hub, but first, you have to download Twilio Helper Library in your directory.
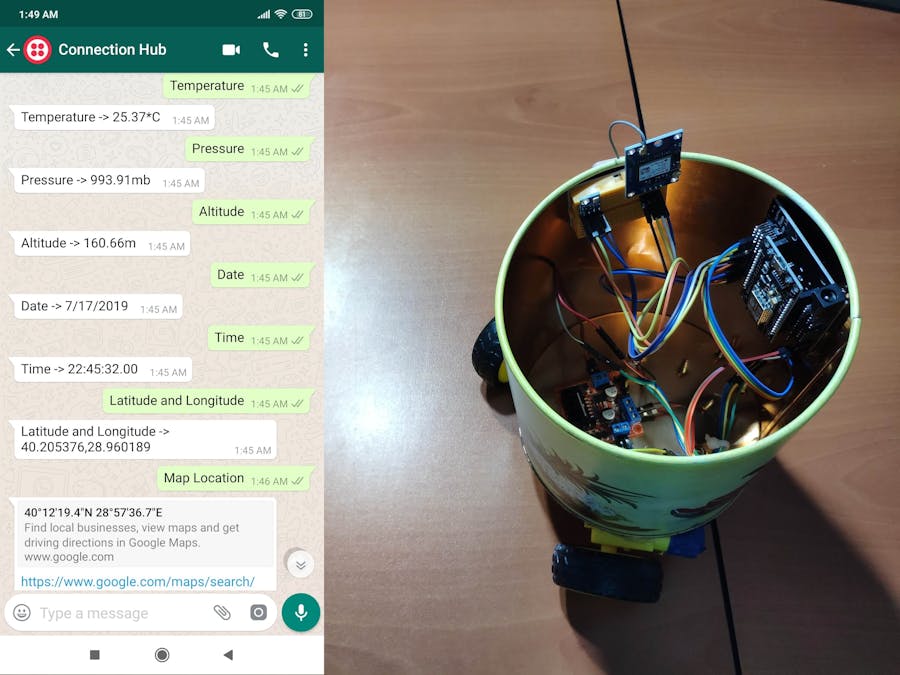
In this project, I wanted to make a remote mapping and weather forecast bot sending temperature, pressure, altitude, latitude, and longitude when requested as WhatsApp response messages and control the base by giving commands through WhatsApp. To gather data, I decided to use a BMP180 Pressure and Temperature Sensor, and a GY-NEO6MV2 GPS Module and to make the base remote and controllable, I used an L298N Motor Driver and two Wheel and DC Motor Kit along with a ball caster.
Also, you can view the location generated by the GPS module on Google Maps through WhatsApp.
First of all, download the required libraries for Arduino IDE below to continue the following steps.
Required Libraries:
For NodeMCU boards, click here.
For GY-NEO6MV2 GPS Module, click here.
For BMP180 Pressure and Temperature Sensor, click here.
To send WhatsApp messages through Twilio's API, the only thing you need to do is to sign up for a Twilio Trial Account.
After signing up, with your SID and Auth Token, you can use Twilio API for WhatsApp without a charge. As explained on Twilio, you need to join a shared phone number with your phone in order to initiate the API and WhatsApp template messages.
Important: To be able to response WhatsApp messages coming from your verified phone, you must change the default endpoint URL of your Twilio application in the Sandbox with your connection hub path.
For more information and learn how to activate your account, click the link below.
You can sign up to Twilio with my referral code here.
For subscribers of my website, I programmed a web application, named WhatsApp Two-Way Connection Hub, which allows you to response WhatsApp messages coming from a verified phone number by a Twilio application in order to get variables from NodeMCU, or any other device that can make an HTTP Request, as WhatsApp messages and send commands to the device.
This application saves the data coming from the device temporarily into a dedicated MySQL server hence no need to call the current variables from the device every time the data requested by the user. To register variables from the device properly, you must send the variables through an HTTP Request to your unique connection hub path.
Important: To be able to use the application, you must change the default endpoint URL of your Twilio application in the Sandbox with your connection hub path generated with your hedron by TheAmplituhedron API.
When you enter a specific keyword, which you can see below for each data on your dedicated database, on WhatsApp, this application will response that message by sending the requested variable associated with the keyword to your phone or transferring commands to the device.
Data holders in the database: Data_1, Data_2, Data_3, Data_4, Data_5, Data_6, Command
Keywords(pre-defined and integrated):
- Temperature -> Get Data_1
- Pressure -> Get Data_2
- Altitude -> Get Data_3
- Date -> Get Data_4
- Time -> Get Data_5
- Latitude and Longitude -> Get Data_6
- Map Location -> Get Google Maps link using GPS information
- Go Straight -> Send itself as a command to the device
- Go Back -> Send itself as a command to the device
- Go Right -> Send itself as a command to the device
- Go Left -> Send itself as a command to the device
- Halt -> Send itself as a command to the device
- Programmed by
- About
- How r u?
- Further information
- Contact
- Spidey -> Test media transferring
- Batman -> Test media transferring
- Help -> Print all keywords
For more information about this application and getting an auto-generated two-way connection hub, click the link below.
Go to WhatsApp Two-Way Connection Hub.
Reminder: WhatsApp Two-Way Connection Hub is open-source. If you do not want to use TheAmplituhedron instead of localhost or your server in your projects, you can download the source code below and thus specialize the keywords by creating your connection hub application on your server.
But, to manage that, you have to download Twilio PHP Helper Library at your directory from here.
1) Collect date, time, latitude, and longitude information generated by a GY-NEO6MV2 GPS Module.
2) Get temperature, pressure, and altitude from a BMP180 Pressure Sensor.
3) Make an HTTP Get Request to transfer variables to the database and receive the command from the database as a response.
4) Depending on the command, control an L298N Motor Driver.
5) Monitor all processes on the serial monitor.
6) Elicit response messages to display variables saved to the database as requested through WhatsApp or give commands to the device by sending the command on WhatsApp.
NodeMCU GPIO pin connections are well-explained at the code down below. Make hardware connections as depicted on figures below.
I just fastened all components to an old cylindrical metal box by using a hot glue gun and solder some components with a soldering iron.
Note: I used a covered 8-AA battery holder as an external power supply to feed the device and components because it is easily connected with the base shield.
Serial Monitor Demonstration | WhatsApp Mapping and Weather Forecast Chat Bot
Using Keywords | WhatsApp Mapping and Weather Forecast Chat Bot
Field Test | WhatsApp Mapping and Weather Forecast Chat Bot


_3u05Tpwasz.png?auto=compress%2Cformat&w=40&h=40&fit=fillmax&bg=fff&dpr=2)


Comments