

Hardware components | ||||||
 |
| × | 1 | |||
 |
| × | 1 | |||
 |
| × | 3 | |||
 |
| × | 1 | |||
 |
| × | 1 | |||
| × | 1 | ||||
 |
| × | 1 | |||
Software apps and online services | ||||||
 |
| |||||
| ||||||
Hand tools and fabrication machines | ||||||
 |
| |||||
| ||||||
I had been working on a web application which allows the user to send and save form information automatically without needing to perform any action after entering inputs to the form for my website, specialized for sending information to micro-controllers such as NodeMCU(ESP8266).Also, I wanted to create a simple way to read that information with the micro-controller without needing a web server hosted by ESP8266(or any other micro-controller) because creating a web server on ESP8266 to get information from a web page would be so exasperating when you try to implement AJAX or other JavaScript libraries. Most importantly, you have to use port forwarding to access your device from a server other than localhost, and it is complicated and not secure to get information from a web page, for instance, form inputs, via port forwarding especially if you are a beginner to web development or back-end programming.
Nevertheless, you do not have to think about port forwarding or web server to access your device in this project while using my web application named Data Panel because TheAmplituhedron API saves form information to your database via MySQL and sends it to your unique data panel connection path if it detects a change on the web application form which lets you send three different variables – Switch(ON/OFF), Range(integer), Message(string). Hence the fact that you will be able to fetch information from your data panel connection path by only using a WiFi client.
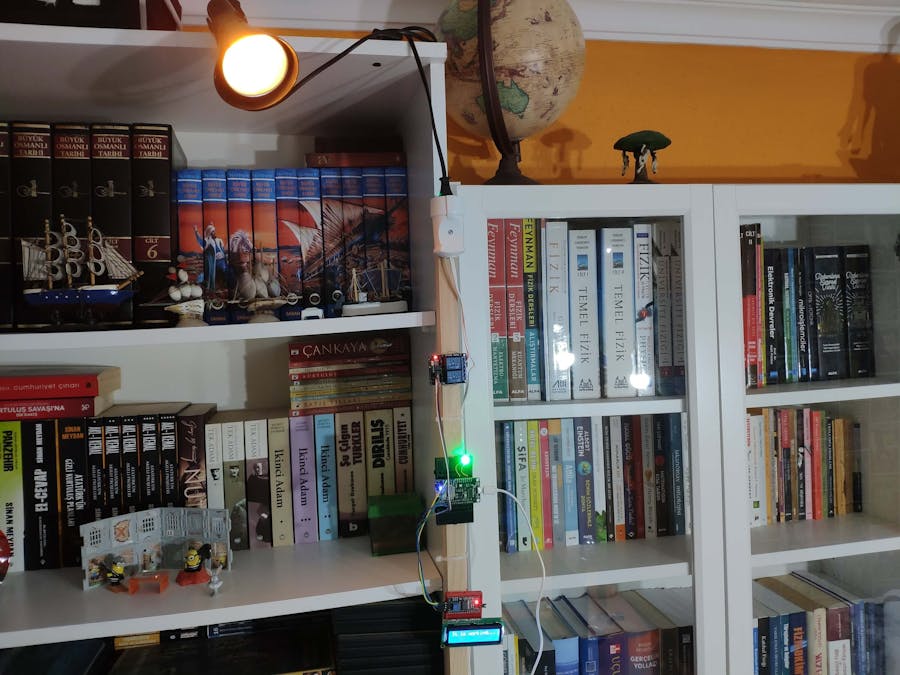
After finishing my web application, I decided to create a data-input-driven control panel which can turn a bookcase light and a LED on/off and display message strings from the response on an I2C LCD screen over the Internet via TheAmplituhedron API by using a NodeMCU(ESP-12E), well-explained below.
Required Libraries:
For NodeMCU, click here.
For I2C LCD screen, click here.
Fetch form information from a web page via NodeMCU WiFi Client through TheAmplituhedron APIFirst of all, to create your unique data panel connection path automatically and be able to access form information through TheAmplituhedron API, click the web application named Data Panel on your dashboard.
Now, you have to connect your page to get your form information by using a WiFi client embedded in ESP8266 libraries as default. It is simple to use and only requires two parameters – a hostname and a port number. But, TheAmplituhedron is protected by SSL so that you need to use WiFiClientSecure instead of the default WiFiClient.
WiFiClientSecure has pretty much the same usage and syntax with WiFiClient; you only need to set an SSL fingerprint to the requested server and use 443 as the port number as depicted on the code below.
client.setFingerprint(fingerprint);
SSL FingerPrint works like an ID card; when you visit a web page that of an SSL protected website, it verifies your connection secure depending on whether you have the fingerprint or not. As a result of that, every browser has a file that contains the SSL fingerprint, mostly known as ThumbPrint.
To get more information about SSL and the current fingerprint for this project, click here
To get a response from your connection page including form information, send an HTTP Get Request to your data panel connection page after setting the SSL fingerprint.
As ESP8266 sends a request to a specific page on a server, the page responds with a string that can be read by ESP8266, including the requested page headers and content. I programmed my web application to send form information into the page content throughTheAmplituhedron API. To separate the headers and the content, use readUntilString() with ‘+’ characters. It gives you only the page content because the page header does not include any ‘+’ character.
client.readStringUntil('+');
TheAmplituhedron API separates each input variable by using a percentage character(%), which allows you to detect and save each input variable on ESP8266.
%Switch%Range%Message%
Unfortunately, there is no easy way to split a string in Arduino IDE aside from detecting each delimiter line index to glean a substring. Therefore, I detect each percentage character as a delimiter and define a substring with the former and the latter to split the response string.
delimiter_1 = readString.indexOf("%", delimiter + 1);
Switch = readString.substring(delimiter + 1, delimiter_1);
By taking these explicit steps, you can save input variables individually and view on the serial monitor as depicted below.
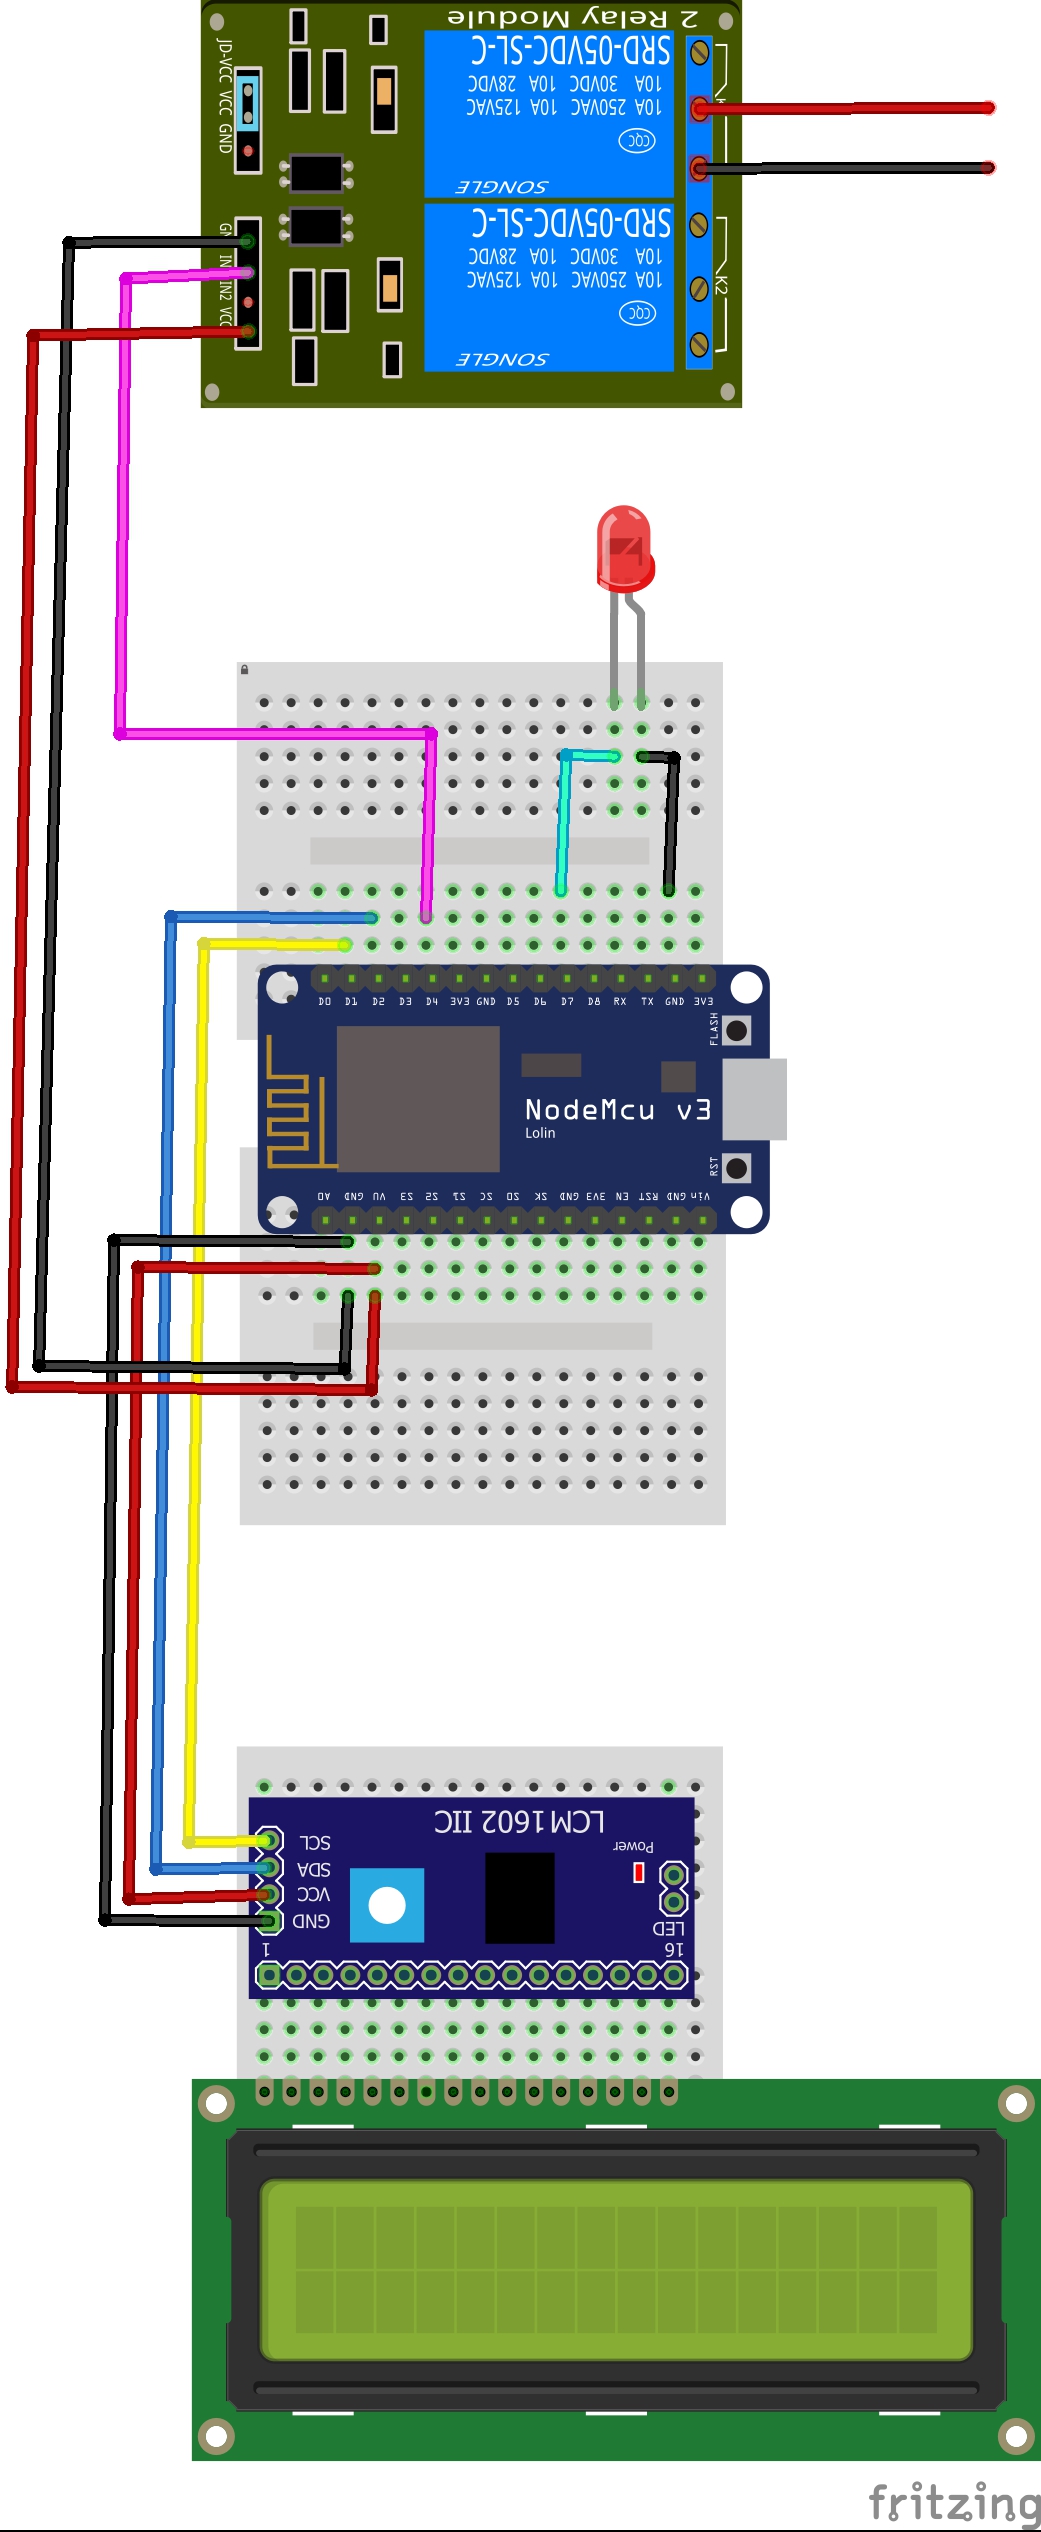
NodeMCU does not have much GPIO pins to spare so using I2C LCD screen is the best option to display message strings.
Include LiquidCrystal_I2C and Wire libraries to initialize the LCD screen by associating I2C address.
Define SDA and SCL pins and connect I2C LCD screen.
Connect all components as explained on the code.
As depicted on the fritzing file, I used the VV pin to feed components with 5V because NodeMCU has 3.3V output as default. But, you can use the VIN pin or another 5V source instead.
For I2C LCD screen, connect the SCL pin to D1 and the SDA pin to D2.
To control the bookcase light, I combine a female connector with a male connector by using a 2-Way Relay.
As the skeleton of the control panel, I used a wooden thick flat stick and attached all components on it by using a hot glue gun and adjustable plastic clamps.
After testing whether it is executing the code properly or not, I fastened the control panel to the bookcase.
You can get three different variables from TheAmplituhedron Data Panel – Switch, Range and Message. Switch is a pre-defined button, which can be ON or OFF. Range is an integer from 0 to 255, which you can use as limit or PWM input. Message is a string up to 100 characters, which you can print as a message, scan for commands or use to create new substrings with the percentage character.
1 - ) Control the bookcase light by using Switch(ON or OFF).
2 - ) If Range is bigger than 135, open the control led, else close the control led. To convert Range to integer, use.toInt() method.
3 - ) Display Message on I2C LCD screen almost instantly.
4 -) Interact with this project over the Internet through TheAmplituhedron API on both mobile and web.
Fetch and Sort Form Information from Web w/ ESP8266
Interact with NodeMCU through TheAmplituhedron API
Project Demonstration Only


_3u05Tpwasz.png?auto=compress%2Cformat&w=40&h=40&fit=fillmax&bg=fff&dpr=2)
Comments