

Hardware components | ||||||
 |
| × | 1 | |||
 |
| × | 1 | |||
 |
| × | 1 | |||
 |
| × | 1 | |||
 |
| × | 1 | |||
 |
| × | 2 | |||
 |
| × | 1 | |||
 |
| × | 1 | |||
 |
| × | 1 | |||
 |
| × | 1 | |||
 |
| × | 6 | |||
| × | 4 | ||||
 |
| × | 1 | |||
Software apps and online services | ||||||
 |
| |||||
_4YUDWziWQ8.png?auto=compress%2Cformat&w=48&h=48&fit=fill&bg=ffffff) |
| |||||
Hand tools and fabrication machines | ||||||
 |
| |||||
 |
| |||||
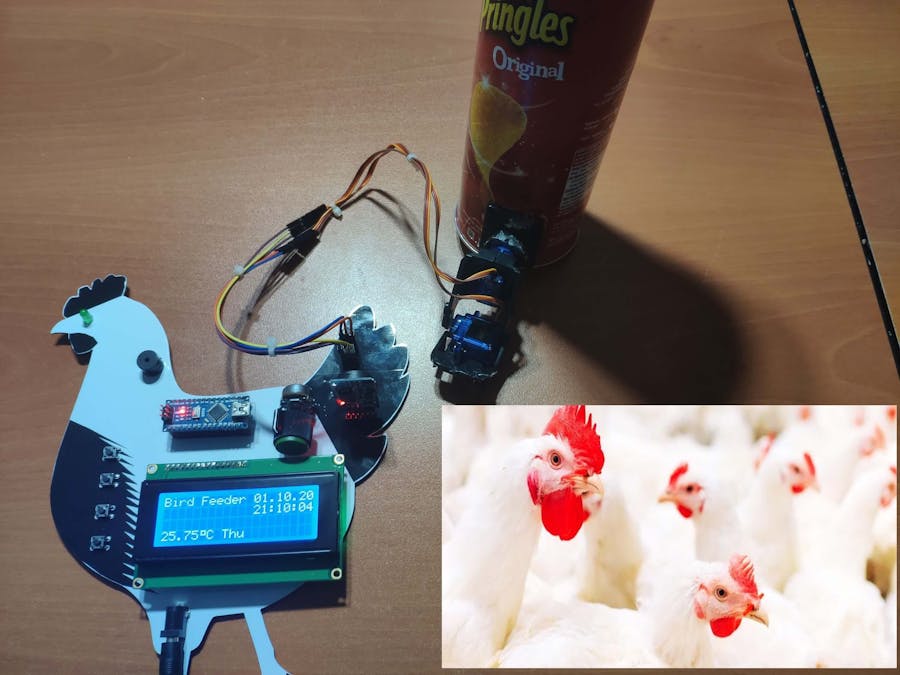
I was keeping quails, chickens, and ducks in my garden before I moved, but it was struggling to manage to feed them in quotidian routine - day-to-day - to accustom them to a new egg production schedule. Also, I was trying to apply sensory preconditioning - repeated simultaneous presentations of two neutral stimuli (sound and light) - while feeding them to improve egg production rate, and it is mandatory to warn the poultry with light and sound while practicing sensory preconditioning. Hence, I had developed a bird feeder with the Arduino Nano as a budget-friendly solution to the problems I had encountered. In this project, I will discuss an enhanced version of my previous bird feeder for those who need a cheap device to practice sensory preconditioning with the poultry.
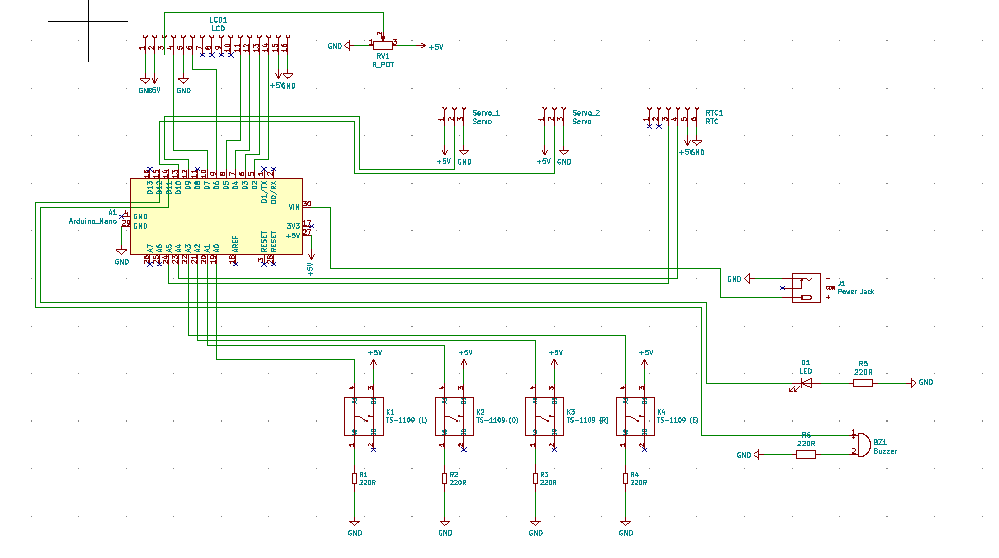
To obtain current time, date, and temperature, I used a DS3231 RTC module.
To create an interface to display the mentioned variables, check the device status, set the feeding time, and monitor the remaining time to the feeding time, I used a 20x4 LCD Screen and pushbuttons.
As the feeding mechanism with the container, I used a Pringles can attached to a mini pan-tilt kit with two servo motors (SG90).
Most importantly and not surprisingly, to apply sensory preconditioning, I added a buzzer and a 5mm green LED to the device, activated in the feeding time.
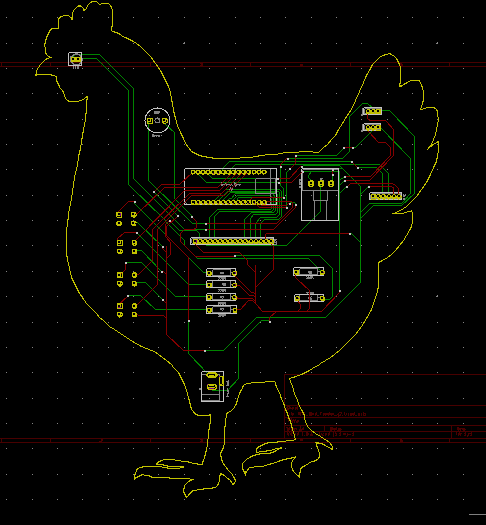
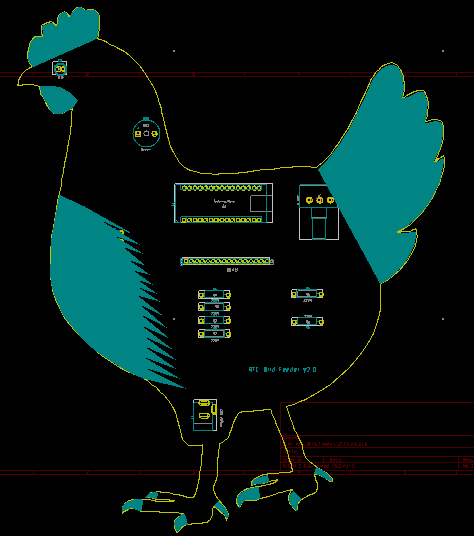
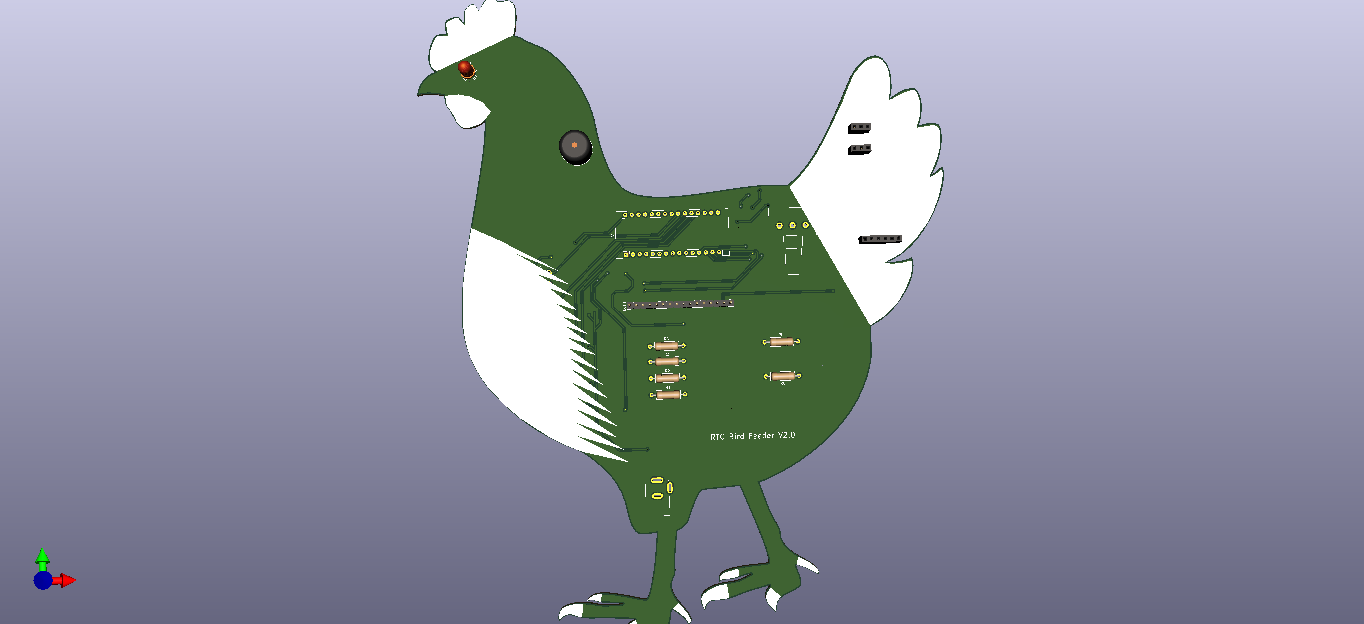
After completing my design on a breadboard and testing the code, I designed a PCB (RTC Bird Feeder V2.0) with a unique chicken shape to create a felicitous and easy-to-use accessory to any chicken coop.
Huge thanks to JLCPCB for sponsoring this project.
I designed the RTC Bird Feeder V2.0 PCB by using KiCad. I attached the Gerber file of the PCB below, so if you want, you can order this PCB from JLCPCB to create a stylish and easy-to-use bird feeder for applying sensory preconditioning to the poultry :)
First of all, by using a soldering iron, I attached headers, 220Ω resistors, 10K potentiometer, the power jack, 5mm green LED, buzzer, and pushbuttons (6x6).
Component list on the PCB:
A1 (Headers for Arduino Nano)
LCD1 (Headers for 20x4 LCD Screen)
RV1 (10K Potentiometer)
Servo_1, Servo_2 (Headers for Servo Motors)
RTC1 (Headers for DS3231)
K1, K2, K3, K4 (6x6 Pushbuttons)
D1 (5mm green LED)
BZ1 (Buzzer)
R1, R2, R3, R4, R5, R6 (220Ω resistors)
J1 (Power Jack)
Download the required libraries to be able to control the modules:
DS3231 RTC Module | Library
- Include the required libraries.
- Define SDA (A4) and SCL (A5) pins.
- Define the LCD screen pins (rs, en, D4, D5, D6, D7).
- Define the servo motors.
- Create LCD characters - clock, X, smile, celsius.
- Define button, buzzer, and LED pins.
- Define menu options and variables to adjust the feeding time.
- Define a time variable to get data from the DS3231 accurately.
- Initiate the LCD screen - 20x4.
- Initiate the RTC module.
- Attach servo motors to PWM pins - D10, D9.
- In the readButtons() function, get data from pushbuttons - Right, OK, Left, Exit.
- In the get_time_rtc() function, get the current time (t) from the DS3231 and set time and date manually if needed.
- In the home_screen() function, display the home screen with Date, Time, Temperature, and DOW variables generated by the DS3231.
- In the set_feeding_time() function, turn the home screen to the feeding time setting screen if the OK button is pressed.
- Adjust the feeding time by either increasing or decreasing variables - feed_Hour and feed_Min.
- Change feed_Hour and feed_Min by pressing Right (min+) or Left (hr+) buttons to adjust the feeding hour in the 24hr format.
- In the get_remaining_time() function, turn the home screen to the remaining time screen if the Left button is pressed.
- Get the remaining time until the given feeding time.
- In the status_check() function, turn the home screen to the status check screen if the Right button is pressed.
- Check whether the feeding mechanism is activated or not.
- In the Feeding_Timer() function, check whether the feeding time is set or not. If so, activate the feeding mechanism (mini pan-tilt) and neutral stimuli (warnings) - 5mm green LED and buzzer - in the given feeding time.
- Wait 10 seconds to turn off the feeding mechanism.
// Connections
// Arduino Nano :
//                                20x4 LCD Screen
// D7 --------------------------- rs
// D6 --------------------------- en
// D5 --------------------------- D4
// D4 --------------------------- D5
// D3 --------------------------- D6
// D2 --------------------------- D7
//                                Servo SG-90 (Joint_1)
// D10 --------------------------
//                                Servo SG-90 (Joint_2)
// D9  --------------------------
//                                DS3231 RTC Module
// SDA (or A4) ------------------ SDA
// SCL (or A5) ------------------ SCL
//                                Buzzer
// D12 -------------------------- +
//                                5mm Green LED
// D11 --------------------------
//                                Right Button
// A3 ---------------------------
//                                OK Button
// A2 ---------------------------
//                                Left Button
// A1 ---------------------------
//                                Exit Button
// A0 ---------------------------
After completing and uploading the code to the Arduino Nano, I attached all required components to the board via headers - Arduino Nano, 20x4 LCD Screen Module, and DS3231 RTC Module.
Then, I assembled the mini pan-tilt kit with two SG-90 servo motors and connected them to the board - Servo_1, Servo_2.
After finishing all connections, I fastened an old Pringles can to the mini pan-tilt kit as the container for the bird food by using screws and a hot glue gun to make joints sturdier.
1) The device displays the date, time, day, and temperature variables on the home screen. It also executes the feeding timer function on the home screen to activate the feeding mechanism within the given feeding time.
2) The device allows the user to select menu options (screens) on the home screen via control buttons:
- OK -> Feeding Time Setting Screen
- Right -> Status Check Screen
- Left -> Get Remaining Time Screen
A. Feeding Time Setting Screen
A.1) In the 24hr format, the device lets the user set the feeding time by adjusting hour (between 0 and 23) and minute (between 0 and 59) separately.
Right -> Minute+
Left -> Hour+
B. Status Check Screen
B.1) If the user did not set the feeding time, the device prints Not Activated.
B.2) Otherwise, the device prints Running and turns on the 5mm green LED.
C. Get Remaining Time Screen
C.1) If the user did not set the feeding time, the device prints Not Activated.
C.2) Conversely, the device evaluates and displays the remaining time to the feeding time.
3) In the feeding time, for 10 seconds, the device:
- Displays Feeding Time!!!,
- Turns on the 5mm green LED,
- Plays a tone with the buzzer,
- Activates the mini pan-tilt to spill the bird food in the container to feed the poultry.


_Ujn5WoVOOu.png?auto=compress%2Cformat&w=40&h=40&fit=fillmax&bg=fff&dpr=2)

_3u05Tpwasz.png?auto=compress%2Cformat&w=40&h=40&fit=fillmax&bg=fff&dpr=2)
Comments