

Hardware components | ||||||
 |
| × | 1 | |||
| × | 1 | ||||
 |
| × | 1 | |||
 |
| × | 1 | |||
 |
| × | 1 | |||
| × | 4 | ||||
Software apps and online services | ||||||
 |
| |||||
| ||||||
| ||||||
Internet of Things is one of the most important topic for today's world. The whole world depends on internet. So, project on Internet of Things seems to be one of the most interesting for all.
This project is a small contribution from my side to the society during this lockdown due to pandemic of COVID-19, as it would help every individual to measure the body temperature anywhere and at anytime as it is much faster than measuring with a thermometer and can monitor ourselves on the basis of previous graph and this system even predicts the temperature in future using Polynomial Regression.
Not only this but it can be used for measuring temperature of all indoor things and things in refrigerator as well.
Also this can be used in large scale industries and significant amount of capital can be saved by sing this low cost but fairly accurate setup. And hence IOT can be used by the workers to keep monitoring the temperatures of machineries, food products, etc.
BUILDING OF PROJECTFirst of all download the required applications:
Telegram
Spyder(for python 3) or any other python 3 applicable application.
Step 1: Download telegram app on yourSteps to sign up and install
- Go to Play Store or App store ad download the telegram App.
- Sign up for a new account by providing your mobile number.
- Telegram will send you OTP to verify your mobile number.
- You will then see a similar screen to the one shown below:
What is a Bot?
Bots are third-party applications that run inside Telegram. Users can interact with bots by sending them messages, commands and requests.
We will be using Bots to send alerts on our channel.
Create a new Bot
Telegram allows us to create a new bot with the help of a bot called as "BotFather". It is a single bot to create and manage other bots.
- On the Home screen of the app, click on the search icon on the top right and type in "botfather".
- Since we need to create a new Bot, go ahead and type in "/newbot" in the window.
- It will ask you to type in few more details like Bot name and Bot username.
When your bot is created successfully, you will be shown a screen similar to the one below and will contain the Bot Token. This token is used to control your Bot as well as send messages on behalf of it. Please keep this token secure as it will allow anyone to access your Bot.
In the screenshot above, the Bot token is "894346529:AAhuJ2XJQy5dlEtLYF0sc0Z_qu0fSqihSSc"
Please save it as telegram_bot_id. The telegram_bot_id is saved as "bot" followed by the bot token. So, in this example, the telegram_bot_id will be "bot894346529:AAhuJ2XJQy5dlEtLYF0sc0Z_qu0fSqihSSc".
- The telegram_bot_id will be used in the python code to send messages. The python code will be taught in the later lessons.
- Also, please be careful when saving the Bot ID. You may get confused between 0 and O, I and 1 etc. as they are similar looking.
- Congratulations, you have created a new Bot. Now, we will need to add it to the channel we have created previously so that we can send alerts.
Add the bot to channel
- From the App home screen, open the channel we have created earlier.
- In the screen, click on the channel name on the top to open the information for the Channel.
*Click on the Administrators button so that we can add the newly created bot to the channel.
*Search for the bot that we have created using the Bot's username. Once you have found the correct Bot click on it to add it to the channel.
*Please make sure you have clicked on the Administrators button in the previous step as this will allow our bot to post to the channel.
*You will be asked to confirm the rights for the bot. Press on the tick mark on the top right to continue adding the bot to the channel.
*Make sure that the bot has the rights to "Post Messages".
*You will now see the newly created Bot in the list of administrators for the channel.
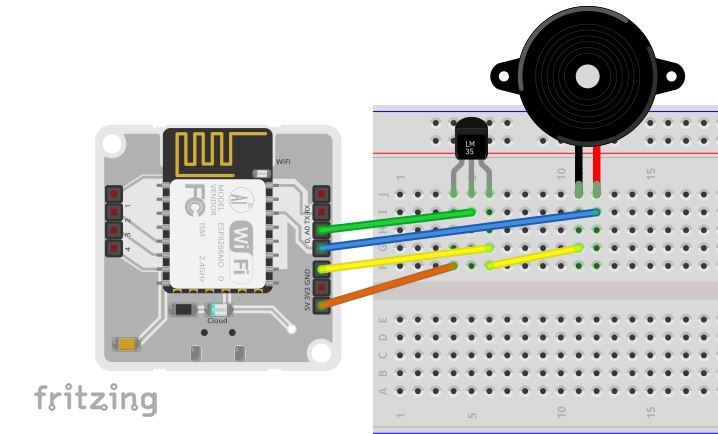
LM 35 and Buzzer connections
- Hold the sensor in a manner such that you can read LM35 written on it.
- In this position, identify the pins of the sensor as VCC, Output and Gnd from your left to right.
- The small pin of the Buzzer must be connected to common Gnd of LM 35 and Long pin should be connected to pin 0 on BOLT device.
- Following pictures will help you with the connections.
In the above images, VCC is connected to the orange wire, Output is connected to the green wire and Gnd is connected to the yellow wire. Using male to male wire connect the 3 pins of the LM35 to the Bolt Wifi Module as follows:
- VCC pin of the LM35 connects to 5v of the Bolt Wifi module.
- Output pin of the LM35 connects to A0 (Analog input pin) of the Bolt Wifi module.
- Gnd pin of the LM35 connects to the Gnd.
Buzzer short pin should be in parallel to yellow wire that is Gnd wire of LM 35 and Long pin is connected to pin 0 on bolt wifi module using blue wire.
- Short pin of buzzer connects yellow pin(Gnd) of LM 35 using breadboard.(refer 2nd fig of this section)
- Long pin(+ve) of buzzer connects pin 0 on Bolt device.
The final circuit should look like the image below:
The code can be basically divided into three major parts. They are:
- Reading values from the Bolt device.
- Comparing the sensor value with the threshold.
- Sending a message via Telegram and beeping of Buzzer if the threshold has been breached.
The above steps are put in a while loop so that it reads the sensor value every 10 seconds and sends the alert if required.
We will be building the system functionally as:
- Reading the sensor value from the device.
- Sending a Telegram message.
- Checking if sensor value is valid and sending a message if it exceeds the threshold.
How this works?
Telegram is a third-party messaging service which is similar to WhatsApp. It is free of cost and simple to use.
Telegram has a feature called as Bots which are just customized applications which you can build in order to send messages to a particular channel or group.
So, if we want to send a message to a channel, we will need to send a request to Telegram instructing the bot to send a message to a particular group.
1.Reading sensor values from the Bolt device
- We will start by creating a new folder.
- Now launch the Spyder IDE and here create a file of name conf.py. It is the configuration file where our configurations variable for Boltiot and telegram are saved.
- Save this conf.py file in the folder created in the first step.
"""Configurations for telegram_alert.py"""
bolt_api_key = "XXXX"                 # This is your Bolt Cloud API Key
device_id = "XXXX"                    # This is the device ID and will be similar to BOLTXXXX where XXXX is some numbers
telegram_chat_id = "@XXXX"            # This is the channel ID of the created Telegram channel. Paste after @ symbol.
telegram_bot_id = "botXXXX"           # This is the bot ID of the created Telegram Bot. Paste after bot text.
threshold = 380 # Threshold beyond which the alert should be sen- bolt_api_key -> This is your API key for the Bolt Cloud. Visit this link to find your API key. Paste the API key inside the double inverted commas.
- device_id -> This is the ID of your Bolt device. It will be something like BOLT12345. Paste the device ID inside the double inverted commas.
- telegram_chat_id -> This is the channel ID which we have got when creating the channel on Telegram. It will be under the permanent link name of the channel. Paste the channel id after the @ symbol. Do not keep any spaces.
- telegram_bot_id -> This is the ID of the Telegram bot we have got when creating the Bot. It will be mentioned under the "BotFather" channel as token. Paste the token after the "bot" text. Do not keep any spaces.
- threshold -> This is the threshold beyond which the alert should be sent. Configure this value to receive alerts accordingly.
Add the configurations to your conf.py file and save it.
Now we will need to create a new python file (eg temperature_alert.py) and save it in the same folder where conf.py file is saved.
Code part: 1
In the above code, we have declared a function `get_sensor_value_from_pin()` which returns the sensor value from the selected pin. In case of any error, it returns -999 which we have declared as an error response.
*( But in late part of code sensor value we have converted to degree celsius so -999 will be converted accordingly and it will be -97.55859375)
2. Send message via telegram
We will need to write a function to send a request to Telegram to send a message to the Telegram channel we have created earlier.
Code part 2:
3. Checking if sensor value is valid and sending a message if it exceeds the threshold.
In this code, we will be comparing the sensor value we have received against our set threshold value to check if the sensor value is a valid one or not and if an alert needs to be sent.
This can be broken down into the following steps -
- Get the sensor value from the Bolt device.
- Check if the sensor value is valid or not.
- Check if the sensor value exceeds the threshold and if a message needs to be sent.
- Wait for 10 seconds.
- Repeat from step 1.
Code Part: 3
NOTE: Full code is attached below.
Running the script*When temperature exceed threshold value a message will be received on your Telegram Channel and the Buzzer will start to beep until temperature is under the threshold value
- Create account on the bolt cloud.
- Create a Product
NOTE: Product name should not contain spaces
- After creating a Product click on the Configure button.
- Then follow the steps shown below.
- Click on save and Link your Bolt device to your Product and click on deploy button.
- You can view your graph after clicking on View this device button.
- After getting atleast 10 points on the plot you can click on the Predict button.
- The similar kind of result will be seen as shown below:


Comments