


Hardware components | ||||||
 |
| × | 1 | |||
| × | 1 | ||||
| × | 1 | ||||
 |
| × | 2 | |||
 |
| × | 2 | |||
 |
| × | 1 | |||
 |
| × | 1 | |||
 |
| × | 1 | |||
 |
| × | 1 | |||
 |
| × | 1 | |||
| × | 1 | ||||
| × | 4 | ||||
| × | 1 | ||||
_ztBMuBhMHo.jpg?auto=compress%2Cformat&w=48&h=48&fit=fill&bg=ffffff) |
| × | 1 | |||
 |
| × | 1 | |||
Software apps and online services | ||||||
 |
| |||||
Hand tools and fabrication machines | ||||||
 |
| |||||
 |
| |||||
 |
| |||||
 |
| |||||
It's a rather detailed (hopefully) description on how to replace a stereo system's volume knob which uses a rotary encoder with a custom board with buttons and Bluetooth connectivity.
IntroductionFor starters, an important note: this project is written with the Panasonic SA-AK45 stereo system in mind (because that's what I worked with), but will work for any other sound system using a rotary encoder for volume control (apart from the system disassembly instructions of course). Note that encoders used by other systems might (but don't have to) have a slightly different signal profile (this can be handled easily by small adjustments in the software - more on that in the appropriate step).
With that out of the way, let's get to the proper intro. Panasonic SA-AK45 is a stereo system from the late 90's which I still have and use mostly as the sound system for my PC. It had a large volume knob in front, but some time ago, unfortunately, it had broken. So I decided to fix it and ended up with a custom button-based volume control with Bluetooth access (more on why I didn't just fix the knob later).
The system comes from an era when digital controls swept the market and replaced analog ones and it is no exception here. The knob doesn't use a potentiometer, but instead, it sits on a rotary encoder (a small device sending digital signals when you rotate it). In case of this system, this particular part is quite unorthodox and it's difficult to find a replacement (not to mention repairing it - these things have TINY parts), so I decided to get rid of it completely, remove the knob and install our custom board with buttons and Bluetooth.
All this must be controlled somehow and we'll use the Attiny85 microcontroller for it, as it's cheap, accessible, pretty small and has just the right amount of resources to do the job. Anyone familiar with Arduino will be able to work with it with no problem.
For Bluetooth communications, we'll use the HC-06 module - it's a quite popular derivative of the ubiquitous HC-05, which differs from it by being cheaper and being able to only work as slave (which is fine for our scenario). Any other module can be used too, with minimal changes in code (see the appropriate step).
FINAL NOTE: Basic soldering/desoldering skills are required.
Now, let's get to it.
Supplies- Panasonic SA-AK45 stereo system (or any sound system with volume controlled by a rotary encoder);
- Attiny85 microcontroller;
- DIP-8 socket (optional - for easy removal of the microcontroller);
- HC-06 Bluetooth module (HC-05 or similar will be fine too but the AT commands controlling it might differ);
- 2 LEDs (might be substituted by resistors if somebody doesn't want the BLING - more on that in a later step);
- 2 tact switches (preferably larger ones, easy to press - these will be our volume control buttons);
- 4 resistors: 100, 1.2k, 2.2k, 100k ohm (or similar values);
- 1 100 nF capacitor;
- 2x2 square PCB female header connector;
- 4 male-male jumper/DuPont wires (20 cm or similar);
- a universal PCB (about 4x6 cm) (or a custom made one, based on the schematics attached in later steps);
- AVR programmer or an Arduino board (to program the Attiny);
- a breadboard and some more DuPont wires for prototyping (optional);
- soldering iron, soldering wire, flux, desoldering pump (optional).
NOTE: if you have a different stereo system than the SA-AK45, the first few steps here won't help you a lot probably, but some aspects of them might be applicable elsewhere, so it's a good idea to at least skim through them.
NOTE 2: it may be a good idea to take pictures as you disassemble your stereo. Especially when it's a different model than mine. Pay special attention to any connections you disconnect or other tricky places.
First, we have to reach the encoder that we'll be replacing. It's soldered on one of the front panel PCBs, dug pretty deep under others, but definitely reachable. It's good to find a Service Manual of the system for reference. These are typically quite easy to find on the web. In our case, we have to reach "E - Operation PCB" - that's where the encoder sits.
This one is pretty straightforward: unplug all the cables from the system and unscrew the top/side cover. It's screwed to the back panel and to the sides of the system (3 screws on each side). Bear in mind that it is latched by 3 thin metal slats to the front panel on top - you have to pull it up to detach it.
Also remove the volume knob, simply by pulling it off the front towards you.
The front is attached to the rest by 3 ribbon cables going from the front panel PCBs to the Main PCB (B). The white thin ones need to be pulled out of the sockets on the Main PCB. Before pulling out the black thicker one, a locking mechanism needs to be lifted on both sides of the connector on the Main PCB, then you can pull it out of the connector.
Another part attaching the front to the back is the CD player/changer on top of the whole thing. It's enough to unscrew it from the back plate of the system - then, after disconnecting the aforementioned cables, the front can be gently detached from the rest (by pulling it away).
The CD changer will still be attached to the front though, which makes things rather unwieldy, so we want to remove it completely.
Step 4: Removing the CD ChangerThe CD changer is connected to the front panel via 2 white ribbon cables going from the front panel to 2 separate PCBs on the changer. Both ribbons can be pulled out from connectors on the changer side (one is hidden beneath a flexible black covering which can be bent out of the way after unscrewing some screws).
After disconnecting the cables from the changer, you have to unscrew it from the 2 beige posts on which it sits on the front panel side. And that's it - we have the front panel completely separated.
The encoder that we want to replace with our custom system sits on the Operation PCB (E), which at this point is hidden under the Panel PCB (G). To reach it, we have to unscrew the Panel PCB.
There are quite a few screws to remove. After doing this, you can carefully lift the Panel PCB. Mind you, that it's still connected to other PCBs via ribbon cables (a small PCB on the front - JOG PCB and the Deck PCB specifically) and via a rigid connector. The rigid connector will disconnect by lifting the PCB straight away from the front (up, when the front lies face down).
The ribbon cable going to the Deck PCB is pretty much undisconnectable, so we can leave it as is. If you prefer to remove the Panel PCB completely to get better access to what lies underneath, you'll have to desolder the ribbon cable connector from the Deck PCB's side, but it's not mandatory. Same goes with the cable going to the JOG PCB (D), but the whole JOG PCB is pretty small and can be detached easily from the front panel (after unscrewing it and lifting a plastic button element that covers the PCB partially) and left to dangle alongside the Panel PCB.
Conveniently, the Operation PCB was attached to the Panel PCB by the sticking out rigid connector that disconnected when we lifted the Panel PCB, so the only step left before we get to the encoder is unscrewing the Operation PCB from the front panel.
In the first picture you can see the end result of the disassembly - the front panel lying face-down and the Operation PCB lying beside it on the left. The Panel PCB stands on the right, still connected to the JOG PCB and Deck PCB by the unremovable ribbon cables, but it's not a big deal at this point.
Our encoder sits on the Operation PCB, next to the beige connector.
We need to desolder our encoder from the Operation PCB, firstly because we want to remove it anyway (and substitute with our custom board), secondly because we want to disassemble it to see what signal it sends (this part is not mandatory - more on this below).
To do this, you need to desolder the 4 signal pins (including the one which is unused) and the 2 mounting pins on the sides. Adding some fresh solder and then removing all solder with a desoldering pump is the technique that worked for me.
To disassemble the encoder, you must straighten the 4 metal flaps keeping the plastic base at the bottom. Then everything will come apart. But I've already done it for you, so you don't have to :-)
In the pictures, you can see the damage to my encoder - a plastic bit, making the rotary contact part smooth on the bottom by filling the space between contacts, broke off and this mangled a thin metal contact attached to the base (attached to the signal A pin), along which the rotary part travels. This in turn completely messed up the output signal parameters/shape.
NOTE: This part is for information purposes only - you don't have to take your encoder apart and analyze it, if you have the same stereo system, because I've already done it. But it would make sense if you have a different stereo with a different encoder.
Basic features of a rotary encoder can be determined by simply rotating it. It can have detents (clicks while being rotated) or no detents (doesn't click). It can be incremental (infinite rotation in both directions), or absolute (finite rotation like a potentiometer). It has a certain resolution (number of signals it sends within one revolution) which can be determined by the number of clicks typically (unless it's clickless...). We can also check what pins it has and read their description from the markings on the PCB.
For us, it's most important to know:
- the type of the encoder (incremental or absolute);
- the resolution (how many increments/decrements per revolution it does);
- the type of signal it sends;
- how it connects to the PCB.
The first thing (type) is trivial to guess - just check if it rotates indefinitely.
The second (resolution) would be easy to know if we had a clicking one, but this one unfortunately doesn't click.
The type of signal and connection are related to each other. Typically these incremental encoders send so called "quadrature" signal using 3 pins: A, B and GND. It's no different in our case, although it also has a 4th unused pin for some reason (which makes finding a fitting replacement really hard...). The way it works, is that it connects A, B or nothing to GND in a cycle. In one direction it's "A, B, nothing, A, B, nothing" and so on, in the opposite direction it's: "B, A, nothing, B, A, nothing" and so on. Hence the controller of the system knows in which direction we're rotating it, and can register each increment/decrement (each "A, B, nothing" or "B, A, nothing" cycle). With most encoders the A and B signals overlap for a small period (between just A and just B there is a period when both are connected to GND - see the attached signal diagram). I don't know how important this overlap is to the operation of this particular system's controller, but I tried to recreate our encoder's signal as accurately as possible.
So what do we know by looking and rotating the encoder?
- it's incremental;
- it's clickless (so we don't know the resolution);
- it sends a quadrature signal (we don't know about the overlap of A and B or resolution though);
- it connects via 4 pins, one of which is unused and three are typical for incremental quadrature encoders: A, B, GND.
We need to determine the resolution (how many "A, B, nothing" or "B, A, nothing" cycles per revolution it sends) and specifics of the signal (if A and B overlap and how much).
The resolution is not that essential for us. It's useful to know how long we want the cycles to be, so that a continuous press of a button increases/decreases the volume at a convenient speed, but this can be determined experimentally by adjusting timings in our software. The shape of the signal (basically the amount of overlap between A and B, which is the only unknown here) might also be non-critical, but let's try to replicate it correctly. To know these things, we must look at the inner parts of the encoder, and, conveniently, it's already disassembled at this point.
When you look at the rotating part, you can count the contacts on its bottom. You'll see that there are 24 contacts of each type, which means a resolution of 24 PPR. The most important information though, is that we can infer the signal shape by looking at the rotary part. See the attached picture. There are 3 main sections in each cycle and one such cycle is marked by red lines in the picture. You can see that there is very little or no overlap between A and B. This tells us how to simulate the signal using a microcontroller - if we send simple cycles of "A, B, nothing" or "B, A, nothing" depending on direction, the thing should work (it seems that we don't need to generate a period of A and B connected to GND simultaneously within the cycle).
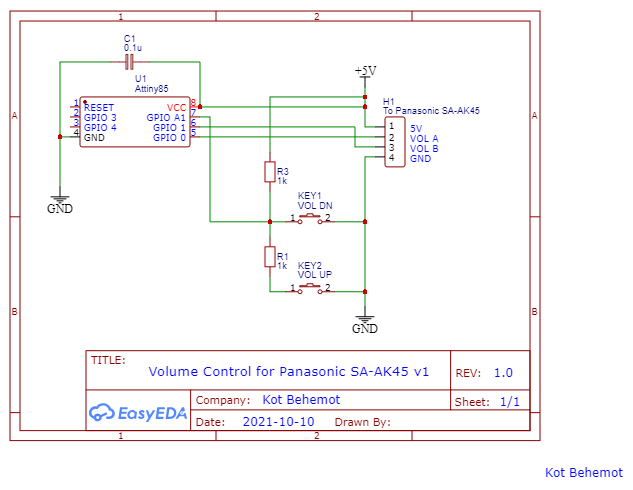
Step 9: Designing the Board to Substitute the Encoder - a Simple SolutionLet's start off with a simple solution with just 2 buttons to substitute the encoder (one button for "volume down" and another for "volume up").
Let's try to determine how many GPIO pins on the Attiny this would require. 2 for the output (A and B "encoder" signals for volume control) and 2 for input (1 for each button) - 4 altogether. But can we decrease this number?
Remember, that we're planning to add a Bluetooth module and this requires 2 GPIO pins (1 for serial input and 1 for serial output), but we only have a total of 5 pins on our disposal (and we already assigned 4 of them). But there's good news. We can connect the 2 buttons to one pin only. How? Using the fact that Attiny has analog inputs. If we connect the buttons via a voltage divider cleverly, the input will register a different voltage for the 3 states that interest us: no button pressed, "volume down" button pressed, "volume up button pressed". Hurrah, we now have 2 free pins left for the Bluetooth module.
But how are we going to power this thing? The answer is simple, the stereo's PCBs use 5V logic which is, conveniently, compatible with the Attiny. We just have to find the 5V line somewhere on the system's boards (we already know where GND is by looking at the encoder's connections). So in the end, we must connect to 4 signals in the stereo system: 5V rail, GND, vol A, vol B.
Let's see what we have in the schematic attached:
- a voltage divider with 2 buttons, between GPIO A1 (GPIO 2 configured as analog input) and GND;
- encoder signal A on GPIO 0;
- encoder signal B on GPIO 1;
- a 4-pin header for connecting to the stereo;
- a decoupling capacitor placed as close to the 5V and GND pins of the microcontroller as possible, to ensure its stable operation.
The principles of operation should be as follows:
- buttons:
- when none is pressed, we should register 5V (or close to 1024 value) on the A1 pin,
- when "volume down" is pressed we should register 0V (or close to 0) on the A1 pin as it's now shorted to GND,
- when "volume up" is pressed we should register about 2, 5V (or close 512) on the A1 pin, as now the current flows through the voltage divider;
- signals:
- when no buttons are pressed (around 1024 value on A1), we should set both GPIO 0 and GPIO 1 to HIGH and keep it that way (or LOW - it doesn't matter much at which part of the cycle we're "frozen" as long as it's not changing);
- when "volume up" is pressed (around 512 value on A1) we should send a cycle of: GPIO 0 LOW for "some time" (connecting vol A to GND), then HIGH and immediately GPIO 1 LOW for "some time" (connecting vol B to GND), then immediately both HIGH for "some time" (connecting none to GND), then repeat;
- "volume down" should work the same as above, just with GPIO 0 LOW and GPIO 1 LOW sections reversed;
- "some time" in the above cycles should be determined experimentally (I eventually settled on 80 ms, so 1 whole cycle takes 240 ms but you're free to tweak it).
This should do the trick and allow us to control the volume. It's as simple as it gets, so let's improve on it now.
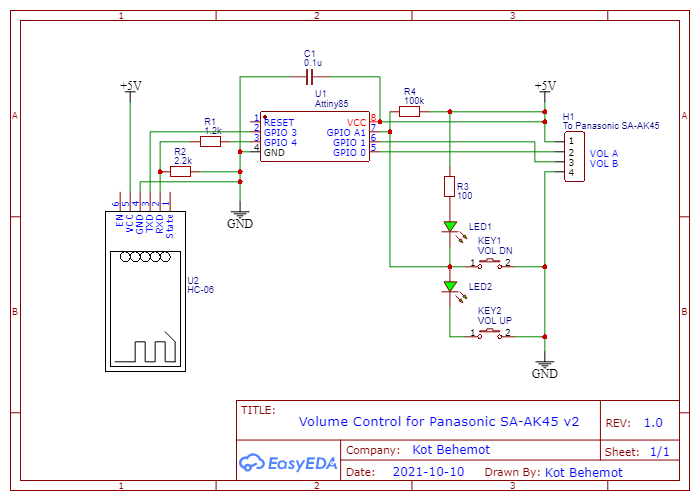
Step 10: The Ultimate Board DesignFirst: the Bluetooth module. Explaining BT module's operation is out of the scope of this instruction, but it's been covered in many great tutorials and is quite simple. Basically, we have to connect it via 2 pins acting as UART (serial) connection, using the SoftwareSerial Arduino library (which can set any GPIO pins as serial). Then we have to receive signals (ASCII characters/bytes) from the module and depending on what character/byte we receive, increase or decrease the volume using the principles described in the previous step.
There's one more obstacle to overcome with the BT module though. It can be powered by our 5V line, but its signal lines are designed for 3, 3V logic. Some people use it with 5V but it's not recommended and might damage it in the long run. So what do we do? We could use a logic level converter but that would be quite bulky and a bit overengineered for our simple case. In fact, the only pin we have to worry about is the Rx on the BT module, as it receives signals from the Attiny, and these mustn't exceed 3, 3V. The Tx is fine because Attiny will register the 3, 3V level that the module sets as HIGH.
So how do we limit the voltage on HC-06's Rx? Using another voltage divider of course. Let's slap a 1, 2k ohm resistor before it and 2, 2k between it and GND and we'll have our desired approx. 3, 3V logic level.
But what if we wanted to add some BLING on top of that? Shiny LEDs maybe? We have no unused GPIO pins left unfortunately, but there are other ways. One way would be to connect some LEDs in parallel to the A and B signals, but I decided it would be quite boring, so why not go another way? What if we based our button voltage divider on LEDs instead of resistors? This will work too, because a LED guarantees a voltage drop. We still have to add a resistor to limit the current on the LEDs, but such voltage divider will work nevertheless, and be quite similar to the one based on resistors.
So we end up with:
- connecting the Bluetooth module to GPIO 3 and 4 for serial communication and to the 5V and GND for power;
- adding 2 resistors as a voltage divider on HC-06 Rx pin, so it receives the correct voltage (around 3, 3V instead of 5V normal for our circuit);
- remaking the button voltage divider with LEDs for added BLING! (1 resistor to limit the current + 2 LEDs as the divider + 1 100k ohm resistor as a pull-up for the situation when no buttons are pressed - this is necessary due to the nature of the LEDs - without it the 5V A1 state could be unstable).
See the schematic attached. This is our complete enhanced custom volume control unit. Now it's time to program the Attiny and build it.
Step 11: Preparing the Connection on the Stereo's SideTo be able to test our solutions, we have to make it possible to connect our prototypes and final contraption to the stereo system. I used 4 male-to-male DuPont/jumper wires for this purpose. I soldered 3 of them to the appropriate pin holes on the Operation PCB meant for the encoder (A, B, GND) and the 4th to a 5V supply line on the Panel PCB. I identified the 5V line by looking at some schematics in the Service Manual (attached in an earlier step) and by making sure where it connects using the continuity mode on my multimeter. I tried to pick a convenient spot, close to the rest of the wires and the volume knob opening in the front panel. For reference, see the pictures attached.
To program the Attiny, you'll need an AVR programmer or an Arduino Board (e.g. Arduino Uno) which can be used as a programmer. You'll also need the Arduino software/IDE with Attiny core/library installed. You could probably use other solutions like PlatformIO too, but I haven't tried it with this project.
Again, Attiny programming with Arduino is out of the scope of this instruction (although, I'm planning to create one on this very topic), but let's quickly sum up how I've done it:
- install Arduino IDE (if you don't already have it): https://www.arduino.cc/en/software;
- install Attiny core (I used the one from here: https://github.com/SpenceKonde/ATTinyCore, it has its own documentation on how to configure and use it);
- upload the "Arduino as ISP" sketch to the Arduino (which will be used as programmer for the Attiny) - the sketch is available in "Examples";
- setup the Attiny core's settings (I set it up like in the image attached, Attiny 85, no bootloader, Arduino as ISP);
- connect the Attiny to the Arduino, like here: https://create.arduino.cc/projecthub/arjun/programming-attiny85-with-arduino-uno-afb829(note that this tutorial is quite old and lists a different Attiny core library for Arduino ISP - this one will probably work too, but I recommend the one from Github, linked above, as it's newer and has more configuration options);
- load my Arduino sketch (attached below) and upload it to the Attiny using the "Upload" function in Arduino IDE (and modify it if you will).
See the attached script for comments. It should be pretty self-explanatory.
NOTE: the code assumes that '1' character sent to the BT module will raise the volume and '2' will decrease it. It's compatible with the "arrow keys section" of the testing mobile app that I mention in the next step.
NOTE 2: the BT module is configured using so called AT commands. In the code there is just one of them called (in the initial BT setup), to set the module's name with which it advertises itself to other devices (to "dupa1"). You are free to change the name or use other commands to set a higher baud rate for connection, or a different password than the default "1234". Bear in mind that for some of these, you have to reset the module to see the effect! Also they don't have to be called on every boot - it would be enough to call them just once, AFAIK. You can find some instructions on the AT commands on module's configuration here: https://www.instructables.com/AT-command-mode-of-HC-05-Bluetooth-module/
Step 13: Testing the Solution - a Note on PrototypingAt this point we should probably make a prototype of our contraption and see if it works. For initial prototyping, I used a regular Arduino Uno (for convenience) and a breadboard on which I put all the parts and connections from the schematic. The only change in the code I needed to make was changing the pin numbers like this:
//vol
#define VOL_A 2
#define VOL_B 3
#define BTNS A0
//BT
#define RxD 4
#define TxD 5
I also initialized a serial connection and used the Arduino serial monitor to debug various portions of the code. Bear in mind though, that when you add Serial.print() commands within the volume up/down routines, you can affect the timing of the signals and thus the experience with the volume buttons (I made that mistake).
NOTE: when testing with an Arduino board connected to your PC via USB and to the stereo at the same time, make sure to make common ground between the Arduino and the stereo. In case of such a "double powered" system, there might be some additional noise in the speakers - ignore it - it will be gone when the microcontroller is independent and connected to the stereo only.
In the pictures attached you can see some prototypes connected to the stereo (both with the Arduino Uno and Attiny).
To test (and use) the Bluetooth control you need some application on your phone (or other device). I used this one: https://play.google.com/store/apps/details?id=com.broxcode.arduinobluetoothfree&hl=en&gl=US. I use the "arrow keys" module (arrows up and down) to send '1' and '2' characters to the BT module which will raise or decrease the volume accordingly. You can, of course, change the code to use any other characters or messages if you like.
There are plenty other similar universal mobile apps available to test the connection. You can also make your own, but this is out of the scope of this instruction.
When you have a 100% working prototype on the Arduino, you should program the Attiny accordingly and test it, still on a breadboard before soldering the final contraption. This step is very important - make sure it works with the Attiny, on the target system's power only, fully independent from the Arduino board.
Step 14: Assemble the Stereo Back TogetherWhen your prototype works to a point where you're sure that all 4 wires are connected to the stereo system correctly (you have 5V, GND and can change the volume), you can reassemble the system and leave the wires dangling out of the volume knob hole on the front panel. This will be all you need for the rest of the steps.
To reassemble the system just reverse the steps from before. Put the Panel PCB back in place, remembering to be gentle and to reconnect the rigid connector to the Operation PCB. Reattach all the ribbon cables by pushing them in the appropriate connectors and remember about the locking mechanism on connector for the black ribbon leading to the Main PCB. Also remember about all the screws on the PCBs and the case.
Step 15: Making the Final Working Board, Some Ideas for ImprovementAt this point you should have:
- a 100% working prototype, with the code uploaded onto the Attiny, and tested with it connected to the system and all the components, using a breadboard (or you're just confident that you programmed it right in the first go :-) );
- the stereo system reassembled.
Now you can get to soldering. For this purpose I used a universal PCB, but you can do it your way - etch one yourself or even order a professionally made one via JLCPCB or the like if you have the skills to design it (I only made the simple schematics attached so can't help you with this one).
In the pictures attached you can see the final contraption as I made it. I like the raw look on the front panel of my stereo, but if you like things more neat and tidy, you could make it on 2 PCBs - one hidden inside the case, with the microcontroller, BT module and other bits there, and one exposed on the front panel, with just the buttons and LEDs (maybe even cut to the shape of the knob hole and pushed inside it). Putting custom 3D-printed buttons on top of it would be extra-pro.
Note that I soldered a few single-pin headers around my board to act as guides/mounting points for putting the PCB on the front panel. After some tinkering they squeeze tightly into the volume knob hole and hold the whole thing quite firmly in place.
That's all for today folks, I hoped you liked my first ever project here. Cheers!
A simple variant of the volume control (without LEDs and Bluetooth)


Comments