

Hardware components | ||||||
_ztBMuBhMHo.jpg?auto=compress%2Cformat&w=48&h=48&fit=fill&bg=ffffff) |
| × | 1 | |||
 |
| × | 1 | |||
| × | 1 | ||||
 |
| × | 3 | |||
 |
| × | 1 | |||
 |
| × | 1 | |||
 |
| × | 1 | |||
| × | 1 | ||||
 |
| × | 3 | |||
| × | 1 | ||||
 |
| × | 1 | |||
Hand tools and fabrication machines | ||||||
 |
| |||||
 |
| |||||
 |
| |||||
What's it all about? Well, I was doing some programming and prototyping with the Attiny85 for my other project and figured out, that doing it all on a breadboard is rather tedious, compared to using a dedicated Arduino board. I had to build a programming breadboard (connected to Arduino UNO configured as a programmer), build my prototype and move the Attiny back and forth between the 2 boards to test various iterations of my software.
So I decided to make a little more efficient solution to help myself with further projects. And thus a little board was born. It combines some ideas from this tutorial: https://create.arduino.cc/projecthub/arjun/programming-attiny85-with-arduino-uno-afb829 and from various people on Reddit and Facebook (thanks guys!). The main features are:
- works as a hat for Arduino UNO (very easy to connect & disconnect);
- allows for live code uploading to the Attiny, thanks to the "ArduinoISP" sketch;
- has some status diodes to help the programming;
- allows for prototyping without the need to remove the Attiny from the board (a continuous upload-and-test workflow), thanks to a header that extends all the pins of the housed Attiny;
- allows to reset the Attiny.
Building it is pretty easy, so let's get to it!
Supplies- a universal board (at least 3x7 cm) or a dedicated PCB;
- 3 LEDs (LED1-3);
- 1 tact switch (KEY1);
- 1 10μF capacitor (C1);
- 1 0.1μF capacitor (C2);
- 1 DIP-8 socket (under U1);
- 1 8-pin female header connector (or 2x 4-pin) (H1);
- 3 330 ohm resistors (R1-3);
- breakaway male header connector (at least 12 pins);
- a breadboard and some more DuPont wires for prototyping (optional);
- soldering iron, soldering wire, flux, desoldering pump (optional);
- Arduino IDE (or other similar platform);
- additionally: Arduino Uno & Attiny85 (without them the board is quite useless :-) ).
NOTE: If you feel confident you may skip this step and get right to soldering, then return to Step 2. But still, please read the general advice below to make the connections right.
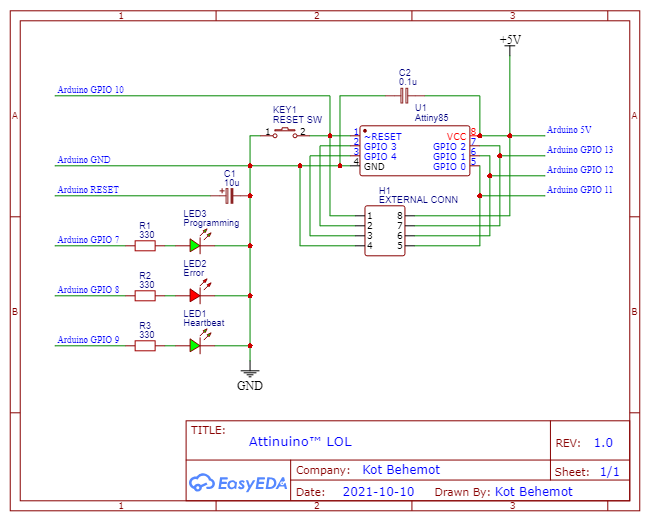
See the attached schematic. Try and build it all on a breadboard first to make sure you got all the connections right and it works. Remember that the RESET pin on Attiny85 is active low, so you have to connect it to the ground to do a reset.
Note the C1 capacitor between Arduino's RESET pin and GND. It's necessary to avoid resets of the Arduino each time you upload a program to the Attiny (Arduino resets are not needed as you're no longer programming the Arduino - at that point it works as the programmer).
Remember to wire the DIP-8 socket meant to house the Attiny (U1) the correct way (the notched part should be on the same side as pin 1). Nothing bad will happen if you do it the other way round, but the notch helps to remember how to orient the Attiny chip when inserting it.
Also make sure, that each pin on the extension header (H1) is connected to the corresponding pin on the U1 socket, so that it's easy to determine which leg of the Attiny is connected to which header pin.
Step 2: Prepare the Arduino IDENOTE: This tutorial assumes that you're using the Arduino IDE. If you prefer other platforms, like PlatformIO, you have to find out how to prepare it for the Attiny85 by yourself (I'm sure it's possible but I've never tried it myself).
To be able to use Arduino UNO as an Attiny85 programmer you need to install an appropriate "core"/library for your Arduino IDE. As opposed to the tutorial mentioned in the Introduction, I suggest using this one: https://github.com/SpenceKonde/ATTinyCore, as it's newer and actively developed (and has more options). On the linked page, you can find the installation instructions: https://github.com/SpenceKonde/ATTinyCore/blob/master/Installation.md (I suggest the method with Boards Manager, as it's very straightforward).
When you have your Attiny core installed in Arduino IDE, you have to configure it. There are multiple possibilities (e.g. you could use an external clock for the Attiny), but you can check the attached picture for the most basic config (the "board" and "chip" parts are especially important). It assumes that you prefer using your Attiny without a bootloader, which is completely fine as you'll have a dedicated board to reprogram it easily, but you can change that option if you want.
Now we're ready to program the Attiny.
Step 3: Prepare Your Arduino UNONow you need to prepare your Arduino UNO to work as an Attiny programmer. Conveniently, there's a ready sketch for that, right in "Examples": "ArduinoISP". Upload this sketch to your Arduino UNO as you normally would with any other sketch.
Step 4: Do Your First Test Upload to the Attiny85Now we're ready for some proper testing:
- we have our prototype on a breadboard (or the final board if you skipped from Step 1 to soldering);
- the Arduino IDE is ready for programming the Attiny;
- your Arduino UNO board has the ArduinoISP sketch loaded.
If you have a brand new Attiny, you have to "burn the bootloader" first. It's a necessary step even if you don't plan to use any bootloader, as it sets some internal config in the Attiny, specifically the clock rate (by default it could be set to 1 MHz, not 8 or whatever you chose in the options).
To do this:
- put the Attiny85 in its dedicated socket (mind the correct orientation - pin 1. should connect to the appropriate pin on the socket, aligning with the socket's notch if you wired it correctly);
- connect the Attinyuino™ prototype to the appropriate Arduino Uno GPIO pins (if you haven't done this yet);
- connect your Arduino UNO to your PC - now, when the UNO board is powered, you should see the heartbeat LED (LED1) on the Attinyuino™ pulse gently;
- set the appropriate COM port in Arduino IDE (if it's not already set);
- make sure that the IDE options are set to the desired values (see Step 2.);
- hit "Burn bootloader".
Now, after the IDE is finished with the "burning", and if everything went fine, your Attiny should be ready for use.
At this point we can upload some code:
- open a sample sketch (if you use the "Blink" example, remember to replace "LED_BUILTIN" with the GPIO pin number you want to use with a LED - e.g. 0 - to avoid confusion);
- hit upload - this should result in the LED3 on your Attinyuino™ prototype blinking while the program is being uploaded;
- after it finishes, your Attiny should already be executing the sketch you uploaded.
To test the uploaded code, simply use the Attiny pin extension header (H1) to connect it to the desired peripherals (in case of the "Blink" example connect a resistor (e.g. 330 ohm) and a LED in series between the appropriate Attiny GPIO pin and GND).
If everything was done correctly, you should see the Attiny executing the uploaded sketch. In the picture attached, you can see the finished board (not a prototype) housing a freshly programmed Attiny, connected to a breadboard and executing the "Blink" prototype. With a breadboard prototype of Attinyuino™, you should be able to achieve the same result at this point.
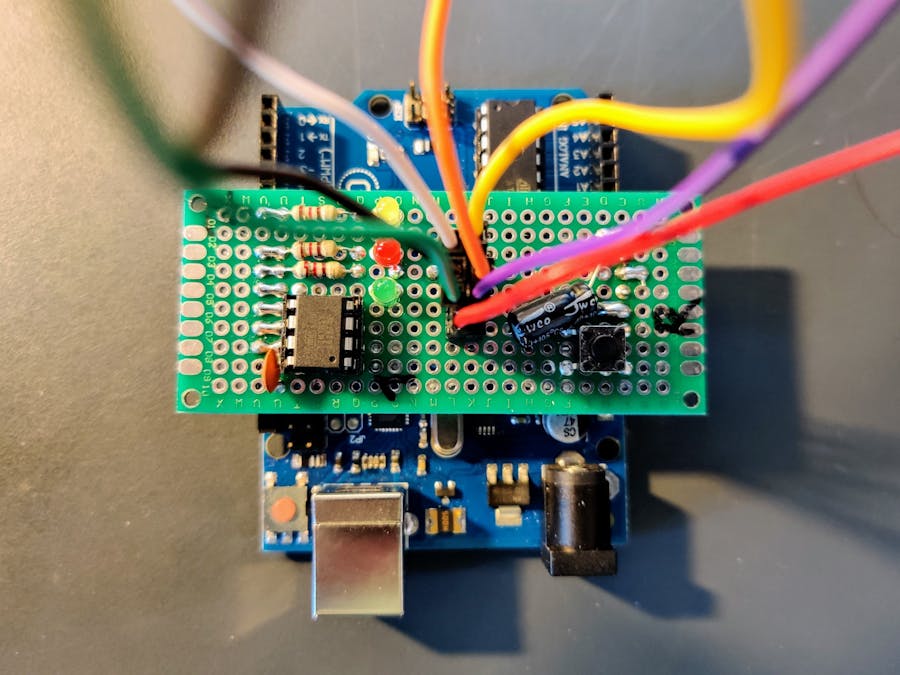
Step 5: Soldering Time!NOTE: Even if you skipped Step 1, before you get to the soldering, please read the general advice about various connections from Step 1, to avoid mistakes.
Now it's time to solder all parts, accordingly with the schematic from Step 1. Start with breaking off appropriate bits of the male breakaway header that will connect your hat to the Arduino. There should be a sole pin to connect with Arduino GPIO 7, a row of 6 pins for GPIO 8-13, and a row of 5 pins for the RESET-GND bit of the POWER section opposite to the rest.
PRO TIP: When you have your male pins prepared, insert them into the appropriate sockets on your Arduino UNO, and place the universal board on top. Solder the pins to the universal board in place like this. This way you'll avoid some bad angles that would prevent you from inserting your hat easily into the Arduino. It's especially important as the opposite sockets on the Arduino don't exactly match up and there's that awkward space between GPIO 7 and 8, so everything SHOULD be skewed a little bit!
I put the board together in 3 steps, doing tests in between. I started with a simple working part, that only allows to program the Attiny (just the socket with basic wiring and Arduino-RESET-disabling-cap). Then I added the status LEDs with resistors, and finally the RESET button, decoupling capacitor and extension header.
If you're here because you skipped Step 1, please proceed to Step 2 now. Otherwise, go to the next step and have fun!
Step 6: Have Fun!Now, if you've done everything correctly, you should have your board ready to be used.
You can see a sample usage in the pictures below. There's my stereo system with a custom volume control module (if you're interested in making something like this, I described it here: https://create.arduino.cc/projecthub/kot_behemot53/bluetooth-volume-control-for-an-old-stereo-with-buttons-ba33f0).
The Attiny85 that runs the volume module was removed from its socket on the module and placed on the Attinyuino™. The Attinyuino™ pin extension header connects to the board on the stereo in place of the Attiny itself, so the Attiny can still control it, even when placed on our development board. It's also connected to an external BlueTooth module on a breadboard and to the PC, so code can be uploaded to the Attiny at any moment and tested live both on the stereo system and the external BT module, without removing anything.
If you've done something wrong, when trying to burn the bootloader or program the Attiny, you might be getting this:
Yikes! Invalid device signature
In such case, check all the connections and make sure the IDE options are set as in Step 2. And don't be a knob like me - make sure you inserted the Attiny into its socket correctly (see the picture attached) :)
That's all for today folks! I hope you liked it :)


Comments