


Hardware components | ||||||
 |
| × | 1 | |||
 |
| × | 1 | |||
| × | 1 | ||||
 |
| × | 1 | |||
Software apps and online services | ||||||
| ||||||
Hand tools and fabrication machines | ||||||
| ||||||
| ||||||
This project is the next in the series to demonstrate usage of SIM-based cryptographic services to improve security of IoT devices.
The first project demostrated telemetry data encryption while delivering messages from IoT device to a server. It was "TLS 1.3 for Arduino Nano".
The second project "Zero Touch Provisioning based on TLS 1.3" was intended to show Device Deployent or in other words configuration of the device at the first power up. The project also demonstrated permanent secure control of a device by means of periodical requests of control parameters from a server.
Now the SIM interface functions of both projects were combined into the library PodEnoSim which is available from Arduino Library Manager and provides the more simpler way for IoT developers to start with the technology.
To load the library find Tools item from the IDE main menu and select Manage Libraries... In the search field type PodEnoSim and push Install button.
During library installation you may asked about missed dependencies.
Push Install all button to be sure everything will work correctly.
The library was tested on two different microcontrollers:
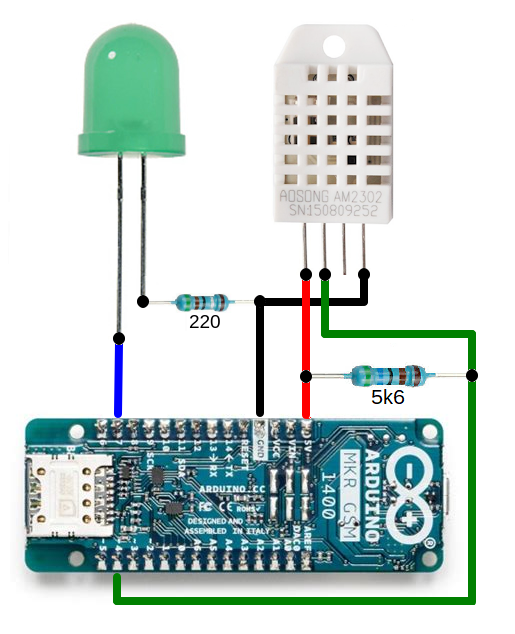
- SAMD21 with u-blox SARA-U201 modem (MKR GSM 1400 board)
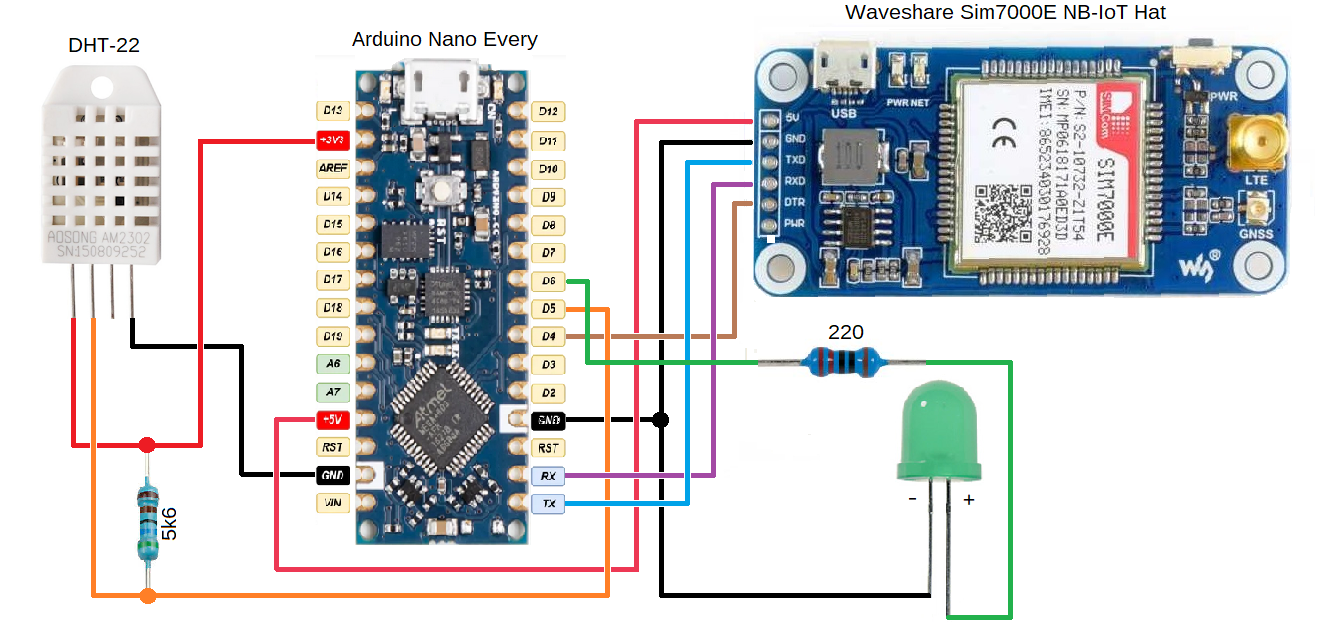
- ATMega4809 with Sim7000E modem (Arduino Nano Every board with Waveshare NB-IoT Hat).
The next examples are provided for each board:
- send data to server in authenticated and encrypted way (
SIM2CloudEncryption-DHT22)
- get configuration or control parameters from a server in authenticated and encrypted way (
ZeroTouchProvisioning-LEDExternal).
There are 2 additional examples for the MKR GSM 1400 board which allow to explore the technology without any additional hardware - just a simulation of data source (SIM2CloudEncryption) and control from the server the state of the built-in LED (ZeroTouchProvisioning-LEDInternal).
Lets go throught the simplest example - SIM2CloudEncryption. All you need to test it - Arduino MKR GSM 1400 board and Pod ENO SIM.
To load an example find File item from the IDE main menu and select Examples then navigate down till section ExamplesfromCustomLibraries and find the name of the libray PodEnoSim. Choose Arduino-MKR-GSM-1400 and SIM2CloudEncryption and you 'll get the demo scetch.
The scetch simultes (hardcoded) "sensitive" information which you need to send to a server. It is a JSON-encoded message: {"temperature":21.5}. It is encoded as DATA_ITEM constant. As you would like to change it please don't forget to update the LEN_DATA constant accordingly.
The setup() functions includes 4 steps to prepare for data sending:
- method
init()is called with MODEM_BAUD_RATE parameter to initialize serial interface to the modem;
- method
waitForModemStart()is called to wait until the modem becomes responsive to the AT commands;
- method
waitForNetworkRegistration()is called to wait until the modem be able to open data channel to the server;
- method
deviceIdSet()is used to provide SIM with unique device identifier.
The loop() function may include some code for getting the data and formatting it. The most interesting part is the request to send encrypted data to a server will look as simple as
byte res = enosim.dataSend(dataBuffer, dataLength);
So you could enforce your project with TLS1.3 encryption by adding just one line of code in the main loop!
Control and simulationThe open source client tool written in python3 may be used to control Pre-Shared keys, upload device configurations and analyze data downloaded be devices. It also provide possibility to simulate SIM sessions to upload test data and download configurations.
To install the tool, clone the repository enosim-cli and execute
cd enosim-cli
python3
To use the tool you shall request from Pod the next secrets:
- TLSPROXY_KEYENC
- API_USER
- API_PASS
- SIM_KEY
The best way to use is put all of the secrets into config.yml file in the iotsim-cli folder.
The DEVICE_ID shall be also configured in advance. For simulation it may be any value but for real usage the value shall be unique along all your devices used.
You could simulate a device, for example a carbon dioxide sensor, by sending data with the command
python3 enosim-cli simulate stc -j '{"co2": 340}'
you 'll get the next messages
2021-06-30 13:03:13,093 - enosim - INFO - TLS1.3-PSK session established. Initialising operation.
2021-06-30 13:03:15,856 - enosim - INFO - b'{"co2":340,"iccid":"98xxxxxxxxxxxxxxxxxx","deviceid":"deb001deb002deb003"}'
The last line is the response from the server to confirm the data was received correctly.
Now you could get the data from the server
python3 enosim-cli device getdata
and see the server response like this
2021-06-30 13:16:04,373 - enosim - INFO - [
 {
   "sim_attribute_update_id": 507,
   "iccid": "89xxxxxxxxxxxxxxxx",
   "deviceid": "deb001deb002deb003",
   "createdAt": "2021-06-30",
   "updatedAt": "2021-06-30",
   "sim_attributes": [
     {
       "id": 679,
       "sim_attribute_update_id": 507,
       "key": "co2",
       "value": "340",
       "createdAt": "2021-06-30",
       "updatedAt": "2021-06-30"
     }
   ]
 }
]
ThePSK in the SIM and in the server may be updated to user specified value. To set new value '404142434445464748494a4b4c4d4e4f' as the PSK in the SIM and to upload it to the server setup a PCSC reader, insert the SIM into the reader and use the next command
python3 enosim-cli
The tool allows to discover technology deeply and debug your own server application or bridge to an IoT platform.


Comments