


Hardware components | ||||||
_MsQPLY30wm.png?auto=compress%2Cformat&w=48&h=48&fit=fill&bg=ffffff) |
| × | 1 | |||
 |
| × | 1 | |||
| × | 1 | ||||
| × | 1 | ||||
| × | 1 | ||||
| × | 1 | ||||
Software apps and online services | ||||||
 |
| |||||
Hand tools and fabrication machines | ||||||
 |
| |||||
When I moved to another city, I decided to keep my small apartment so I could occasionally visit my hometown and stay for a week or so. To ease my concerns about its condition while I was away, I installed several WiFi cameras throughout the place.
I also had a storage room in the basement that my Wi-Fi router couldn't reach. Once, while I was there, I thought it would be useful to receive at least one picture from the storage room each day. This way, I could stay aware of any potential issues within a reasonable timeframe.
MotivationWhile it's possible to find a decent 4G off-grid camera that can take pictures, none of them satisfied my needs. I wanted an open platform, both hardware and software, that I could modify according to my specific use case. So I decided to build my own.
DesignSimple and plain. What can be simpler than a cylinder?
The default holder allows the camera to rotate 360°, and the arms are firm enough to keep the camera at a fixed angle.
The enclosure is accessible from both sides. Since the camera is intended for indoor and outdoor use, I added rubber seals between the caps and the enclosure. Right now, the caps are held in place just by friction. But I'm thinking of adding threading, like on some jars.
The parts were printed on a Prusa FDM 3D printer. STL files can be found in the attachments.
The holder features a 1/4-20 UNC socket and can be mounted on a camera tripod:
Electronics consist of four off-the-shelf boards and a small manually soldered addition (to couple a light sensor with the Witty Pi board).
Raspberry Pi Zero 2 W - main board;
Raspberry Pi Camera Module 3 - captures images;
Witty Pi4 L3V7 - controls power cycles and battery charging;
Clipper LTE Mini HAT - 4G modem;
TSL2591 - ambient light sensor.
Unfortunately, Witty and Clipper boards cannot be used together because they share the same pins on the RPi connector for different functions. Therefore, some light rewiring of the Witty board is necessary.
Witty Pi 4 L3V7 modificationsIn parentheses, the pin numbers are given as they are enumerated on the standard Raspberry Pi 40-pin header.:
BCM GPIO 14 (pin 8) ---> BCM GPIO 13 (pin 33) --- blue wire
BCM GPIO 6 (pin 31) ---> BCM GPIO 19 (pin 35) --- white wire
BCM GPIO 4 (pin 7) ---> BCM GPIO 26 (pin 37) --- yellow wire
The original three traces must be cut. Refer to the red circles in the image below.
The board doesn't need any rewiring, but the SMA connector and the two buttons have been removed since they aren't needed. This also allows mounting the Witty board on top of the Clipper, resulting in a very compact overall assembly (rubber bands are just holding the battery in place for the photoshoot; they are not a part of the design).
To remove the buttons I used hot air (the buttons are fragile so they most likely will be destroyed in the process).
To remove the SMA connector, I used a hand drill to carefully drill out all five legs. I selected a drill bit slightly smaller than the vias' diameter to preserve them, since they will be needed later for soldering an antenna cable.
The EEMB 3.7V LiPo battery (3700 mAh) is used. Be careful with connector polarity! The battery’s connector has the opposite polarity from what the Witty board’s socket expects. This is not an issue for the camera design, however, because I removed the connector from the board (to save space) and soldered it via wires in an orientation that matches the battery connector.
TSL2591 - Ambient light sensorA light sensor is needed to prevent the camera from waking up in the dark and wake it up when there is light. My use case is to record images every three hours, but only when a room is lit, which happens at arbitrary times. So the logic for the camera is:
- Wake up
- Take an image if there is light, otherwise sleep until light
- Sleep until the next event (either timeout or light)
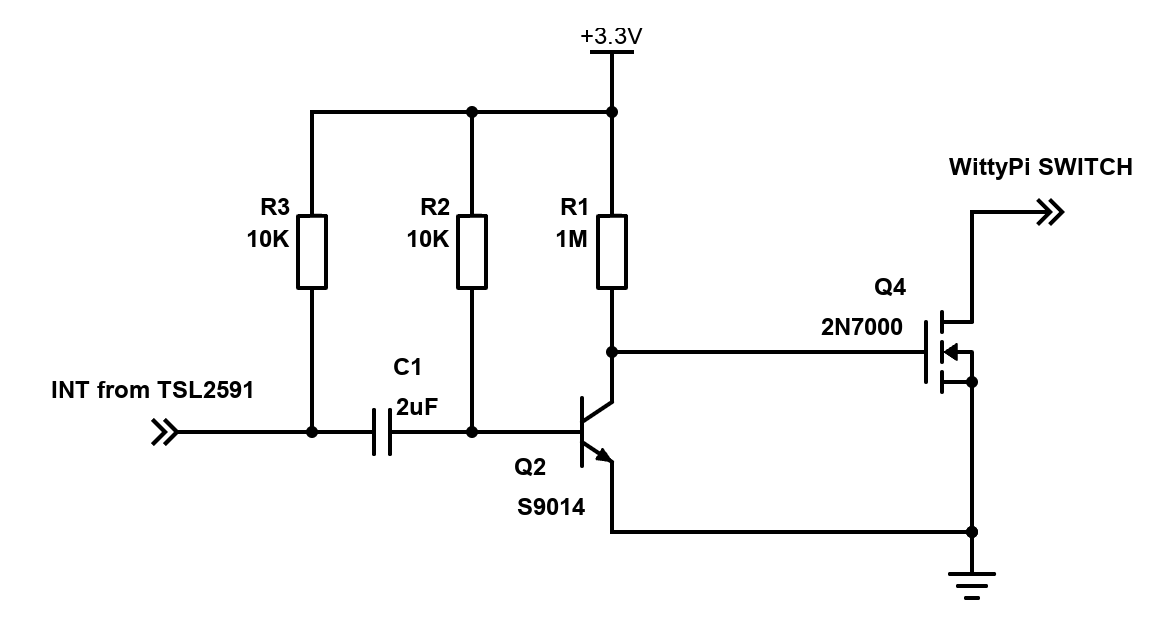
To achieve this logic, the interrupt output of the TSL2591 sensor is used. However, since it is an open-drain output that goes low when the interrupt is active, and the Witty board expects a short negative pulse, we need a conversion circuit between them.
For now, I simply soldered discrete components (according to the schematic shown below) onto a small piece of a prototype board, which you can see on the right side in the pictures above.
To set up a 4G modem, I followed the instructions on the Pimoroni website.
I don't use Witty Pi software because I don't need most of its functionality. Instead, I write directly to configuration registers over I2C to set up the next wake-up alarm. They have a detailed description of the registers in their manual.
Standard Raspberry Pi OS runs on the Raspberry Pi Zero 2 W board. An application that takes images and sends them via MQTT is based on the Raspberry Pi rpicam-apps demo applications. The source code is hosted on GitHub.
To store and view images, I use my mini open-source IoT platform. However, since the camera simply sends MQTT messages, it is easy to integrate it with any system that features an MQTT broker.


Comments