

Hardware components | ||||||
| × | 1 | ||||
| × | 1 | ||||
| × | 1 | ||||
| × | 1 | ||||
Software apps and online services | ||||||
 |
| |||||
Hand tools and fabrication machines | ||||||
 |
| |||||
 |
| |||||
 |
| |||||
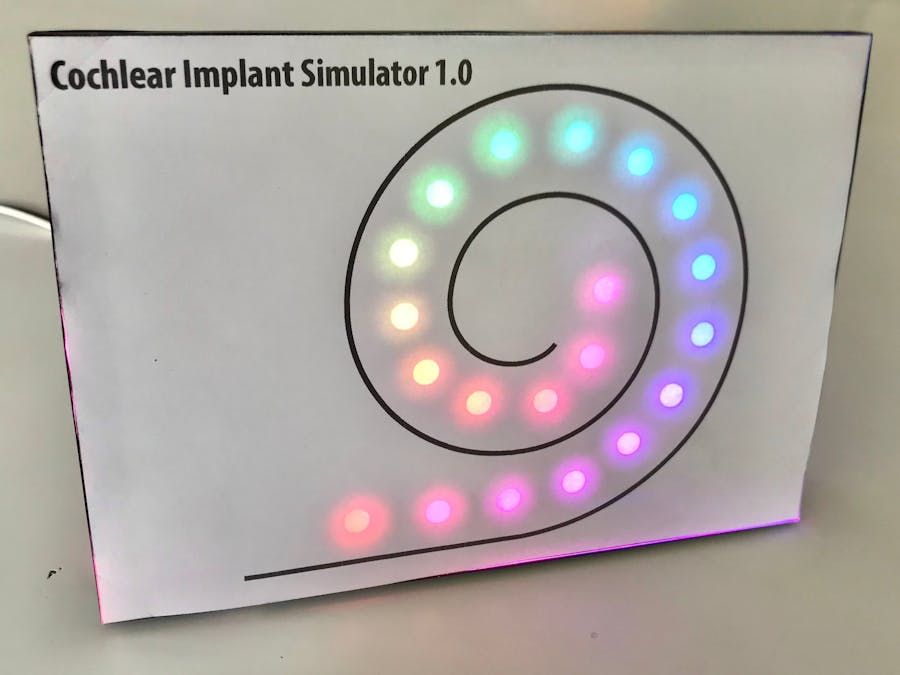
Goal of this project is to create awareness for the cochlear implant as a hearing solution for people with a moderate to profound hearing loss. Furthermore it is a nice exercise to learn about Arduino, audio sampling, FFT processing and addressable LED strips.
The algorithm implemented is designed to show nice visuals under different noise conditions and different type of microphones. It is by no means a representation of the algorithms as implemented by the different cochlear implant manufactures.
When people receive a cochlear implant an electrode is surgically placed in the cochlea. The electrode has a number of contacts representing the different audio frequencies like the keys on a piano. When current is driven at the electrode on the base of the cochlear a high-pitched sound is perceived by the user. Current driven more to the centre of the cochlea sounds lower in tone.
In this project a microphone picks up the sound. A fast Arduino microcontroller reads in 128 samples and does a frequency analysis using an FFT algorithm. The resulting 128 bins are grouped into 20 bark bands. Some automatic scaling is implemented to be less sensitive to background noise and to cater for different microphones. A threshold is used to only light-up the LEDs representing the loudest bands.
To sample at a decent rate and do the processing a fast Arduino board is used. The Wemos D1 mini is very cheap (2 euro) and does a good job. Typically this Arduino board is used for wifi-enabled applications but for now this feature is not used in this project. By optimizing the code I managed to sample sound at 10 kHz and update the LEDs 35 times per second. Sampling at 10 kHz results in sound up to 5 kHz being analysed.
Instructions- Connect the microphone and LED strip to the Arduino board
- Program the board using the Arduino IDE
- Test the functioning
- Prepare the display
- Use the template to drill the holes for the LEDs
- Glue in the LED strip
- Glue the base to the front board
- Glue the Arduino and microphone
- Print the front sheet and tape
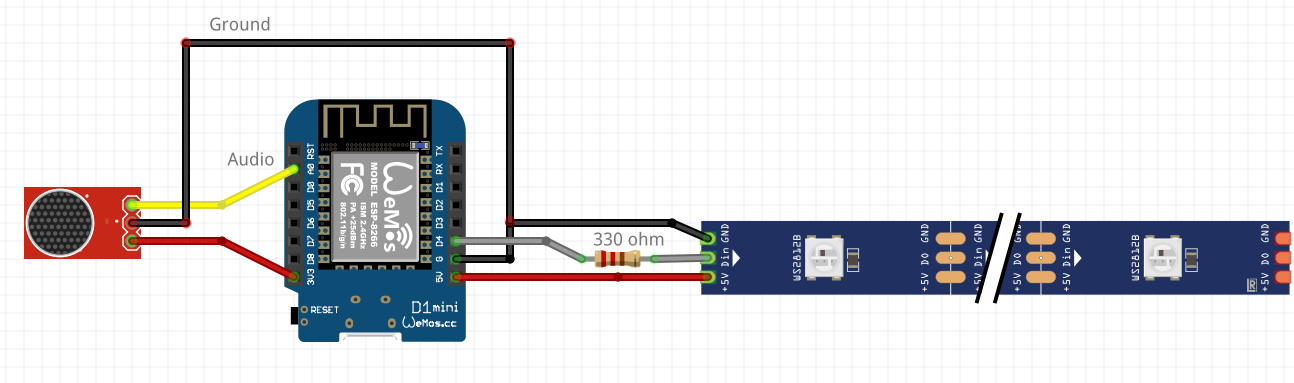
Connect the microphoneboard and LED strip to the Arduino board
The Wemos D1 provides 2 voltages: 3.3 V and 5 V.
The 5V is used to power the LED strip. Supplying the microphone of the 3.3 V provides some separation from the noise caused by the current drawn by the LED on the 5V supply.
Several microphone boards can be found when you search the different online stores. Make sure you buy one with integrated op-amp. These typically have 3 connections (VCC, GND and out). Some microphones are sold with a comparator that only provides a on/off signal when sound is above a certain threshold. Don't use that one.
The microphone analogue out is connected to the only analogue input on the Wemos board : A0.
Cut the LED strip to 20 LEDs, counting from DATA IN arrow pointing into the LED strip.
The LED strip digital in is driven from D4. In code D4 this is PIN 2.
Use a 330 Ohm series resistor.
To use the Wemos board with your Arduino IDE the correct board manager has to be installed.
You need to install the following libraries: arduinoFTT and Adafruit Neopixel.
Board settings:
Upload the code onto the board and test.
The code consists of the following parts :
- At start-up an animation is shown
- 128 samples are read from the analogue input
- FFT is calculated
- FFT bins are grouped into 20 bark bands
- At start-up initial scalers are calculated per band
- Scalers per band slowly adapt to get all bands around the value of 100
- A bark average is calculated
- The LEDs for which the bark band level is above a certain threshold are powered
- Read the next 128 samples
A 10 mm thick A5 sized plexiglass is used. I ordered a 21 x 21 cm board that I cut in two parts. One A5 size for the front panel (21 cm x 14, 8 cm) and one strip (21 cm x 6 cm) for the bottom part.
Find a drill template in the attachments on the bottom of this page. You need to drill holes that are at least 7 mm diameter. Use a 7 or more common 8 mm drill.
Fold the LED strip as shown below to help placing the individual LEDs in the holes. Besides removing the paper strip that exposes the glue, also the glue-foil can be removed, which makes handling the LED strip easier.
Use a hot glue gun to glue the LEDs one by one in the holes.
Put glue around the hole, then press the LEDs in the hot glue. Use a tool to hold the strip down not to burn your fingers.
Follow the spiral, make sure to start from the outside and end with the connecting wires in the middle.
Glue the bottom panel and front panel in an angle together.
Glue the Arduino board and the microphone on to the bottom panel.
Print and place the front page onto the front panel using tape on the sides.
Put black tape around the plexiglass board.
Add an analogue low pass filter between the microphone and the Arduino. Since the AD samples at 10 kHz audio frequencies above 5 kHz result in aliasing artifacts. By implementing a filter we can avoid that these frequencies get into the AD.
Different color schemes might look nicer.
Different audio processing might look better.
Since the Wemos D1 mini Arduino board has wifi, control using a smartphone can be implemented. Or even control over the internet.
All ideas for improvement welcome!
Cheers,
Koen


Comments