/*
Author: students JOMA secundair Merksem and K. Kuypers
Contact: kathleen.kuypers@gmail.com or kkuypers@jomasecundair.be
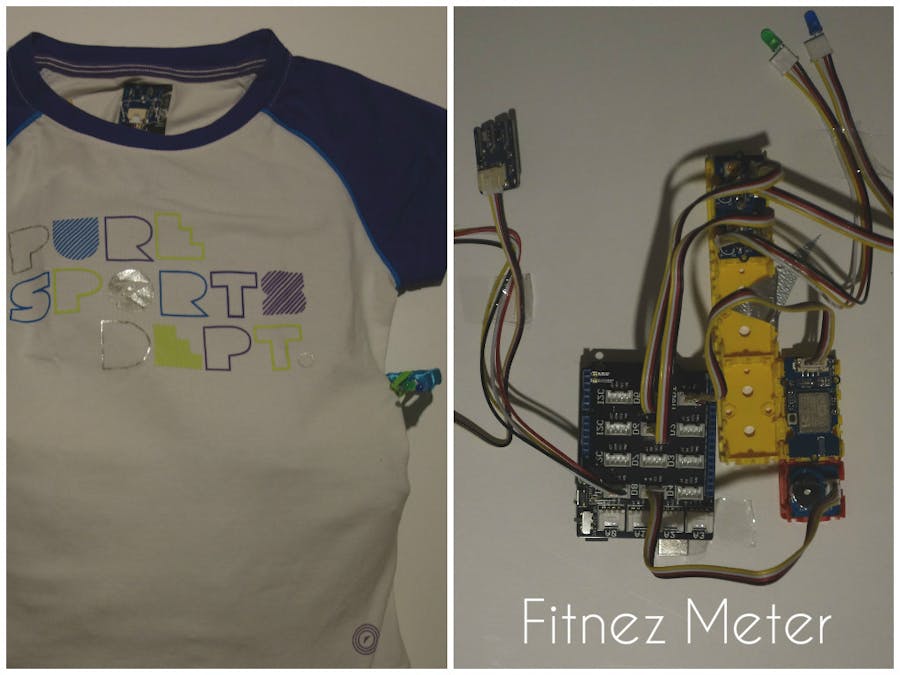
Arduino UART Demo Sketch. This Sketch is made for an Genuino 101 IoT board with a Grove
UART WiFi module based on the popular ESP8266 IoT SoC to communicate to the AllThingsTalk
IoT developer cloud.
The Grove UART WiFi module has firmware installed which includes the ATT_IOT library. It
communicates through Serial1 of the Genuino 101 board.
Version 1.0 dd 19/03/2016
This sketch is an example sketch to deploy the Grove TPH (temperature, pressure, humidity)
sensor (114990245) to the AllThingsTalk IoT developer cloud.
### Instructions
1. Setup the Arduino hardware
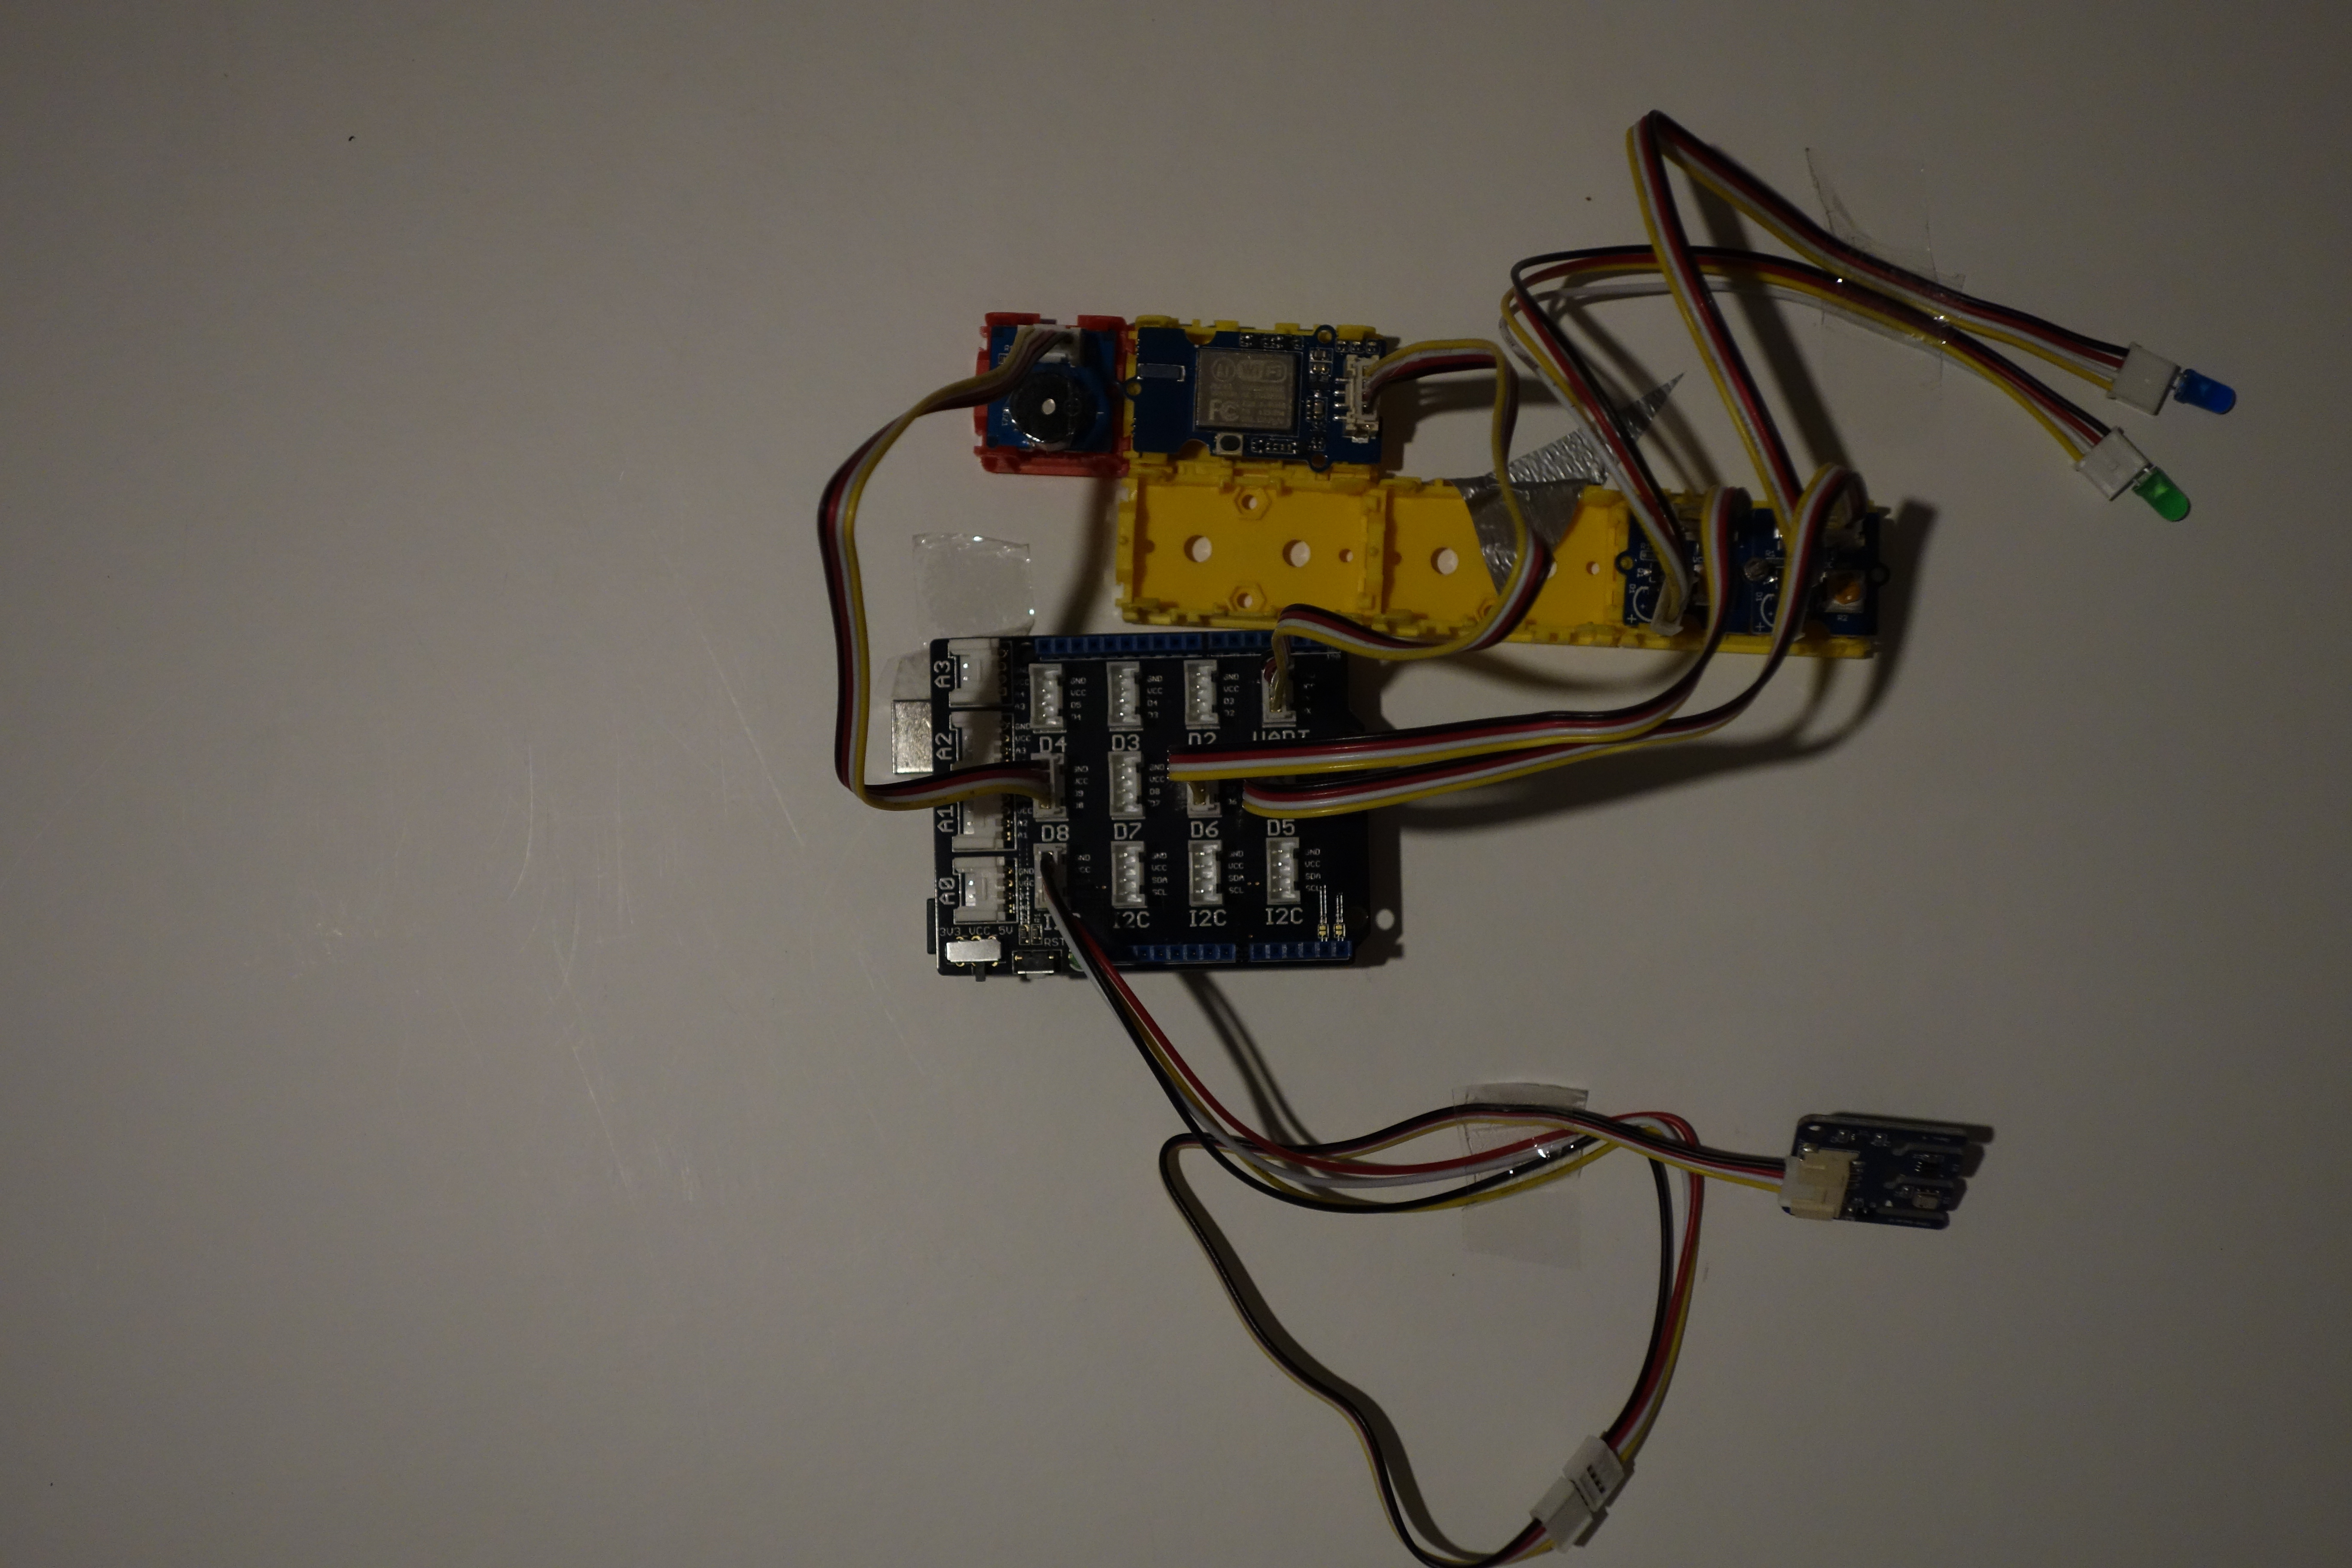
- Use an Arduino Genuino 101 IoT board
- Connect the Arduino Grove shield, make sure the switch is set to 5V
- Connect USB cable to your computer
- Connect a Grove TPH board to pin I2C of the Arduino shield
- Grove UART wifi to pin UART (D0,D1)
- Connect a Grove Buzzer actuator to pin D8 of the Arduino shield
- Connect a Grove Green Led actuator sensor to pin D6 of the Arduino shield
- Connect a Grove Green Led actuator sensor to pin D5 of the Arduino shield
2. Add 'ATT_IOT_UART' library to your Arduino Environment
More info can be found at http://arduino.cc/en/Guide/Libraries
3. Fill in the missing strings (deviceId, clientId and clientKey) in the keys.h file
4. Optionally, change sensor names, labels as appropiate
5. Upload the sketch
Note: for use of extra actuators, extend the callback function at the end of the sketch
*/
#include "ATT_IOT_UART.h" // AllThingsTalk Arduino UART IoT library
#include <SPI.h> // Required to have support for signed/unsigned long type.
#include "keys.h" // Keep all your personal account information in a seperate file
#include <Sodaq_TPH.h>
ATTDevice Device(&Serial1);
char httpServer[] = "api.smartliving.io"; // HTTP API Server host
char mqttServer[] = "broker.smartliving.io"; // MQTT Server Address
//****************************************************************
//** PIN numbers
//****************************************************************
#define temperatureId 0
#define buzzerId 8
#define greenLedId 6
#define blueLedId 5
#define messageBoardId 9 //to communicate with sportsman
// Required for the device
void callback(int pin, String& value);
//****************************************************************
//** setup
//****************************************************************
void setup()
{
Serial.begin(57600); // Init serial link for debugging
while(!Serial && millis() < 1000); // Make sure you see all output on the monitor. After 1 sec, it will skip this step, so that the board can also work without being connected to a pc
Serial.println("Starting sketch");
Serial1.begin(115200); // Init serial link for WiFi module
while(!Serial1);
while(!Device.StartWifi())
Serial.println("Retrying...");
while(!Device.Init(DEVICEID, CLIENTID, CLIENTKEY)) // If we can't succeed to initialize and set the device credentials, there is no point to continue
Serial.println("Retrying...");
while(!Device.Connect(httpServer)) // Connect the device with the AllThingsTalk IOT developer cloud. No point to continue if we can't succeed at this
Serial.println("Retrying");
//*** Add assets to the smartliving IOT cloud
Device.AddAsset(temperatureId, "TEMPERATURE", "temperature", false, "{\"type\": \"number\", \"minimum\": -40, \"maximum\": 85, \"unit\": \"°\"}"); // Create the Sensor asset for your device
Device.AddAsset(blueLedId, "INITIALISING", "blueLED", true, "boolean");
Device.AddAsset(greenLedId, "WELL DONE", "greenLED", true, "boolean");
Device.AddAsset(messageBoardId, "MESSAGE BOARD", "message", false, "string");
//***
delay(1000); // Give the wifi some time to finish everything
while(!Device.Subscribe(mqttServer, callback)) // Make sure that we can receive message from the AllThingsTalk IOT developer cloud (MQTT). This stops the http connection
Serial.println("Retrying");
pinMode(buzzerId, OUTPUT); // Initialize the digital pin as an input.
Serial.println("Buzzer is ready for use!");
pinMode(greenLedId, OUTPUT); // Initialize the digital pin as an input.
Device.Send("false", greenLedId);
Serial.println("Green LED is ready for use!");
pinMode(blueLedId, OUTPUT); // Initialize the digital pin as an input.
Device.Send("false", blueLedId);
Serial.println("Blue LED is ready for use!");
Device.Send("", messageBoardId);
Device.Send("", temperatureId);
tph.begin();
}
//****************************************************************
//** Variables
//****************************************************************
boolean firstTime=true;
float increase = 1; //degrees Celsius that the temperature has to rise
int timer = 10; //time in seconds that temperature rise has to last
int sec = 0; //timer
float baseTemp = 0; //temperature when trainig was startes
float temp = 0; //measured temperature every second
//****************************************************************
//** Loop
//****************************************************************
void loop()
{
if (firstTime)
{
baseTemp = initialiseBaseTemp();
firstTime = false;
}
temp = tph.readTemperature();
Serial.print("Temperature: "); Serial.print(temp); Serial.println(" °C");
Device.Send(String(temp), temperatureId);
if(temp >= baseTemp+increase) //if current temp is high enough
{
if ( sec >= timer) //OK long enough so goal is reached
{
Device.Send("Well done! You've made it! You can stop and cool down now.", messageBoardId);
Device.Send("true", greenLedId);
digitalWrite(greenLedId, HIGH);
digitalWrite(buzzerId, HIGH);
delay(200);
digitalWrite(buzzerId, LOW);
delay(200);
digitalWrite(buzzerId, HIGH);
delay(200);
digitalWrite(buzzerId, LOW);
delay(200);
digitalWrite(buzzerId, HIGH);
delay(600);
digitalWrite(buzzerId, LOW);
sec = 0; //reset timer
}
else
{
Device.Send("You're doing well, hold on!", messageBoardId);
sec++;
}
}
else //not hot enough
{
Device.Send("Keep on going!", messageBoardId);
sec = 0; //reset timer
}
delay(1000); //measure every sec
Device.Process();
}
//****************************************************************
//** Measure initial temperature
//****************************************************************
float initialiseBaseTemp()
{
float initTemp =0;
int isec = 0 ; //timer
Serial.println("Measuring base temperature..."); //before starting excercise, meassure the initial temperature
Device.Send("Initialising base temperature during 5 seconds, please wait", messageBoardId);
while (isec < 5)
{
Device.Send("true", blueLedId);
digitalWrite(blueLedId, HIGH);
delay(500);
Device.Send("false", blueLedId);
digitalWrite(blueLedId, LOW);
initTemp = tph.readTemperature();
delay(500);
isec++;
}
digitalWrite(buzzerId, HIGH); //signal to indicate that initiating is finished
delay(200);
digitalWrite(buzzerId, LOW);
Serial.print("Base temperature: "); Serial.print(initTemp); Serial.println(" °C");
Device.Send("Base temperature is " + String(initTemp), messageBoardId);
Device.Send(String(initTemp), temperatureId);
return initTemp;
}
//****************************************************************
//** Callback function: handles messages that were sent from the iot platform to this device.
//****************************************************************
void callback(int pin, String& value)
{
Serial.print("Incoming data for: "); // Display the value that arrived from the AllThingsTalk IOT developer cloud.
Serial.print(pin);
Serial.print(", value: ");
Serial.println(value);
}


Comments