

Hardware components | ||||||
| × | 1 | ||||
_ztBMuBhMHo.jpg?auto=compress%2Cformat&w=48&h=48&fit=fill&bg=ffffff) |
| × | 1 | |||
 |
| × | 1 | |||
| × | 1 | ||||
| × | 1 | ||||
 |
| × | 1 | |||
 |
| × | 1 | |||
 |
| × | 1 | |||
| × | 1 | ||||
 |
| × | 1 | |||
 |
| × | 1 | |||
Software apps and online services | ||||||
 |
| |||||
Hand tools and fabrication machines | ||||||
 |
| |||||
The story begins with my maker friend, Jinger, giving me a kimono to "Kittify". The fabric has a beautiful cherry blossom print. I'd been thinking about how to transform it into a techfashion piece while trying some new technology.
Then I remembered Versalume's lasers. They are lasing in visible colors (at much more visually appealing wavelengths then the lasers I work with in research labs) and are super bright. With a diffused optical fiber connected to the laser, the light leaks out of the fiber, so the whole fiber lights up. If you've seen my other projects and my website, you know that I've been using LEDs and optical fibers quite a bit. But these commonly used LED+optical fibers normally emit light at the fibers' tips. One needs to rub the fibers with sandpaper or use diffused fibers to get some light out from the sides. But they are much dimmer.
Also, I've been wondering how these laser+fibers are different from EL wires. I decided to give it a try. Turned out they are sooooo much softer, thinner and brighter than EL wires. They are completely visible under bright sun light. Thus, you don't have to make an outfit/decor that only works in the dark.
Step 2One other thing I wanted to try was embroidery using these fibers. They are very soft and thin. So I was wondering if I could use them as threads. Turned out they are slightly more rigid and thicker than I imagined. I could not sew or bend the fibers anyway I want. However, they are much softer than the common optical fibers. So I explored weaving the fiber into fabrics.
A cool aspect is that the laser light leaks out from the fiber's tip, creating a ball of light and a scattered beam. I guess we are one step closer to making the Star Wars laser swords. For now, it is safe.
I bought a blue laser mini module which has a JST connector. So it only needs a 3.7 V LiPo battery. It doesn't have a switch. It just lights up as soon as you plug in the battery. I thought it might be interesting to add some control with a microcontroller. Due to my focus area being wearables, I always prefer the microcontroller to be as small as possible. So I chose an Adafruit Gemma.
Instruction
1. Basic setupI wanted to do a simple on/off function controlled by ambient light, i.e. when it's bright, the laser is off; and when it's dark, the laser turns on. Because I wasn't certain if Gemma and the laser can behave exactly as I planned, to start with, I used an Arduino UNO to test out the circuit.
I used an Arduino 101 tutorial as a base and modified code and circuit on top of it. I used a photoresistor to sense the ambient light and a LED to imitate the laser. When the photoresistor is covered, the LED turns on. (Although the tutorial in this link is for Arduino 101, the project does not require functionality specific to 101. The photoresistor experiment works for Uno.)
Then I transferred the setup onto Gemma. To have a Gemma working, you have to follow a few initial steps and download drivers. Luckily, Lady Ada explains it well. Don't try to skip these steps.
One thing to point out is that you have to upload the script onto Gemma in its Bootloader mode. Make sure the red D1 LED on Gemma is blinking when you hit "upload" on Arduino IDE. Very important.
Replace the LED with the laser now.
The laser came with a black GND line and joint red and yellow lines. By convention, the red line should be POWER and the yellow should be SIGNAL. I figured that since the laser came with no control option, those two lines were joint. So for me, to add a control, I needed to split them.
Cut off the battery connector from the laser and strip the wires.
Test the circuit before soldering.
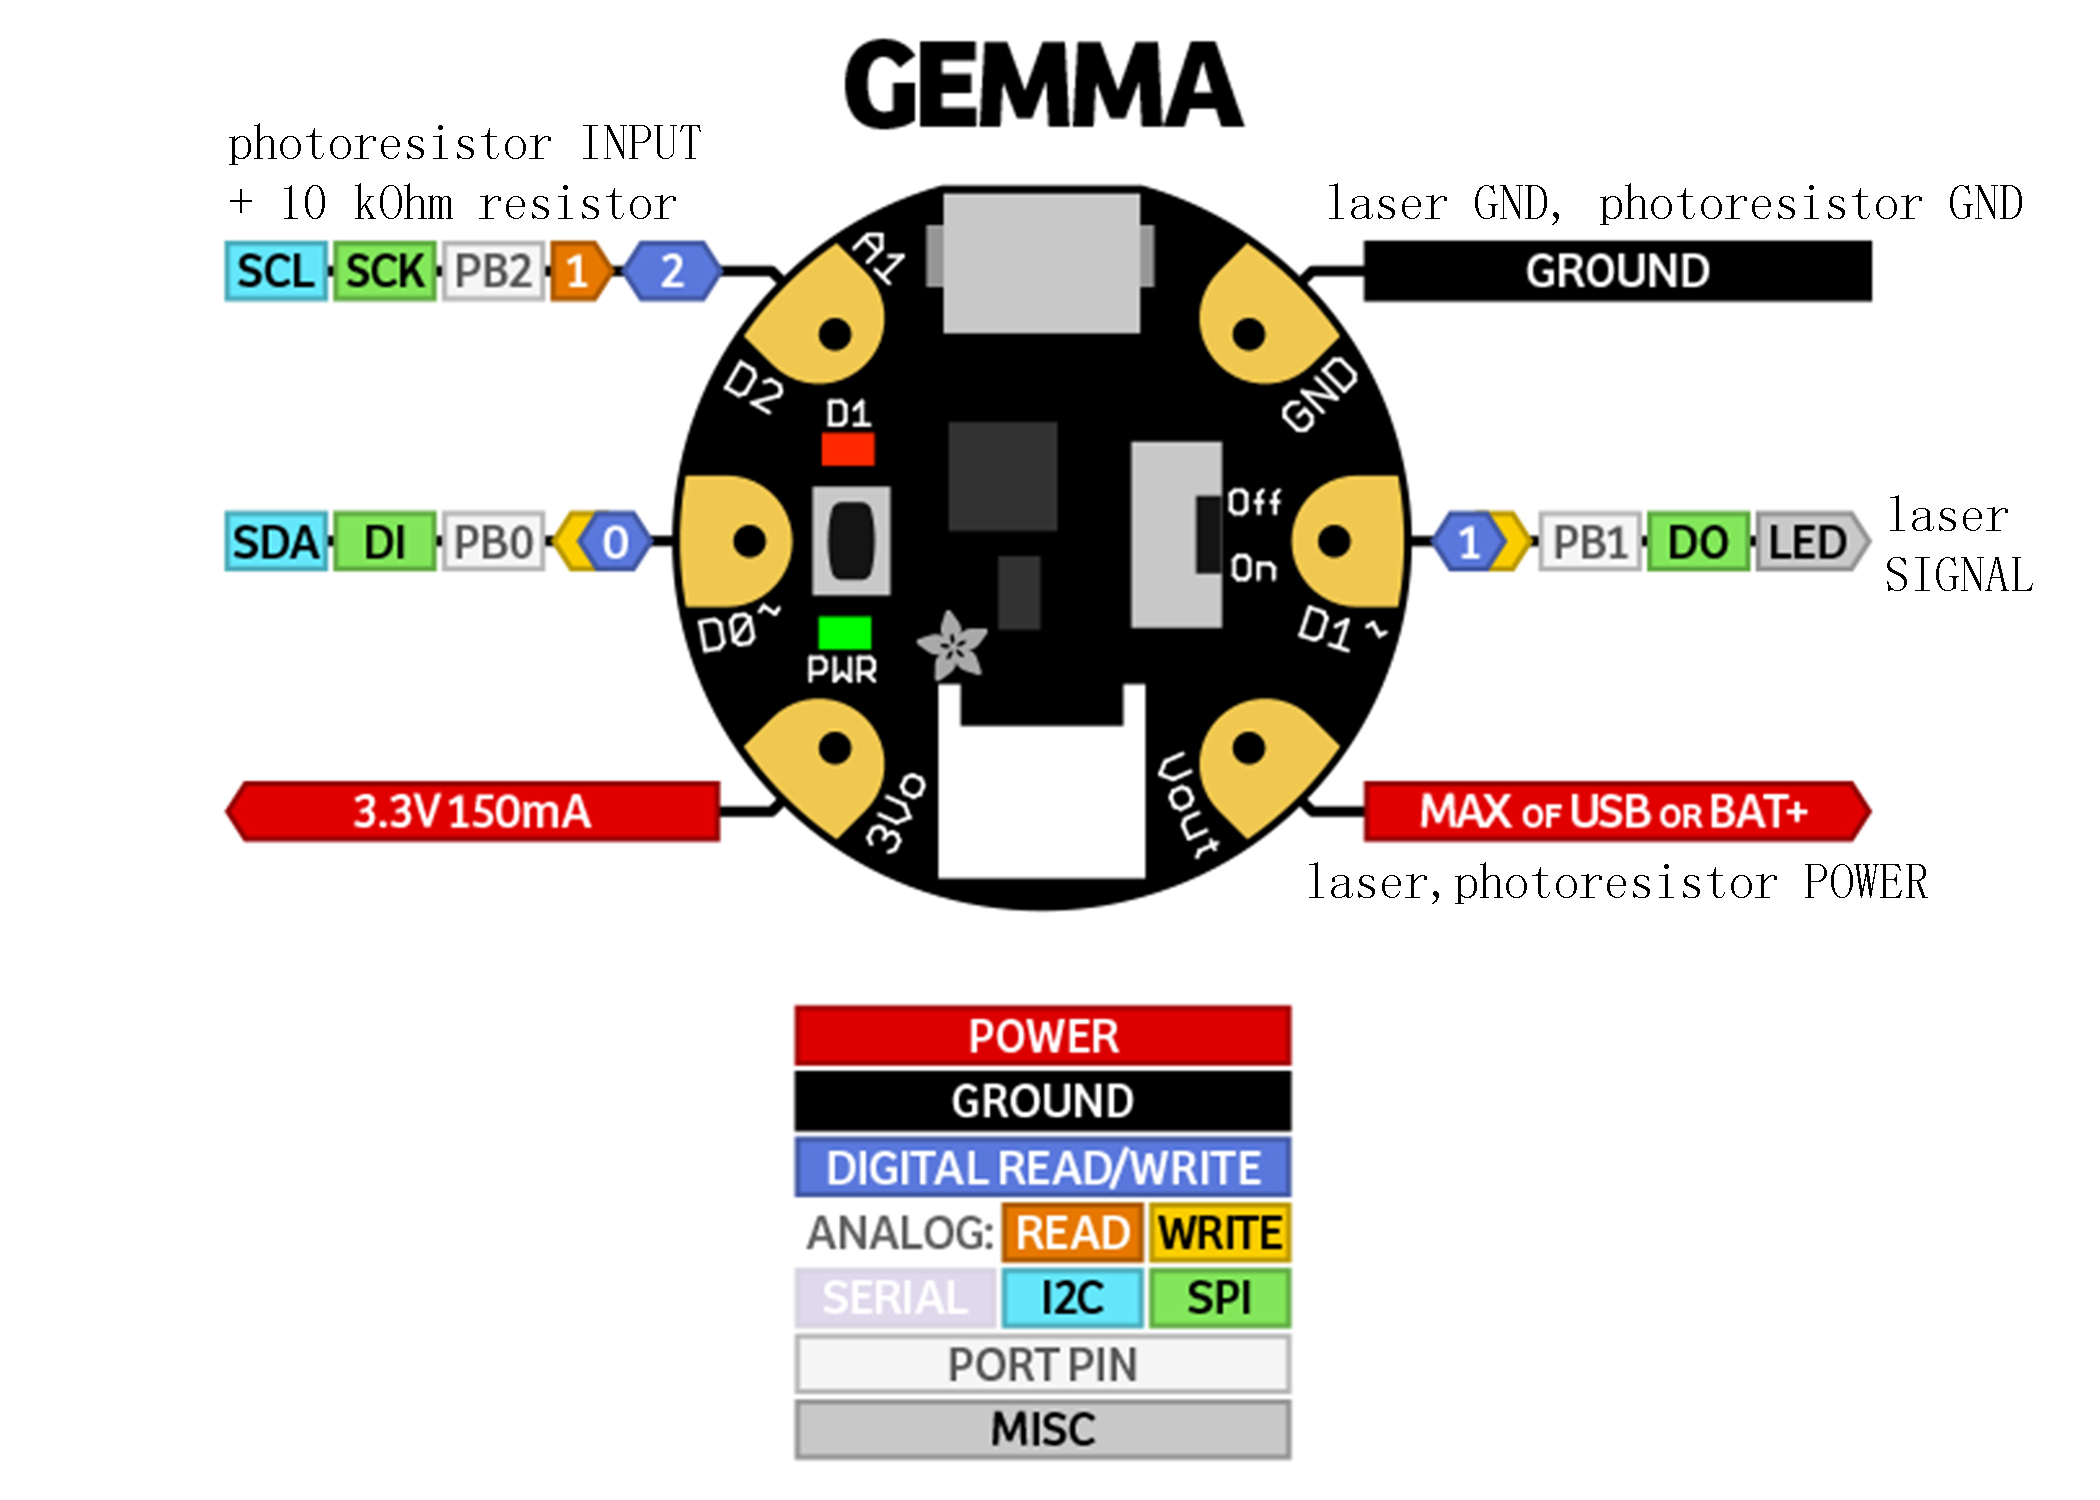
The connection is basically the same as the Arduino example mapped onto a Gemma. Pins ~9 and A0 on Arduino Uno become pins D1 and A1 on Gemma. Also, unlike the LED, the laser does not need the 100 Ohm resistor. And remember to put the yellow SIGNAL line into D1 and red POWER line into Vout on Gemma.
I actually added a switch between the laser POWER line and the Vout on Gemma. You don't have to.
3. Solder the connectionsNow the circuit can be soldered. Put the photoresistor a little higher than Gemma so that later it can be poked through the fabric and be on the outside of the clothes.
Remember my initiative has been tech-fashion design. How to place the laser is important. I don't normally display the raw electronics.
First, Gemma needs to be hidden behind the fabric but the photoresistor needs to be on the outside. Poke a hole on the fabric (conveniently in the center of the flower in this case) and feed the photoresistor through. Seal up the hole using a thread.
Actually, use an "invisible" thread. It's like very soft fish wire. I wish the optical fiber were as thin and soft.
Sew the electronics on the inside.
Use the invisible thread to fix the optical fiber into the shape you desire.
Actually I tried a few different ways to place the optical fiber onto the fabric, including this "weaving" way. Even though the fiber cannot be bent into the angles to mimic the flower petals, one could still feed the fiber through the fabric, achieving the basic "embroidery" idea.
I made a treble clef and circled around the flowers. Could have been more creative if the fiber were more like a thread... Maybe in the near future, technology will advance to such a point.
But the nice thing is you can make the shape pop out into 3D.
Note the fiber is about 1 m long as purchased. I'm not sure if it can be extended on a single mini module. If I want to cover the whole kimono with laser light, it'll be a little too expensive.
Overall, I'm happy with the effect. More designs on my website. Lumos Maxima!
Oh, and what's it about the monocle? My awesome eyewear designer friend, Percy Lau, finally made a design that satisfied my strange love for monocles, as shown in my childhood drawing:


Comments