


Hardware components | ||||||
 |
| × | 1 | |||
 |
| × | 1 | |||
 |
| × | 1 | |||
 |
| × | 1 | |||
 |
| × | 1 | |||
Software apps and online services | ||||||
| ||||||
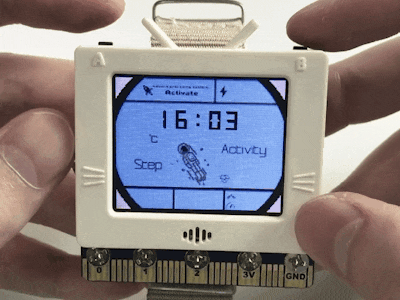
The astronaut dial plate theme of Huawei Watch GT2 was very popular a while ago, so why don't we make one with Future Board too? It's not hard to write a program on Future board to show the time, but how to make the astronaut dial plate theme? A quick way is to find similar image materials and use them on the Future board!
Step 1: Download ImagesWe have found the materials and adjusted them to fit the Future board size for you.
You can find all the images in this zip file
After decompressing it, copy the files to a TF card (you can upload them to the Future board one by one too, but it may take a long time). We recommend the Sandisk high-speed card.
(You can also design your own dial plate images, but just remember they have to fit the size of the Future board: 160*128)
Step 2: Write the Dial Plate ProgramOpen Kittenblock and click the "Switch to Coding" button in the upper right corner.
A python editor then shows up. Now you can code here.
Copy the code to Kittenblock:
#/bin/python
from future import *
from sugar import *
from time import sleep
import ntptime
from machine import RTC
wifi.connect(str("Kittenbot"), "kittenbot428")
sleep(1)
ntptime.host="ntp.aliyun.com"
rtc = RTC()
ntptime.settime()

timestarty = 0
H1x = 0
M0x = 0
Dx = 0
H0x = 0
M1x = 0
timestartx = 0
taix = 0
taiy = 0
taidelay = 0

def time():
  global timestarty,H1x,M0x,Dx,H0x,M1x,timestartx,taix,taiy,taidelay
  timeH1 = (int(rtc.datetime()[int(4)] / 10))
  timeH0 = (rtc.datetime()[int(4)] % 10)
  timeM1 = (int(rtc.datetime()[int(5)] / 10))
  timeM0 = (rtc.datetime()[int(5)] % 10)
  timestartx = 40
  timestarty = 30
  H1x = (timestartx + 16 * 0)
  H0x = (timestartx + 16 * 1)
  Dx = (timestartx + 16 * 2)
  M1x = (timestartx + 16 * 3)
  M0x = (timestartx + 16 * 4)
  screen.loadPng(str(timeH1)+'.png',H1x,timestarty)
  screen.loadPng(str(timeH0)+'.png',H0x,timestarty)
  screen.loadPng('10.png',Dx,timestarty)
  screen.loadPng(str(timeM1)+'.png',M1x,timestarty)
  screen.loadPng(str(timeM0)+'.png',M0x,timestarty)


sleep(3)
screen.sync = 0
taix = 40
taiy = 50
taidelay = 0.1
screen.fill((255, 255, 255))
screen.loadPng('142.png',-8,0)


while True:

  screen.loadPng('142.png',-8,0)
  time()
  screen.loadPng('132.png',taix,taiy)
  screen.refresh()
  sleep(taidelay)
  screen.loadPng('143.png',taix + 13,taiy + 10)
  screen.loadPng('133.png',taix,taiy)
  screen.refresh()
  sleep(taidelay)
  screen.loadPng('143.png',taix + 13,taiy + 10)
  screen.loadPng('134.png',taix,taiy)
  screen.refresh()
  sleep(taidelay)
  screen.loadPng('143.png',taix + 13,taiy + 10)
  screen.loadPng('135.png',taix,taiy)
  screen.refresh()
  sleep(taidelay)
  screen.loadPng('143.png',taix + 13,taiy + 10)
  screen.loadPng('136.png',taix,taiy)
  screen.refresh()
  sleep(taidelay)
  screen.loadPng('143.png',taix + 13,taiy + 10)
  screen.loadPng('137.png',taix,taiy)
  screen.refresh()
  sleep(taidelay)
  screen.loadPng('143.png',taix + 13,taiy + 10)
  screen.loadPng('138.png',taix,taiy)
  screen.refresh()
  sleep(taidelay)
  screen.loadPng('143.png',taix + 13,taiy + 10)
  screen.loadPng('139.png',taix,taiy)
  screen.refresh()
  sleep(taidelay)
  screen.loadPng('143.png',taix + 13,taiy + 10)
  screen.loadPng('140.png',taix,taiy)
  screen.refresh()
  sleep(taidelay)
  screen.loadPng('143.png',taix + 13,taiy + 10)
  screen.loadPng('141.png',taix,taiy)
  screen.refresh()
  sleep(taidelay)
  screen.loadPng('143.png',taix + 13,taiy + 10)
But remember to change the WIFI name and password in line 7 into yours!!
Then, save your program to the TF card.
How to use the images we download to show the time?
For example, 21:51
The hour we get from RTC is int(rtc.datetime()[int(4)]=21
The minute we get from RTC is int(rtc.datetime()[int(5)]=51
we need to separate them into 2, 1 and 5, 1, and change the images of the tens and ones digits of the hour and the minute through variables.
To separate them, we need to divide them by 10. We divide 21 by 10, take only the integer, get 2; take the remainder, and get 1.
Now, we set the variable of the corresponding image name to str(x)+'.png', then we can get the corresponding images of the number. For example, the corresponding image of number 1 is 1.png.
Code Explanation 2: Show the Astronaut Images in TurnsImages of the astronaut are from 132.png to 141.png.
We only need to show the images from 132.png to 141.png in turns, but these images' backgrounds are transparent, so when we show 133.png after 132.png, we may find that two images overlapped.
So we can make use of the blue image 143.png.
Then,
show 132.png → cover a 143.png on top of 143.png → show 133.png
Check Out the Final Result!


Comments