


Hardware components | ||||||
 |
| × | 1 | |||
 |
| × | 1 | |||
 |
| × | 1 | |||
 |
| × | 1 | |||
Software apps and online services | ||||||
 |
| |||||
 |
| |||||
In this project, I connected a vibration sensor to a NodeMCU ESP8266 and used KiwisIoT to monitor vibration activity online.
The ESP8266 reads the vibration sensor output and sends the value through Wi-Fi to the KiwisIoT dashboard.
Basic flow:
Vibration Sensor → ESP8266 → Wi-Fi → KiwisIoT → Dashboard
The main idea is to detect vibration or movement using a vibration sensor.
When the sensor experiences vibration, its output changes. The ESP8266 reads this signal and sends the sensor value to KiwisIoT.
This makes it possible to monitor vibration activity remotely from the dashboard.
For example, the sensor can be placed on a table, machine, door, or other object where vibration needs to be detected.
Components RequiredHardware
- NodeMCU ESP826
- Vibration Sensor Module
- Jumper Wires
- USB Cab
Software
- Arduino IDE
- KiwisIoT Arduino Library
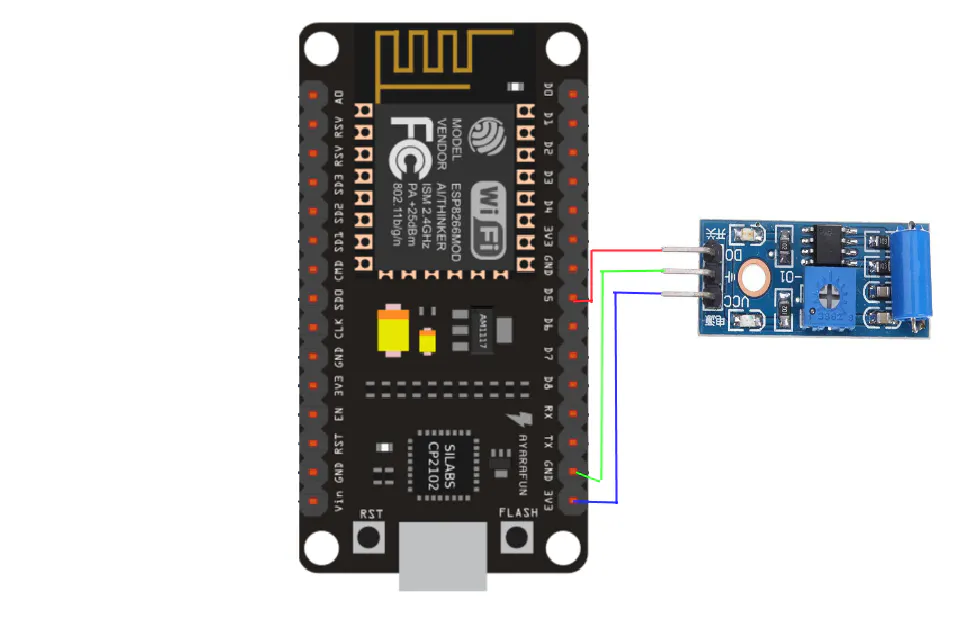
For a typical vibration sensor module with VCC, GND and digital output, I connected it like this:
Vibration Sensor -----> NodeMCU ESP8266
VCC ------- > 3.3V
GND ------- > GND
DO ------- >D5
Note: Some vibration sensor modules may have different pin labels or operate differently. Check the pin labels on your particular module before connecting it.
Arduino ProgramI used the KiwisIoT library to read the vibration sensor and send the value to the dashboard.
#include <KiwisIoT.h>

const char* ssid  = "YOUR_WIFI_NAME";
const char* pass  = "YOUR_WIFI_PASSWORD";
const char* topic = "YOUR_TOPIC_ID";

KiwisIoT kiwisiot(ssid, pass, topic);

#define VIBRATION_PIN D5

void setup() {
  Serial.begin(9600);

  pinMode(VIBRATION_PIN, INPUT);

  kiwisiot.begin();
}

void loop() {
  kiwisiot.run();

  int vibrationValue = digitalRead(VIBRATION_PIN);

  kiwisiot.send("1", vibrationValue);

  Serial.print("Vibration Value = ");
  Serial.println(vibrationValue);

  delay(1000);
}
Replace the Wi-Fi details and Topic ID with your own values.
The ESP8266 continuously reads the digital state of the vibration sensor and sends the result to KiwisIoT Channel 1.
KiwisIoT DashboardAfter connecting the ESP8266 to Wi-Fi, I created a dashboard in KiwisIoT.
For this project:
Channel 1 → Vibration Sensor
I used a widget to display the incoming vibration sensor value.
The basic dashboard flow is:
Vibration Sensor → D5 → ESP8266 → Wi-Fi → KiwisIoT Channel 1 → Widget
The dashboard allows me to monitor whether vibration is being detected without continuously checking the physical sensor.
Step 7 — How It WorksThe vibration sensor detects physical vibration or movement and changes its digital output.
The ESP8266 reads this output using:
digitalRead(VIBRATION_PIN);The sensor state is then stored in:
int vibrationValue = digitalRead(VIBRATION_PIN);The value is sent to KiwisIoT using:
kiwisiot.send("1", vibrationValue);When vibration occurs, the sensor output changes and the corresponding value can be viewed on the KiwisIoT dashboard.
Step 8 — Working FlowPhysical Vibration
↓
Vibration Sensor
↓
Digital Signal
↓
ESP8266 D5
↓
Wi-Fi
↓
KiwisIoT
↓
Channel 1
↓
DashboardThe ESP8266 acts as the bridge between the physical vibration sensor and the online IoT dashboard.
ApplicationsThis project can be used for basic IoT experiments such as:
- Machine vibration monitoring
- Door or window movement detection
- Equipment activity monitoring
- Object movement detection
- Anti-tamper prototypes
- Smart-home experiments
- Security monitoring prototypes
- IoT learning projects
For more advanced applications, vibration sensors can also be combined with other sensors to monitor equipment conditions.
TroubleshootingVibration value is not changing
- Check VCC → 3.3V
- Check GND → GND
- Check DO → D5
- Make sure the vibration sensor is firmly connected.
- Tap or move the surface where the sensor is placed.
- Check the sensitivity adjustment if your module has a potentiometer.
Dashboard is not receiving data
- Check the ESP8266 Wi-Fi connection.
- Check the KiwisIoT Topic ID.
- Check Channel 1.
- Check that the KiwisIoT library is installed correctly.
- Check the ESP8266 connection.
- Make sure
kiwisiot.run();is insideloop().
Vibration is detected too easily
Some vibration sensor modules are sensitive to small movements.
If your module has a sensitivity adjustment potentiometer, adjust it according to your requirement.
Vibration is not detected
- Increase the sensor sensitivity.
- Check the wiring.
- Make sure the sensor is mounted properly.
- Test it by gently tapping the surface.
After uploading the code, I opened the Serial Monitor at 9600 baud.
Example readings can look like:
Vibration Value = 0
Vibration Value = 0
Vibration Value = 1
Vibration Value = 0
Vibration Value = 1
The exact output depends on the vibration sensor module and its sensitivity.
When vibration is detected, the sensor output changes and the ESP8266 sends the value to:
ESP8266
   ↓
Vibration Value
   ↓
KiwisIoT Channel 1
   ↓
Dashboard
This allows me to monitor vibration activity remotely through the KiwisIoT dashboardQuestions & Answers
1. What does the vibration sensor detect?
It detects physical vibration, movement, or shaking and provides an electrical output.
2. Why did I use D5?
I used D5 as the digital input pin for reading the vibration sensor's digital output.
3. What does Channel 1 represent?
Channel 1 = Vibration Sensor
4. Does the value represent vibration intensity?
Not necessarily. With a typical digital vibration sensor module, the value mainly represents the sensor's digital state. It should not be interpreted directly as a calibrated vibration-intensity measurement.
5. What do 0 and 1 mean?
They represent the digital state reported by the sensor. Depending on the particular module, the HIGH/LOW behavior can differ, so check the module's output behavior when testing it.
6. Can I add another sensor?
Yes. Additional sensors can be connected and assigned to other available KiwisIoT channels.
7. Can this project be used for machine monitoring?
Yes, it can be used as a basic vibration-detection prototype. For professional machine-condition monitoring, a calibrated accelerometer and appropriate signal processing would normally be used.
8. Can I monitor the vibration remotely?
Yes. Once the ESP8266 is connected to Wi-Fi and successfully sends data to KiwisIoT, the sensor data can be monitored through the dashboard.


Comments