

Hardware components | ||||||
_ztBMuBhMHo.jpg?auto=compress%2Cformat&w=48&h=48&fit=fill&bg=ffffff) |
| × | 2 | |||
 |
| × | 2 | |||
| × | 2 | ||||
| × | 1 | ||||
| × | 1 | ||||
 |
| × | 1 | |||
 |
| × | 1 | |||
| × | 1 | ||||
| × | 2 | ||||
| × | 1 | ||||
Software apps and online services | ||||||
 |
| |||||
| ||||||
Hand tools and fabrication machines | ||||||
| ||||||
| ||||||
| ||||||
| ||||||
| ||||||
| ||||||
Check out how I made this rig here:
See the build process of the project (0:00) and the camera rig working for the first time (5.50).
Check out my first test outside with the rig here:
Check out the rig being used without a user subject in the centre:
Check out the rig being used with bubbles!
Please Subscribe to my YouTube channel to watch all my latest videos including experimentations with the camera rig!
How I made itThis was my first ever Arduino and physical computing project as part of my BSc Product Design course at Middlesex University London. The brief given was:
"To develop a new user experience for smartphone camera users. The system should enable users to shoot amazing video that has either not previously been possible or that can only be done with expensive professional systems"
I wanted to focus on the Bullet time effect the visual technique made famous by the Matrix films and more recently used in BBC's Sherlock.
As part of my project I was required to use Arduino & related physical computing resources that I had available to me.
I looked at several ways of achieving the desired effect, the original idea was to have a device which could hang from a suspended pivot point (e.g. a ceiling or tree) and then spin around the user standing below. However, it was quickly identified that this could pose a risk to the user and also limit the areas where it could be used.
I then looked at potential tech which I could implement in order to get the high speed required to shoot the bullet time effect as well as other 360º surround video.
Initial PrototypeI tested out the Arduino & drone motor setup using a simple Fade code from the Arduino example basic sketches.
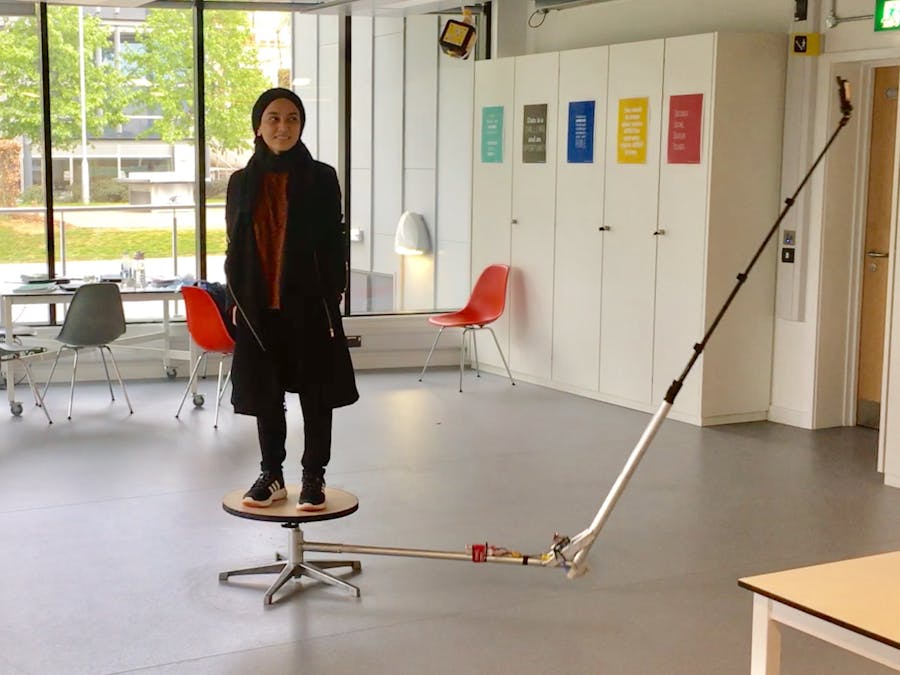
I then looked to make a device that wouldn't require an specific environment in order to work and came up with the idea of a pivot point which the user would stand on and have the camera swing around below their feet.
Wanting to prove my concept worked, I made an initial prototype using materials readily available to me which included scrap ply & metal, an old bicycle wheel and a plastic platform. I then roughly attached the Arduino and all the other tech including the motor with a soft propeller.
This prototype proved that I could achieve the desired effect as you can see in the first part of my YouTube video below however it wasn't as stable for the user because of the narrow bicycle pivot point. I then went to a scrapyard to look for wheels with bigger hubs and bearings.
I found this discarded office chair and had hoped to apply the bicycle wheel and its bearing system from the prototype to the mechanism and base from this chair - as it was ideal to overcome the stability issues that I had had with the initial prototype but they proved to be unsuitable for working with together in order to get the compact finish I wanted.
However, I realised that I could still use the strong and stable base from the chair and make a custom fit bearing to go around the stem of the base and swing around with the user standing where the person would have sat on the chair.
I made the custom fit bearing and fitted it to the metal base. I had an extension arm fitted where I attached and mounted the Arduino, motor (onto water jet cut bracket) & battery with the Monopod (selfie stick) into the top part of the arm.
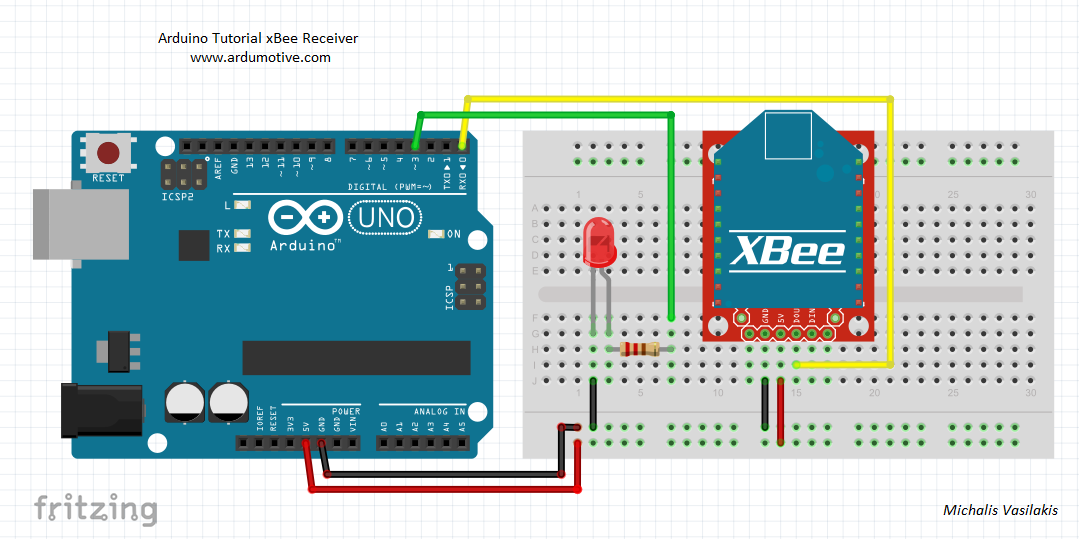
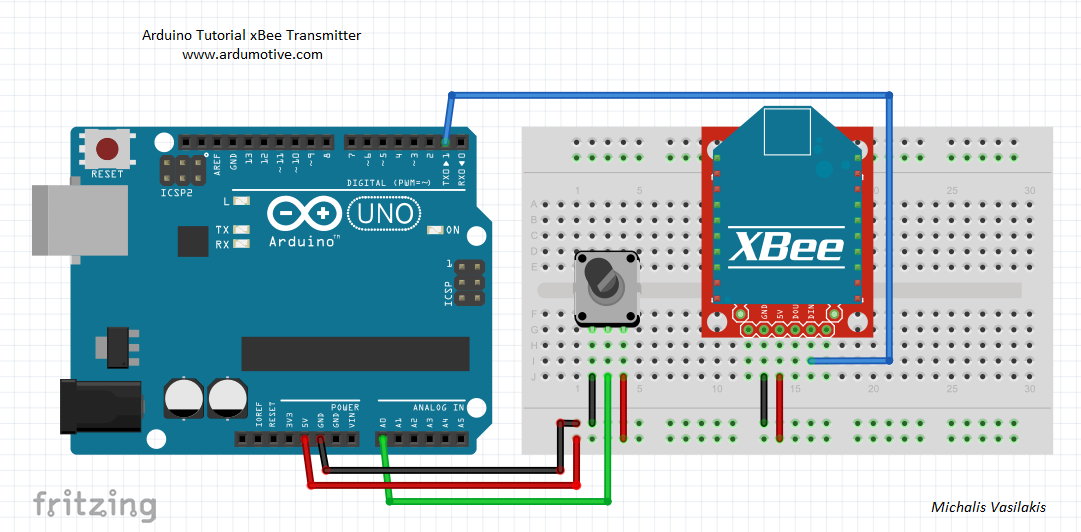
I used Digi's Xbee Series 2 Wireless connectivity to allow the operator to have full control of the speed and the status of the rig when the user was within it. I needed to have a second Arduino to communicate with the one on the arm that controlled the speed and on/off status which became a remote control.
Watch the final result footage from the Camera rig in the series of videos that I have made for my YouTube Channel:
Check out the rig being used with bubbles!
Thanks for reading about and watching my first ever Arduino project!For updates on my work, please follow me on:
- Facebook: facebook.com/KFERNANDESIGN/
- Instagram: instagram.com/kfernandesign/
- Twitter: twitter.com/KFernandesign


_3u05Tpwasz.png?auto=compress%2Cformat&w=40&h=40&fit=fillmax&bg=fff&dpr=2)

Comments