


Hardware components | ||||||
| × | 1 | ||||
Software apps and online services | ||||||
| ||||||
| ||||||
Hand tools and fabrication machines | ||||||
 |
| |||||
These two G-code files will help you determine the best temperature for a specific PLA filament. What they do is simple: They print a prism shaped small container with thin walls by gradually lowering the temperature every 10 millimeters. This way we can see how the plastic behaves at different temperatures. This is important since different PLA filaments have different melting points - this applies to different brands, different opacities, and even different colours.
Each file has a different layer height (0.1 mm and 0.2 mm) and the heat is gradually lowered in intervals as the object grows higher. By looking at the physical print, we will be able to easily determine the best range of temperature to use. We will also be able to see the quality differences when it is too hot and when it is too cold.
- 0.1 mm (100 microns): The thinner the layers you print, the better the layer adhesion you get. Although at this thickness you will notice problems associated with higher temperatures.This is because layers do not have the time to cool down before the next one is placed. The plastic could spill over the sides of the previous layer. This results in deformation when the layers contract when cooling down. High temperatures can cause gas bubbles in the extruded plastic, which results in a foamy, hazy print.
- 0.2 mm (200 microns): At this thickness, you will better notice problems associated with lower temperatures. We may find that thicker layers will have more trouble bonding to the layer beneath. This is because the layer beneath has already cooled and combined adhesion between the two layers is inadequate.
Note: Printing thicker layer at a cooler temperature is hard for the 3D printer. This means pushing out more plastic with high viscosity. This puts strain on the extruding mechanism and the pushing gear might slip and grind the filament strand.
Additional Gcode commands: If you open up the Gcode files in a text editor, you will find many different commands. Here are two important ones related to the heating of the nozzle.
M109: “Sets the extruder heater temperature in degrees celsius and waits for this temperature to be achieved.” This is used at the beginning of the Gcode to heat the extruder and halt the execution of any subsequent command until the temperature is reached.
M104: ”Sets the temperature of the extruder to a specific temperature and returns control to the host immediately" (i.e. before that temperature has been reached by the extruder). Here the printer is able to continue with other commands while the heater reaches the given temperature.
For more information on Gcode commands, refer to this page.
2. Load the filament you want to test- Turn on the machine.
- Click on the rotary encoder for the Main Menu and then the Prepare Menu.
- Scroll down to the option that says: “Change Filament” and enter.
- Follow the instructions on the screen.
Note regarding the differences in PLA: The colour makes a difference - adding chemicals to PLA to make it coloured or opaque changes its behaviour. The main ingredient is still the same (PLA), but even a 3% of colour may produce big changes in the required temperature and hardness of the plastic. It is best to test each filament and note the ideal temperature on the finished test print. For convenience, you can download some custom labels here. Read more about specific behavior in different PLA filaments here
- Go to the Main Menu and choose “Print from SD”.
- In the next menu you will get two options: “Use Gcode params” and “PLA”
- Choose MA_02zThWall_215_185.gcode for testing 0.2 mm layer height
- Choose MA_015zThWall_215_185.gcode for testing 0.15 mm layer height
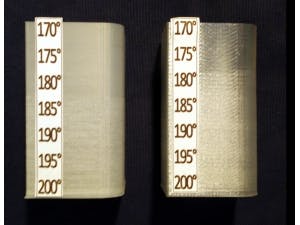
Watch your printer print the whole test-file. Note on a piece of paper when the printer starts to fail. I made a "temperature ruler" which you can use to see where exactly the printer changes temperature. Download the PDF here.
There are two clear cut failures that are related to the temperature set in the Gcode:
- Plastic is missing from layers and the object breaks easily. AKA: Delamination (layers not bonding) Cause: Plastic has too high viscosity. Reason: Temperature too low.
- Plastic is foggy, hazy, filled with small bubbles, uneven and rough. What's happening? The plastic is gaseous (bubbly). Cause: The plastic is changing state in a chemical and a gas is produced and is infused in the plastic. Reason: The temperature is too high.
NOTE: Try and pull the layers apart to get a feel to see at which temperature the layers bond well. Then you can measure with this "temperature ruler" to see at which height you got a good bond.
- To get the most out of these test-files use them on all new spool of plastic you buy for you printer. Even if you buy the same brand and colour as last time. You never know if the supplier changed manufacturer since the last time.
- When you’ve found the temperature sweet spot for your current filament try and print this prism (stl-file). Set the speed at 30 mm/s and tick the spiral vase option. You should be able to make these settings in both Slic3r and Cura.
kengdahl
 Arduino_Scuola


Comments