

Software apps and online services | ||||||
| ||||||
Hand tools and fabrication machines | ||||||
 |
| |||||
Technically, backlash* can be described as the maximum distance or angle through which any part of a mechanical system may be moved in one direction without applying appreciable force or motion to the next part in the mechanical sequence**. But, in the context of 3D printers, you will notice it when your circles are not round and your infill does not touch the perimeters of your object. It can be observed when the printer tries to change direction and fails to some degree to change direction efficiently enough.
The cause for backlash can be due to either of the following things or a combination of them:
- The belts: could be worn out or loose
- The pulleys are: worn out or not fastened on the guide rod
Note: If the Y and X axis are not perpendicular to each other you might get something which appears similar to backlash but this is something different. Look in your manual on the under the headline “Calibrating the X and Y axis".
*For context: other words for backlash could be “slack” or “play”.
**Bagad, V.S. (2009). Mechatronics (4th revised ed.). Pune: Technical Publications. ISBN 9788184314908. Retrieved 23 March 2015.
The Symptoms of Backlash- Circles are elongated or squarish i.e., not round.
- The infill does not touch the parameters.
If you have backlash on the Y or X-axis, any hole or circle you print will be flatter along the X axis (towards the front of the printer). This means that you have backlash on the Y-axis.
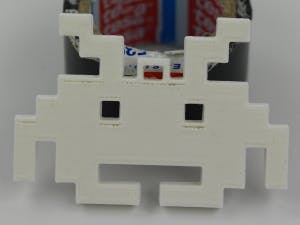
This space invader has only vertical and horizontal angles and therefore a great test object for us. Below is pictures of the space invader which shows symptoms of backlash. Notice the gap between the infill and the perimeters. When generating the Gcode, I have intentionally made the top infill orthogonal to the perimeters. Normally Slic3r is set to print the infill at an 45 degree angle, here we are going to use a angle of 90 degrees.
In the start of G-code of Slic3r or the slicing software you use, enter the command: M99 X0 Y0.2 Z0 E0
The “Y0.2” stands for 0.2 mm of backlash being compensated for on the Y-axis. Enter the value and use the Materia101_test_print.zip from the Materia 101 product page to see if the value inserted removes the backlash.
If you are using a program, like Repetier Host or Pronterface, to run your printer, enter the following command to see your current backlash settings in the log: M98
The only way to get the right amount of backlash compensation is to print one file over and over, observe the changes between the prints, and adjust the backlash compensation on the appropriate axis.
In the picture below there is not enough compensation.
In the picture below the hysteresis on the Y axis is set to: M99 X0 Y1 Z0 E0
1 mm, which is too much. Causing the horizontal and vertical lines to not be perpendicular. I also think this plays with the fact that the two belt on my Materia were not equally tight.
Before compensating for backlash here is list of things to check first:
- Check the pulley for wear and tear. If the pulleys are worn you will notice a slight movement even when the motors are locked in place.
- Check the tension of the belts on the axis with the backlash.
- Check all the teeth on the belts for wear and tear. This is unlikely on a new machine.
- Check the pulleys so that the set screws in the pulley are tightened.
- Check if the hot end and extruder are fastened properly on the x carriage.
- Check that the X and Y linear guides making up the axes are perpendicular.
kengdahl
 Arduino_Scuola


Comments