

Hardware components | ||||||
_baVEVgguW1.jpg?auto=compress%2Cformat&w=48&h=48&fit=fill&bg=ffffff) |
| × | 1 | |||
 |
| × | 1 | |||
 |
| × | 1 | |||
| × | 1 | ||||
Software apps and online services | ||||||
 |
| |||||
Hand tools and fabrication machines | ||||||
 |
| |||||
 |
| |||||
 |
| |||||
 |
| |||||
Microcentrifuges are an essential piece of equipment in any biomedical laboratory. However, biomedical equipment like this is generally too expensive for most hobbyists to afford, so I developed this centrifuge to help lower the cost of a proper microcentrifuge.
What is a Microcentrifuge?A microcentrifuge is a device that spins samples at very high RPM in order to separate and purify materials in the samples. A common use for a microcentrifuge is Differential Centrifugation, which is used to separate organelles and nucleic acids(such as DNA) from cell samples. High quality, reliable microcentrifuge prices start from $1,000, and entry-level microcentrifuges cost around $300-$700. This is way too expensive for many hobbyists and other people, so I set off to develop my own open source microcentrifuge.
Impact of this projectThis project is aimed towards biohacking communities, underpriveleged schools, and underfunded hospitals that cannot afford proper equipment. I hope this project will be useful to many, and can open up opportunities in areas that cannot provide them otherwise.
Design Process1. Hardware
For this project, I will be using an Arduino 101, as I am participating in the Inventing The Future contest. Unfortunately, I didn't win an Arduino 101, so I bought one. I want to make this device Internet-connected in order to integrate it into my upcoming Internet Connected Biohacking Lab series(coming soon!), and will eventually develop an app that can integrate these devices to provide a seamless laboratory experience.
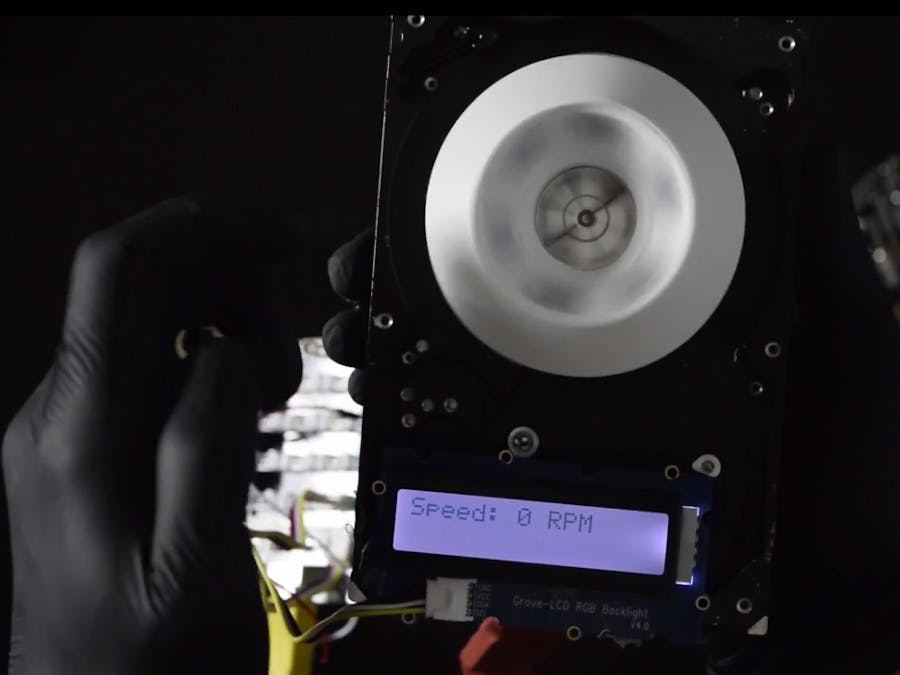
In order to make a centrifuge, I needed a motor that could spin at very high RPM in order to create enough centripetal force to separate a cellular sample. I decided to use a dead 3.5" hard drive I had in my basement, as it would spin at 7200 RPM, and should be able to generate up to 4400 g's - enough to tear apart most cells! As I wanted to make this centrifuge as user-friendly as possible, while giving users the most control they could get, I opted to add an LCD, potentiometer, and a few buttons so I could develop a useful interface to the device. I would like to also add an internet controlled interface to the centrifuge to make the device more easy to use.
Voiding the WarrantyTo be able to use the hard drive, we need to remove all of the parts of the hard drive except for the motor. In order to do that, we need to start by removing the PCB on the back using a TORX wrench. I didn't have the right size torx wrench, so I just ripped off the PCB, and since I am not planning on using it, it should be fine.
Now that you have removed the PCB, flip the hard drive over, and begin removing the screws in the areas circled in red. Once you have done that correctly, you should be able to pry off the protective plate. Have fun and and admire the reflective hard drive platters for a few moments.
Now that you have removed the front plate, you can then remove the needle of the hard drive by removing the top magnet by prying it out with a screwdriver. It's just held together by the force of the two magnets. Be careful when trying to remove them, as the magnets are quite strong, and I've crushed my fingers multiple times when playing around with them.
Once you've removed the top magnetic piece, the rest is easy! Just remove the screw on the needle's hinge, and remove the needle. Then you can proceed in removing the other screws holding down the second magnetic piece.
Once you've done that, remove the screws holding down the platters, and remove the platters and spacers. Your hard drive should be finished with its modifications.
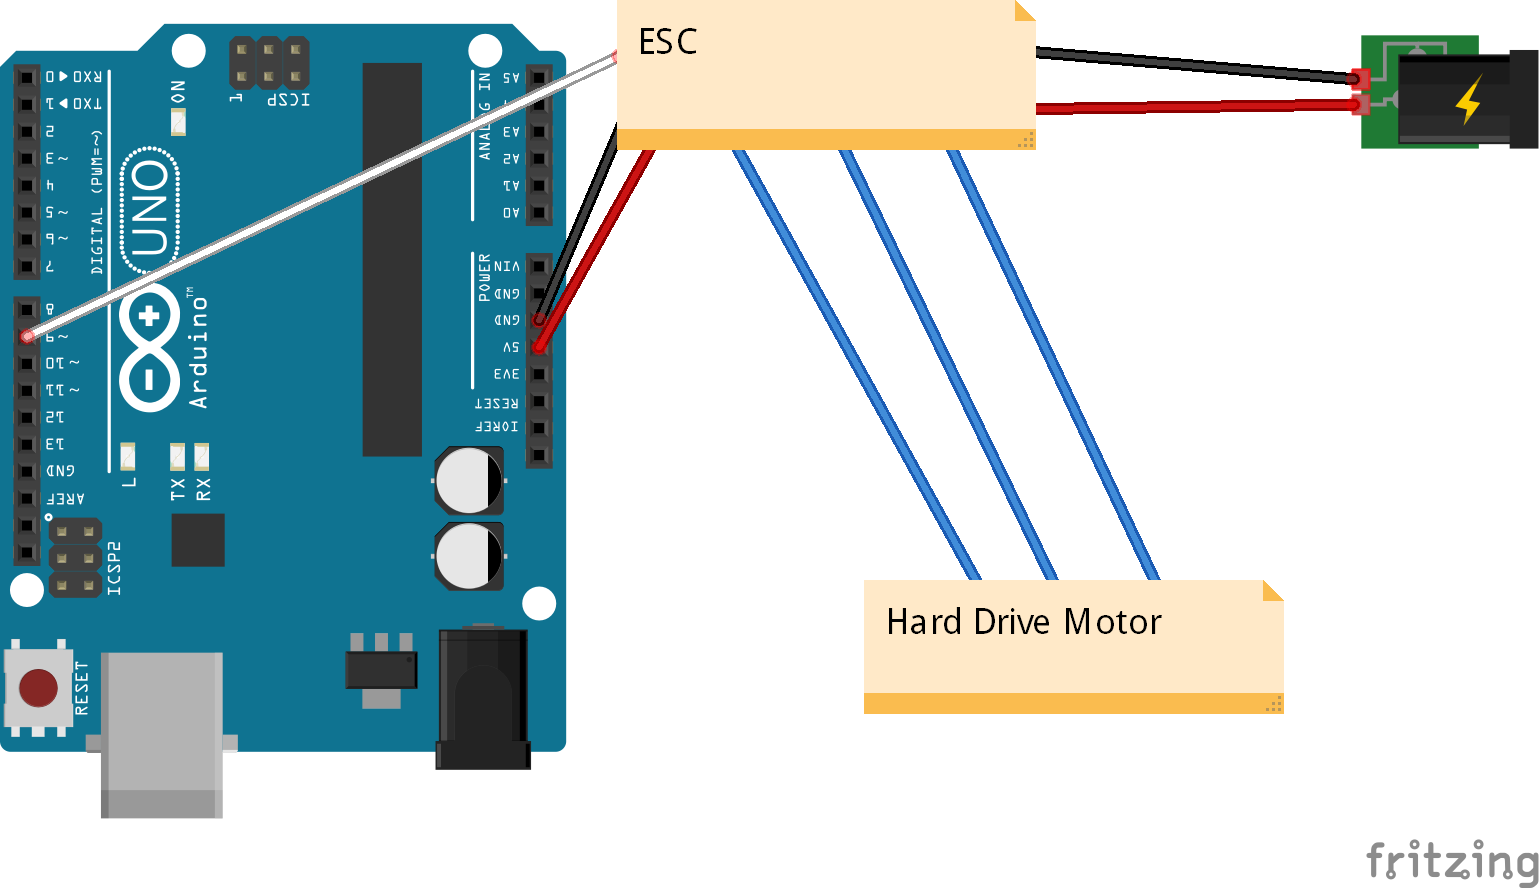
WiringTo control the hard drive, we must add an ESC(Electronic Speed Controller) to the device. I am using a standard hobby ESC that is commonly used in hobby aircraft, as it runs off 12v, and the hard drive runs off 12v too. To supply enough power to the ESC and Hard Drive, you can use any 12v power supply, but I couldn't find any, so I used a standard computer power supply. I connected a jumper to the green wire and a GND terminal, so that it would power on as soon as it was plugged in. You can also add a power switch to add some extra control to the device.
Wire up the ESC to the 12v rail and GND. Then connect the ESC's PWM cable to GND, 5V, and D7. Connect a potentiometer from 5v and GND and connect the middle terminal to A0. Then you can test out the wiring for the motor.
Upload the following code to the Arduino 101:
#include <Servo.h>
Servo esc;
int throttlePin = 0;
void setup()
{
esc.attach(9);
}
void loop()
{
int throttle = analogRead(throttlePin);
throttle = map(throttle, 0, 1023, 0, 179);
esc.write(throttle);
}
To connect the motor to the ESC, you must either do a continuity test by checking to see if the pins on the bottom of the hard drive are connected or not. You can also randomly solder on the wires of the ESC to the pins on the hard drive motor, and switch them up if the motor does not work, as there are 6 possible combinations, and only 2 of them work properly. This code and wiring should be enough to develop a basic centrifuge.
As of writing this, I have 3 hours to submit this project, so I had to cancel my print mid-way in order to provide a proof of concept. Below is an image of the sample holder mounted on the motor:
Update March 30, 2017: The updated version of the sample holder was successfully printed, and I have a photo of the print below:
See the attachments section below for CAD models.
Once mounted and tested, we can finally improve our code and interface. I added a Grove Shield and LCD to the Arduino, and added an RPM indicator to the program. It is not reliable as it provides an estimate based on the reading on the potentiometer, not the motor. I will add an encoder once it ships. Below is a copy of the v0.1 code:
#include <Wire.h>
#include "rgb_lcd.h"
#include <Servo.h>
Servo esc;
rgb_lcd lcd;
int throttlePin = 0;
void setup() {
   // set up the LCD's number of columns and rows:
   lcd.begin(16, 2);
   // Print a message to the LCD.
   lcd.print("Initializing...");
   esc.attach(9);
   lcd.setRGB(50, 50, 50);
}
void loop() {
   lcd.clear();
   int throttle = analogRead(throttlePin);
   throttle = map(throttle, 0, 1023, 0, 179);
   int throttlepercent = (throttle*100) / 179;
   int myRPM = 7200 / (100 - throttlepercent);
   esc.write(throttle);
   // Turn off the display:
   lcd.print("Speed: ");
   if(myRPM == -1){
   lcd.print("7200");
   }else if(myRPM <= 100){
     lcd.print("0");
   }else{
   lcd.print(myRPM);
   }
   lcd.print(" RPM");
   delay(50);
}
Here are some photos and videos of the device working:
I have uploaded version 2 of the sample holder. It's lighter, and takes less time to print. Don't forget to scale the stl model by 25.6, as Fusion 360 is having issues with unit conversion while exporting stl files. I am working on designing a nice enclosure for the device, and will add some form of optical encoder so that the Arduino can provide accurate readings for RPM. The interface will likely be improved in the next two updates, and I hope to have the app ready by the end of April.
Planned ImprovementsThis project is still a work in progress, and I will be doing gradual improvements to this over the next two months. I am currently working on adding an interface with a timer function so that it can spin the sample at a set speed for a set amount of time, and that will be included in v 0.2. I will be posting higher quality images soon, and will print a better version of the sample holder. I am also working on an app that can control it wirelessly over Bluetooth and WiFi, and possibly Alexa, but that won't happen until v 0.5. Until then, I will work on designing an enclosure with a cover so that there aren't any safety issues with the device (you wouldn't want samples flying around!), and will make it more aesthetically pleasing. I am also working on an entertaining and informative video of the project, and will post that soon.
Applications of this projectThis project has a huge impact on many people, and it is very useful in many contexts. I mainly use centrifuges for DNA experiments, as it separates organelles and many other parts of cells very easily and effectively. Centrifuges are also used commonly in blood samples to prepare them for disease testing procedures. A good centrifuge will help doctors and researchers speed up the testing process, and lower risks and costs. A low-cost device like this can inspire biohackers to develop their own solutions and improve upon current procedures. This DIY approach is also very useful in STEM education, as it can inspire students to engage in scientific research and find solutions to problems we see in everyday life. Another interesting aspect of this project is the fact that it uses e-waste, and is more environmentally friendly than throwing out old power supplies and dead hard drives.
Update 1, March 29, 2017: I have uploaded version 2 of the sample holder. It's lighter, and takes less time to print. Don't forget to scale the stl model by 25.6, as Fusion 360 is having issues with unit conversion while exporting stl files. I am working on designing a nice enclosure for the device, and will add some form of optical encoder so that the Arduino can provide accurate readings for RPM. The interface will likely be improved in the next two updates, and I hope to have the app ready by the end of April.
Update 2 March 30, 2017: After successfully printing the v2 model of the sample holder, I mounted it onto the device and tested it. Fortunately, it was much lighter, and was able to spin at the maximum rpm. I will be doing extensive testing on DNA extraction once my eppendorf tubes arrive, and will share the results as soon as I can. Improved interface, and enclosure coming soon. I uploaded a few photos and videos of the 2nd version of the microcentrifuge.


Comments