

Hardware components | ||||||
 |
| × | 1 | |||
 |
| × | 1 | |||
 |
| × | 1 | |||
 |
| × | 1 | |||
 |
| × | 1 | |||
 |
| × | 1 | |||
 |
| × | 1 | |||
Software apps and online services | ||||||
| ||||||
Hand tools and fabrication machines | ||||||
 |
| |||||
I recently got a really good new laptop, and I do most of my work on there now. However sometimes I need to do stuff on my old Desktop computer, like this that need a higher rated graphics card.
To connect to my desktop, I simply use Remote Desktop from my laptop as It works well for what I need. Since I don't need a monitor, keyboard, or mouse attached to it (only my WiFi stick), I want to put it somewhere out of the way.
The issue I faced with moving it out of the way was that I needed some way to easily power it on and off when I needed to use it.
After giving it some thought, I decided that I would use my Particle Photon for controlling it, that way I can use IFTTT to send event to turn on and off my computer. This makes it simpler, as then I can just use the IFTTT button om my Android tablet turn it on and off, or I can use IFTTT to schedule certain times when it should come on and turn off.
To control the computer I can just attach the Photon to the power button header on the motherboard, and then use a transistor to emulate the button being pressed.
What You'll needFor this project, you'll need: (in the end these aren't many parts at all)
- A particle Photon
- A transistor rated for around 5 volts, I used a C9013 from Korea Electronics as that's what I had around
- A 1k resistor for current limiting on the transistor (I used a 10k as I couldn't find a 1k and it worked fine)
- A bunch jumpers (a few of each would be good, male-male, male-female, and female-female)
- A piece of proto/varo-board
- Some male and female headers
- A soldering iron and some solder
- Some electrical tape of heatshrink
Now you could simply run some jumper wires from the power button header to the transistor, but I wanted to still be able to use the power button on my front IO panel. It order to do this I needed to solder a few jumpers together so that I could plug one end of the cord onto the header, and connect on of the other ends to the power button, and the other end to the transistor. I need 2 of these for the 2 wires for the power button.
Now we need to find our power header, on my computer it was pretty easy to find.
You can see the two pins on the far right are marker as the power button (the far far right pin isn't populated), so we need to pull out the existing power button header (yuck, got a lot of dust on my fingers, time for a clean!) and plug on our 2 wires.
Now I measured the voltage across the two power button lines to make sure it wouldn't break down our transistor and give us a nasty surprise. (Notice that I used an insulated alligator clip so I didn't shock myself if it was something high!)
Only 3.5v like I expected, excellent! The transistor I'm using it rated for 30v across the collector-emitter so I should be good.
Please be careful after you've connected the wires, especially if your computer freaks out after a hard shutdown. It's not dangerous in the least, but If the wires fall and short against the case it will think the button is being pressed, and leaving it like that for 10 seconds will cause a hard reset.
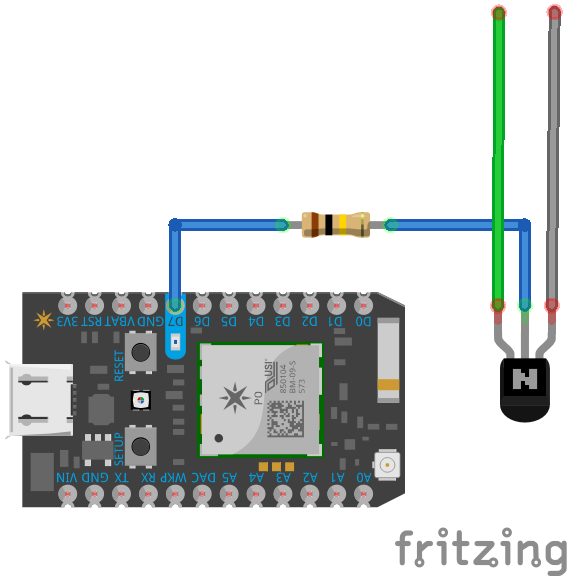
PrototypeThe next step was to prototype my design on a breadboard. Here is a Fritzing schematic for my design:
The base of the transistor is connected to digital pin 7 trough the resistor, and then the collector and emitter of the transistor connect to the computer. I connected the collector pin to the pin marked + on the power button header, and the emitter to the other pin.
I used digital pin 7 because it has an LED,
so I could see that it was actually "pushing the button" while testing.
Flashing the CodeNow head over to build.particle.io, and create a new project. Here is the code we'll be using:
//The pin you want to control, in this case I'm blinking the on-board blue LED on digital pin 7
int led = D7;
//This function is called after the Photon has started
void setup(){
    //We set the pin mode to output
    pinMode(led, OUTPUT);
    //We "Subscribe" to our IFTTT event called button so that we get events for it
    Particle.subscribe("start_computer", myHandler);
}
//The program loop, not sure if this has to be here for the program to run or not
void loop() {}
//The function that handles the event from IFTTT
void myHandler(const char *event, const char *data){
    // We'll turn the LED on
    digitalWrite(led, HIGH);
    // We'll leave it on for 1 second...
    delay(500);
    // Then we'll turn it off...
    digitalWrite(led, LOW);
}
Save it, and then hit the lightning bolt (flash) to upload it to your Photon.
First TestFor a first test I flashed my Photon with the Tinker app, and then I just clicked on D& to set it to high. I forgot that it takes a few seconds before you can change the state, so instead of the button turning on and then off, I accidentally left the button on and it triggered a hard restart on the PC, oops!
Connecting to IFTTTIf you haven't already, you'll need to head over to ifttt.com and register for an account, and then you'll need to connect your Particle account to IFTTT by clicking "Connect" on this page.
Now for this I used the DO Button app from IFTTT on my tablet to turn on and off my computer. You can see how to set that up in my other project over here if you'd like to do it that way, you just need to change the event name to be "start_computer"
Using IFTTT, you can set the computer to start when different events happen, such as turning your computer on at 7am, and off at 11pm, or turning it on when it starts raining, so that when you come inside it's all ready for you to play some games.
Making it permanentNow I want to leave this in my computer, but I want to have the breadboard free for other projects, and I'd like a bit more of a permanent solution.
I went and found a suitable piece of proto-board that have been used for something else previously so it had a few headers on it. I went ahead and soldered on a couple rows of females headers spaced correctly for the Photon, as I have no plans to solder my Photon permanently into anything.
The blue stuff on the headers is some tack I was using to hold them in place whilst I was soldering them.
Next I soldered the resistor from D7 to a free row on the proto board.
And then I added the transistor, with the middle leg (base) on the same row as the resistor so it was connected to D7, and then I added some male headers across the transistor pins so I could easily connect the jumpers from the power button.
Now we're ready to connect it into the computer! For anyone who want's it, here is the rough proto-board design:
Now I can't just stick the protoboard into the computer, because then there is a VERY HIGH chance of the contacts on the bottom touching the case, which would short the power button, the Photon, and the resistor, and would probably destroy the Photon. No one likes a fried Photon, so lets put it in a box.
I had this nice little box from SparkFun laying around from when I ordered my Intel Edison, and it was a perfect size to fit inside my computer and hold the protoboard.
I went ahead and cut a couple holds in the back, one for the USB cable and a small one for the jumpers. Later on I plan on powering the Photon from the computer's PSU or one of the USB headers, but until then I'm just running a USB cable out one of the PCI card slots and plugged it into the back of the computer. After that I tucked the box away into an empty drive bay which it fit into perfectly.
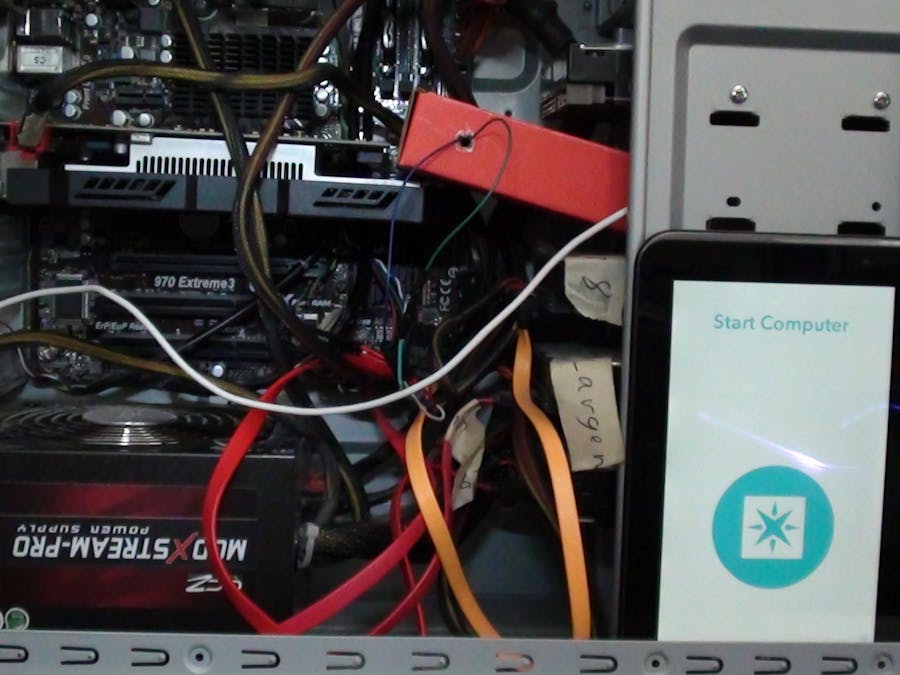
With everything packed away into the box, and all the cords attached, it was time for a final test using IFTTT.
It works! Yay! Sorry for the bad resolution, it wasn't until now that I realized someone had changed the resolution setting on my camera.
What to do next..I don't want to be using up one of my back USB ports for power, and running a cord through the case. So in the future I'm going to be figuring out a solution for either running it off of one of the USB headers on the motherboard, or directly off the power supply.
I'm also planning on hooking up the Photon to the power LED header, that way with an analog read I can tell if the computer is on, sleeping, or off, as well as connecting it to the reset header in the same way as the power button.
I'm curious to see what anyone makes from this, please link to your projects in the comments so I can see them! :)


_3u05Tpwasz.png?auto=compress%2Cformat&w=40&h=40&fit=fillmax&bg=fff&dpr=2)
Comments