

Hardware components | ||||||
 |
| × | 1 | |||
 |
| × | 1 | |||
Software apps and online services | ||||||
 |
| |||||
| ||||||
Hand tools and fabrication machines | ||||||
| ||||||
This is a tutorial that includes everything you need to know about customizing a TinyTV including:
- Assembly Instructions
- Some tips on Customizing and Painting the TinyTV Enclosure
- How to Upload your own Videos to the TinyTV
- Changing the TinyTV Settings to Loop videos, Change Mode, Show Time, Autoplay, and even using a different remote!
This tutorial will include some links that lead to separate tutorials that have extended information on the above topics - so think of this page as a detailed table of contents that helps you understand all the customizable parts of the TinyTV!
Assembly InstructionsYou can follow along with the assembly video below and pause as you need, or follow step by step written instructions from the TinyCircuits Wiki.
During assembly, just be sure to be careful with the small components! Take special care to keep even pressure on the TinyScreen+ when placing it into the TinyTV enclosure.
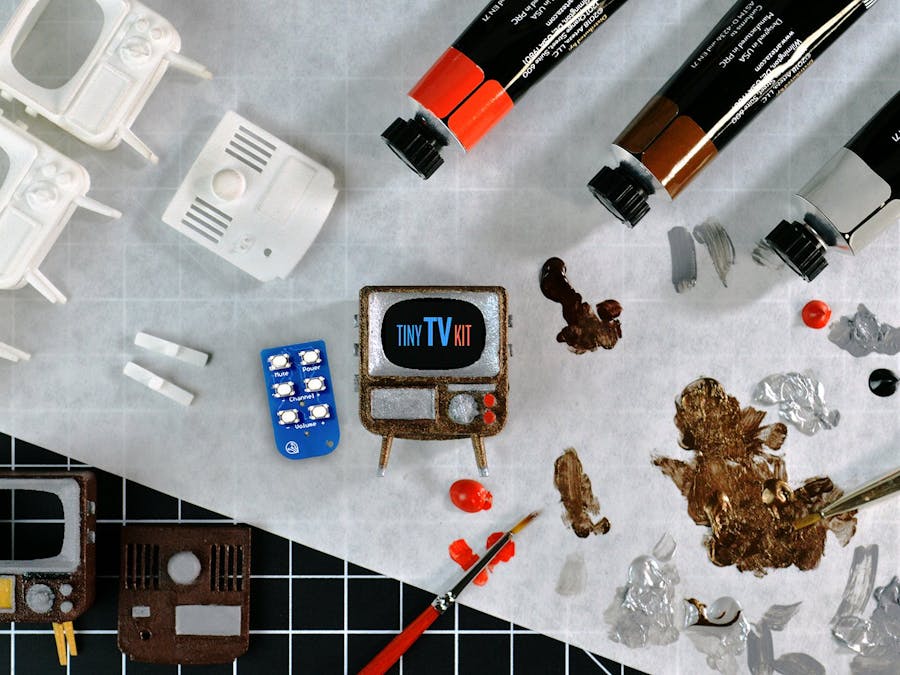
Painting and Customizing the TinyTV EnclosureThe best way to make a TinyTV your own, or to add a special touch for a gift is to add color to the white enclosure. All of these tips are optional, and you can take or leave whatever advice you would like! Some things you might want to use:
- Primer -(optional) Used to prep your surface before painting
- Fine grit sandpaper- (optional) Used to smooth out the 3D printed TV housing
- Paint acrylic or enamel will work best, we use Arteza brand acrylic
- Paint palette
- Small paintbrush
- Tweezers will come in handy
- Filtered water for cleaning your brush
- Masking tape or Liquid Frisket
- Q tips
- Lint-free cloth or paper towel
- Metallic sharpies work well too instead of paint
Sand & Prime: To prepare the enclosure, you may want to sand the textured housing and then wipe off any remaining dust. Once you have a smooth surface to your liking, you can prime the TV with a plastic-compatible primer (the 3D print material of the TV is SLS Nylon with a raw finish from the 3D printing service JawsTec).
Add Some Color: Next, you can put a base coat on the enclosure. Tweezers will come in handy as you begin painting the smaller pieces, like the power switch. Paint the TV as many colors as you like, and layer it however you want! If you want to add some fine detail or a metallic shine, you can use Sharpie markers, and their ultra fine-tip ends for more precise details.
There is a lot to say on how you can customize the outside of a TinyTV - and you can check out the extended write up with pictures on the TinyCircuits blog for more details.
Uploading Videos to the TinyTVThere is no programming required for this step! To upload videos to the TinyTV, you just need the microSD card that plugs into the TV, the videos you want to watch on the TinyTV, and the TinyScreen Video Converter (TSV Converter).
Download the TSVConverter for Windows or Mac:
Open the TSV Converter, then open the video you want to make tiny from the TSV Converter, and select "Convert" to get the TinyTV formatted video. The.tsv file will automatically download into the same location as the original video.
Add the.tsv file to the microSD card plugged into your computer. The order of the.tsv files on the microSD card is the same order the videos will appear on the TinyTV. Plug the microSD card back into your TinyTV, and watch your new videos!
For a step-by-step tutorial with pictures, check out the full TSV Converter tutorial on the TinyCircuits Wiki.
Changing the TinyTV SettingsThere are a few usable modes that come with the TinyTV that you can access through the settings menu. To get to the settings menu: shut the TinyTV power switch off, and then hold the upper-right button while turning the TinyTV on.
You should see an option for Settings, IR, and Exit. Use the buttons on the side of the TV to select what menu to navigate to.
The Settings menu includes an option for TinyTV Mode (plays videos like channels on a TV, or when turned off simply plays the videos with no effect), Full Volume, Loop Video, Show Time, or Auto Play. All of these Settings options can be toggled on or off to change the functionality (or program) of the TinyTV to create different behavior.
From the IR menu, you can change which Tiny Remote buttons work for the Mute, Power, Channel (+), Channel (-), Volume (+), or Volume (-) button options. You can even use a different remote! You just need to point the remote you want to use, click the button of your choice, and then save the IR code that should appear on the screen to save the change.
Once you are happy with all the changes, you can select the Exit button or turn the TinyTV off and back on to see the changes you have made.
For more information and pictures on the different settings and how to access them, check out the TinyTV Settings Customization page on the TinyCircuits Wiki.
Bonus: Customizing the TinyTV with the Arduino programIf you want to go even further with your customizations, you can program the TinyTV kit using Arduino. The tutorial with the TinyTV program can be found at the bottom of this page, or on the Tiny Video Player & TinyTV Program tutorial page.
Share your creations!Tag @TinyCircuits with your creation on Twitter, Instagram, or Facebook!
If you have any questions about the TinyTV, feel free to comment below.
Thanks for reading!


Comments