Hardware components | ||||||
![]() |
| × | 1 | |||
![]() |
| × | 1 | |||
![]() |
| × | 1 | |||
![]() |
| × | 1 | |||
![]() |
| × | 1 | |||
![]() |
| × | 1 | |||
![]() |
| × | 1 | |||
Software apps and online services | ||||||
![]() |
| |||||
![]() |
|
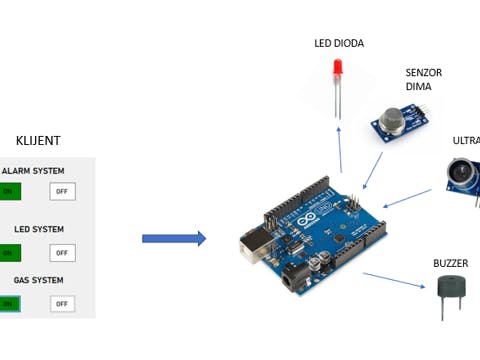
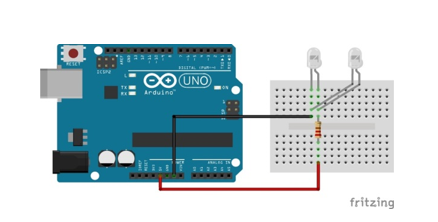
My second Arduino project was to design a simple prototype of a smart home consisting of a burglar alarm system, detection of gases, smoke, fire and LED lighting control. The system consists of an Arduino UNO platform, smoke sensor, ultrasonic distance sensor, buzzer and LED. The system is programmed using the Arduino IDE and C # applications. The user interface offers the possibility of manually turning on and off the burglar alarm system, smoke system and LED system.
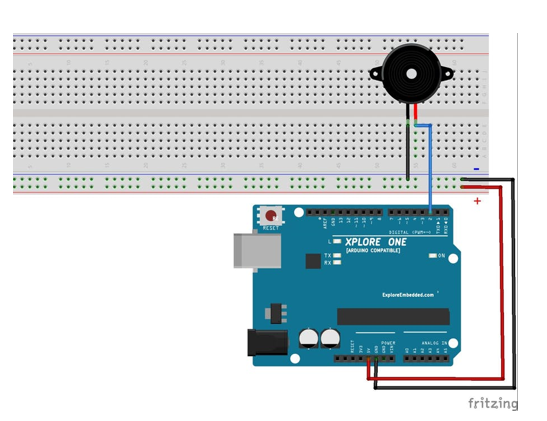
Ultrasonic sensor and Arduino Uno
Ultrasonic sensors are supposed to be in front of the door or windows and if something occurs and ultrasonic sensor measure distance less than reference distance, the buzzer will make a sound.
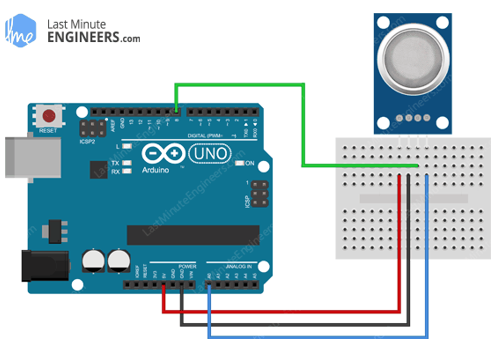
MQ Gas Sensor and Arduino Uno
They are commonly used to detect toxic or explosive gasses and measure gas concentration. Gas sensors are employed in factories and manufacturing facilities to identify gas leaks, and to detect smoke and carbon monoxide in homes.
#define echoPin 2 // pin D2 echo pin senzora udaljenosti
#define trigPin 3 // pin D3 trig pin senzora udaljenosti
int gas;
long duration; // varijabla za trajanje zvučnog signala
int distance; // varijabla za mjerenje udaljenosti
bool alarm = false;
const int buzzer = 9; //buzzer spojen na arduino pin 9
bool osoba= false;
bool dim=false;
bool gasSystem=false;
const int gasPin = A0; //GAS sensor output pin to Arduino analog A0 pin
void setup()
{
Serial.begin(9600);
pinMode(13, OUTPUT); // izlazni pin spojenih ledica
pinMode(trigPin, OUTPUT); //izlazni pin senzora udaljenosti
pinMode(echoPin, INPUT); //ulazni pin senzora udaljenosti
pinMode(buzzer, OUTPUT); // buzzer pin 9 je output
}
void loop()
{
Provjera_Komunikacije();
Provjera_Alarma();
Provjera_Alarma2();
}
void Provjera_Alarma() {
if (alarm == true)
{
digitalWrite(trigPin, LOW);
delayMicroseconds(2);
digitalWrite(trigPin, HIGH);
delayMicroseconds(10);
digitalWrite(trigPin, LOW);
duration = pulseIn(echoPin, HIGH);
distance = duration * 0.034 / 2; // Speed of sound wave divided by 2 (go and back)
Provjera_Komunikacije();
if(distance < 20){
osoba=true;
}
if(osoba == true){
Serial.write("1");
tone(buzzer,500);
delay(800);
noTone(buzzer);
}
}
}
void Provjera_Komunikacije(){
if(Serial.available())
{
char data1=Serial.read();
if (data1 == 'G')
{
alarm = true;
}
else if (data1 == 'H')
{
alarm = false;
osoba=false;
}
switch(data1)
{
case 'O':digitalWrite(13, HIGH);
break;
case 'F':digitalWrite(13, LOW);
break;
}
if (data1 == 'I')
{
gasSystem = true;
}
else if (data1 == 'J')
{
gasSystem = false;
dim=false;
}
}
}
void Provjera_Alarma2(){
if (gasSystem==true){
gas=analogRead(gasPin);
Provjera_Komunikacije();
if(gas > 400){
dim=true;
}
if (dim== true){
Serial.print('2');
tone(buzzer,1500);
delay(400);
noTone(buzzer);
}
}
}
C# code
C#In the C # application, which is available to the client, by pressing the ON button under the heading ALARM SYSTEM, the client turns on the alarm system and the ultrasonic sensor constantly measures the distance and sends it to the Arduino. If it has measured a certain distance at which we know someone is in the room, the Arduino sends the information to the buzzer and it advertises. On the OFF button, the client has the option to turn off the alarm system or buzzer.
The smoke detection system works in the same way. By pressing the ON button below the GAS SYSTEM heading, the smoke sensor measures air quality and sends it to the Arduino. If the air quality is out of range, an alarm or buzzer is activated. On the OFF button, turn off both the system and the buzzer if it is activated.
The LED system works by pressing the ON button below the LED SYSTEM header to turn on the LEDs and they are on until you press the OFF button.
using System;
using System.Collections.Generic;
using System.ComponentModel;
using System.Data;
using System.Drawing;
using System.Linq;
using System.Text;
using System.Threading.Tasks;
using System.Windows.Forms;
using System.IO.Ports;
namespace Project_RS
{
public partial class Form1 : Form
{
public SerialPort myport;
public Form1()
{
InitializeComponent();
}
private void button1_Click(object sender, EventArgs e)
{
button1.BackColor = Color.Green;
button2.BackColor = Color.White;
myport = new SerialPort();
myport.BaudRate = 9600;
myport.PortName = "COM7";
myport.Open();
myport.WriteLine("O");
myport.Close();
}
private void button2_Click(object sender, EventArgs e)
{
button1.BackColor = Color.White;
button2.BackColor = Color.Red;
myport = new SerialPort();
myport.BaudRate = 9600;
myport.PortName = "COM7";
myport.Open();
myport.WriteLine("F");
myport.Close();
}
private void button3_Click(object sender, EventArgs e)
{
button3.BackColor = Color.Green;
button4.BackColor = Color.White;
myport = new SerialPort("COM7",9600,Parity.None,8,StopBits.One);
myport.BaudRate = 9600;
myport.PortName = "COM7";
myport.Open();
myport.WriteLine("G");
myport.Close();
}
private void button4_Click(object sender, EventArgs e)
{
button3.BackColor = Color.White;
button4.BackColor = Color.Red;
myport = new SerialPort();
myport.BaudRate = 9600;
myport.PortName = "COM7";
myport.Open();
myport.WriteLine("H");
myport.Close();
}
private void label1_Click(object sender, EventArgs e)
{
}
private void button5_Click(object sender, EventArgs e)
{
button5.BackColor = Color.Green;
button6.BackColor = Color.White;
myport = new SerialPort();
myport.BaudRate = 9600;
myport.PortName = "COM7";
myport.Open();
myport.WriteLine("I");
myport.Close();
}
private void button6_Click(object sender, EventArgs e)
{
button6.BackColor = Color.Red;
button5.BackColor = Color.White;
myport = new SerialPort();
myport.BaudRate = 9600;
myport.PortName = "COM7";
myport.Open();
myport.WriteLine("J");
myport.Close();
}
public void button7_Click(object sender, EventArgs e)
{
}
public void serialPort1_DataReceived(object sender, SerialDataReceivedEventArgs e)
{
serialPort1.Open();
MessageBox.Show(serialPort1.ReadLine());
}
private void button7_Click_1(object sender, EventArgs e)
{
}
}
}
Comments