


Hardware components | ||||||
_ztBMuBhMHo.jpg?auto=compress%2Cformat&w=48&h=48&fit=fill&bg=ffffff) |
| × | 1 | |||
 |
| × | 1 | |||
 |
| × | 1 | |||
 |
| × | 1 | |||
| × | 1 | ||||
| × | 1 | ||||
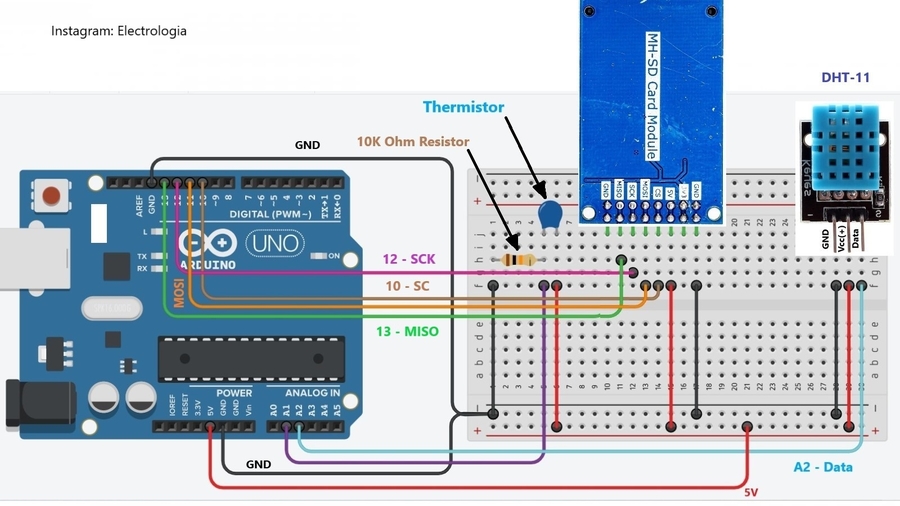
In this project I am going to test sensitivity of DHT11 sensor and NTC Thermistor (from old laptop battery pack). First I will build circuit with the help of Arduino and measure the temperature of surrounding (room temperature in the kitchen) and then I will put it inside the fridge. By this I will make sharp temperature reduction and according to gained data I will measure how long do sensors need to get stabilized accurate temperature.
Components for the circuit:- Arduino Uno
- NTC Thermistor (10k Ohm)
- 10k Ohm resistor
- DHT11 sensor
- MH-SD card module
- Jumper cables and solderless breadboard
- Random fridge (to get sharp temperature reduction)
The aim of the circuit: Each second the data collected from NTC Thermistor and DHT11 sensor will be save on SD Card.
According to the code, every second the temperature from 2 sensors will be saved in this format:
0_Thermistor_Temperature_21.91_Celcius_DHT11_Temperature_21.91_Celcius_Humidity_52.00_%
For example: at 5th second Thermistor detected 21.99 Celsius and DHT11 detected 21.00 Celsius temperature. (in this project we do not count humidity)
I put underscore symbol (_) between each variables in order, easily convert data to excel.
Bellow we can see that overall circuit worked 5061 seconds. (1 Hour, 24 Minutes and 20 Seconds)
Now time to make data visualization. For this I am using Python (Matplotlib).
Analyzing data from thermistor: From the collected data we can show that temperature on the thermistor started to go down from 237 second.
At 1593 second it started to show stabilized temperature in the fridge. (between 10.6 and 10.51 Celsius). So overall 1593-237= 1356 seconds needed to get accurate temperature in the fridge. (1356 sec = 22min, 36 sec)
Analyzing data from DHT-11: Temperature on the DHT-11 sensor started to go down from 277 second.
At 1525 second it started to show stabilized temperature inside the fridge (8 Celsius). So overall 1525-277=1245 seconds needed to get accurate temperature during instant temperature reduction. (1245 sec = 20 min, 45 sec)
All the files of this project:
https://drive.google.com/drive/folders/1_3Es_cTz8hum3kX2qMZne4OPNvxVFr-S?usp=sharing
Conclusion:DHT-11 needs 20 min. 45 seconds to get accurate temperature data.
Thermistor needs 22min. 36 seconds to get accurate temperature data.


Comments