



Hardware components | ||||||
| × | 1 | ||||
| × | 1 | ||||
| × | 1 | ||||
 |
| × | 1 | |||
 |
| × | 1 | |||
| × | 1 | ||||
| × | 1 | ||||
Software apps and online services | ||||||
 |
| |||||
Copyright ©️ 2026 Kaled Souky. All rights reserved.
This program is free software: you can redistribute it and/or modify it under the terms of the GNU General Public License as published by the Free Software Foundation, either version 3 of the License, or (at your option) any later version.
This program is distributed in the hope that it will be useful, but WITHOUT ANY WARRANTY; without even the implied warranty of MERCHANTABILITY or FITNESS FOR A PARTICULAR PURPOSE. See the GNU General Public License for more details.
GigaNES (developed by Kaled Souky in 2026) is a specialized port of the Nofrendo NES emulator core, custom-engineered for the Arduino Giga R1 WiFi (STM32H747XI) and the Arduino Giga Display Shield. This project leverages the high-speed Cortex-M7 core and low-level STM32 register access to deliver a full-speed, low-latency gaming experience on modern Arduino hardware.
In the field of emulation, the STM32H747XI delivers disruptive performance. Although it is a dual-core SoC, its 480 MHz Cortex-M7 core is the true standout: thanks to its superscalar architecture and zero-latency Tightly Coupled Memory (TCM) , it processes video layers and transparencies with a fluidity that popular alternatives simply cannot match. While the ESP32 (Xtensa at 240 MHz) or the RP2040/RP2350 (Cortex-M0+/M33 at 150 MHz) often encounter data access bottlenecks, this chip ensures consistent 60Hz (NTSC) emulation, high-fidelity audio via its 12-bit DAC , and imperceptible input lag. This undoubtedly positions this project as the most advanced and powerful NES emulator ever developed for the Arduino ecosystem .
Unlike typical portable emulation projects based on Single-Board Computers (SBCs) like the Raspberry Pi 5 or Orange Pi, GigaNES operates entirely on bare-metal hardware . While high-performance MPUs rely on a complex Linux operating system layer—which introduces multi-threaded scheduling overhead, driver abstraction, and unpredictable input lag (ranging from 15 to 50 ms)—this project achieves a near-zero latency (< 1 ms) gaming experience. By avoiding the heavy overhead of an OS kernel, the Cortex-M7 core samples controller inputs through direct low-level register access in a deterministic manner. Furthermore, this MCU-centric design eliminates data corruption risks during sudden power-offs, boots instantly in under a second, and operates with extreme thermal efficiency, delivering a silent, fanless, and robust console experience that modern MPU-based alternatives cannot replicate.
1. 👩🏫 Technical Specifications: Architecture (v1.0)1.1 Video System (High-Performance Blitter)- M7 Brute Force: Due to hardware DMA2D limitations for simultaneous rotation and scaling, the Cortex-M7 core is utilized to perform a high-speed software transformation, bypassing standard HAL overhead.
- Rotation & Scaling Architecture: Adapts the native NES output (256×240) to the MIPI DSI panel (native Portrait 480×800) to achieve a true Landscape orientation:
Short Axis: The scaled NES height (240×2 = 480) perfectly matches the display's native width.
Long Axis: The scaled NES width (256×2 = 512) is centered on the 800px long axis.
- Bus Optimization (64-bit Writes): To maximize throughput on the memory bus, the system utilizes
uint64_tpointers to transfer 4 pixels (16-bit each) per single bus operation. - Loop Unrolling (8x): The critical blitter loop is unrolled 8 times to minimize branch overhead, achieving consistent Blit times of ~6.0ms (consuming only 36% of the total frame time budget).
- Sampling Rate (44100 Hz): Set to the CD-quality standard to ensure maximum sound accuracy. This frequency captures the full harmonic spectrum of the NES APU and specialized expansion chips (like the VRC6), providing a rich and authentic auditory experience.
- DAC Output: Utilizes the Advanced DAC (DAC0 / Pin A12) integrated into the STM32H7. The system performs precise dynamic mapping from 16-bit signed emulation samples to the 12-bit unsigned hardware output of the peripheral.
- Stability & Buffer: Implements a circular buffer with an x8 DMA queue depth . This specific "sweet spot" balance ensures crisp, glitch-free audio without "popping" or latency issues, even during intensive CPU cycles.
- DTCMRAM (128 KB): Zero-latency memory directly coupled to the core. Hosts the
emu_buf(256x240) andhw_palette, eliminating CPU wait states during the scaling process. - Internal SRAM: Stores executable code and critical emulator state variables.
- External SDRAM (8 MB): Managed by the FMC (Flexible Memory Controller) for the screen's Double Framebuffer and PRG/CHR ROM bank storage.
- Direct Register Access: Bypasses Arduino's
digitalWrite/digitalReadfunctions for the original NES controller interface. - Atomic Manipulation: Utilizes the BSRR (Bit Set/Reset Register) for Latch and Clock lines, ensuring state changes in a single clock cycle.
- Instant Capture: Data line reading is performed via the IDR (Input Data Register), eliminating input lag and providing a response identical to the original hardware.
- Library: SdFat in
DEDICATED_SPImode (50 MHz) for maximum I/O speed. - Auto-Save Engine: Emulates the original battery-backed RAM (SRAM) behavior by monitoring writes in the
$6000-$7FFFrange. This ensures that "natural" game progress is automatically preserved. - Zero-Jitter SaveThread: An independent RTOS thread manages the creation and updating of
.savfiles in the background. By using a shadow buffer, it ensures that saving does not impact emulation fluidity, eliminating any stuttering or frame drops.
- Header Parsing: The system analyzes iNES flags to automatically detect NTSC or PAL formats.
- Hardware Synchronization: Dynamically adjusts the MIPI controller Pixel Clock (23.7 MHz for PAL / 28.4 MHz for NTSC) and scanline count, maintaining correct game speed without display resets.
- Video: The LTDC/DSI controller utilizes hardware DMA to read the framebuffer from SDRAM autonomously.
- Audio: The DAC uses internal timers for output cadence, freeing the CPU from the precise timing of audio samples.
In your Arduino IDE, you must have the following packages and libraries installed; if you do not have them, install them using the Boards Manager and Library Manager:
- The Arduino Mbed OS Giga Board Package
- Arduino_H7_Video (Included in the Arduino Mbed OS Giga Board Package)
- Arduino_GigaDisplay
- Arduino_AdvancedAnalog
- SdFat
- SDRAM (Included in the Arduino Mbed OS Giga Board Package)
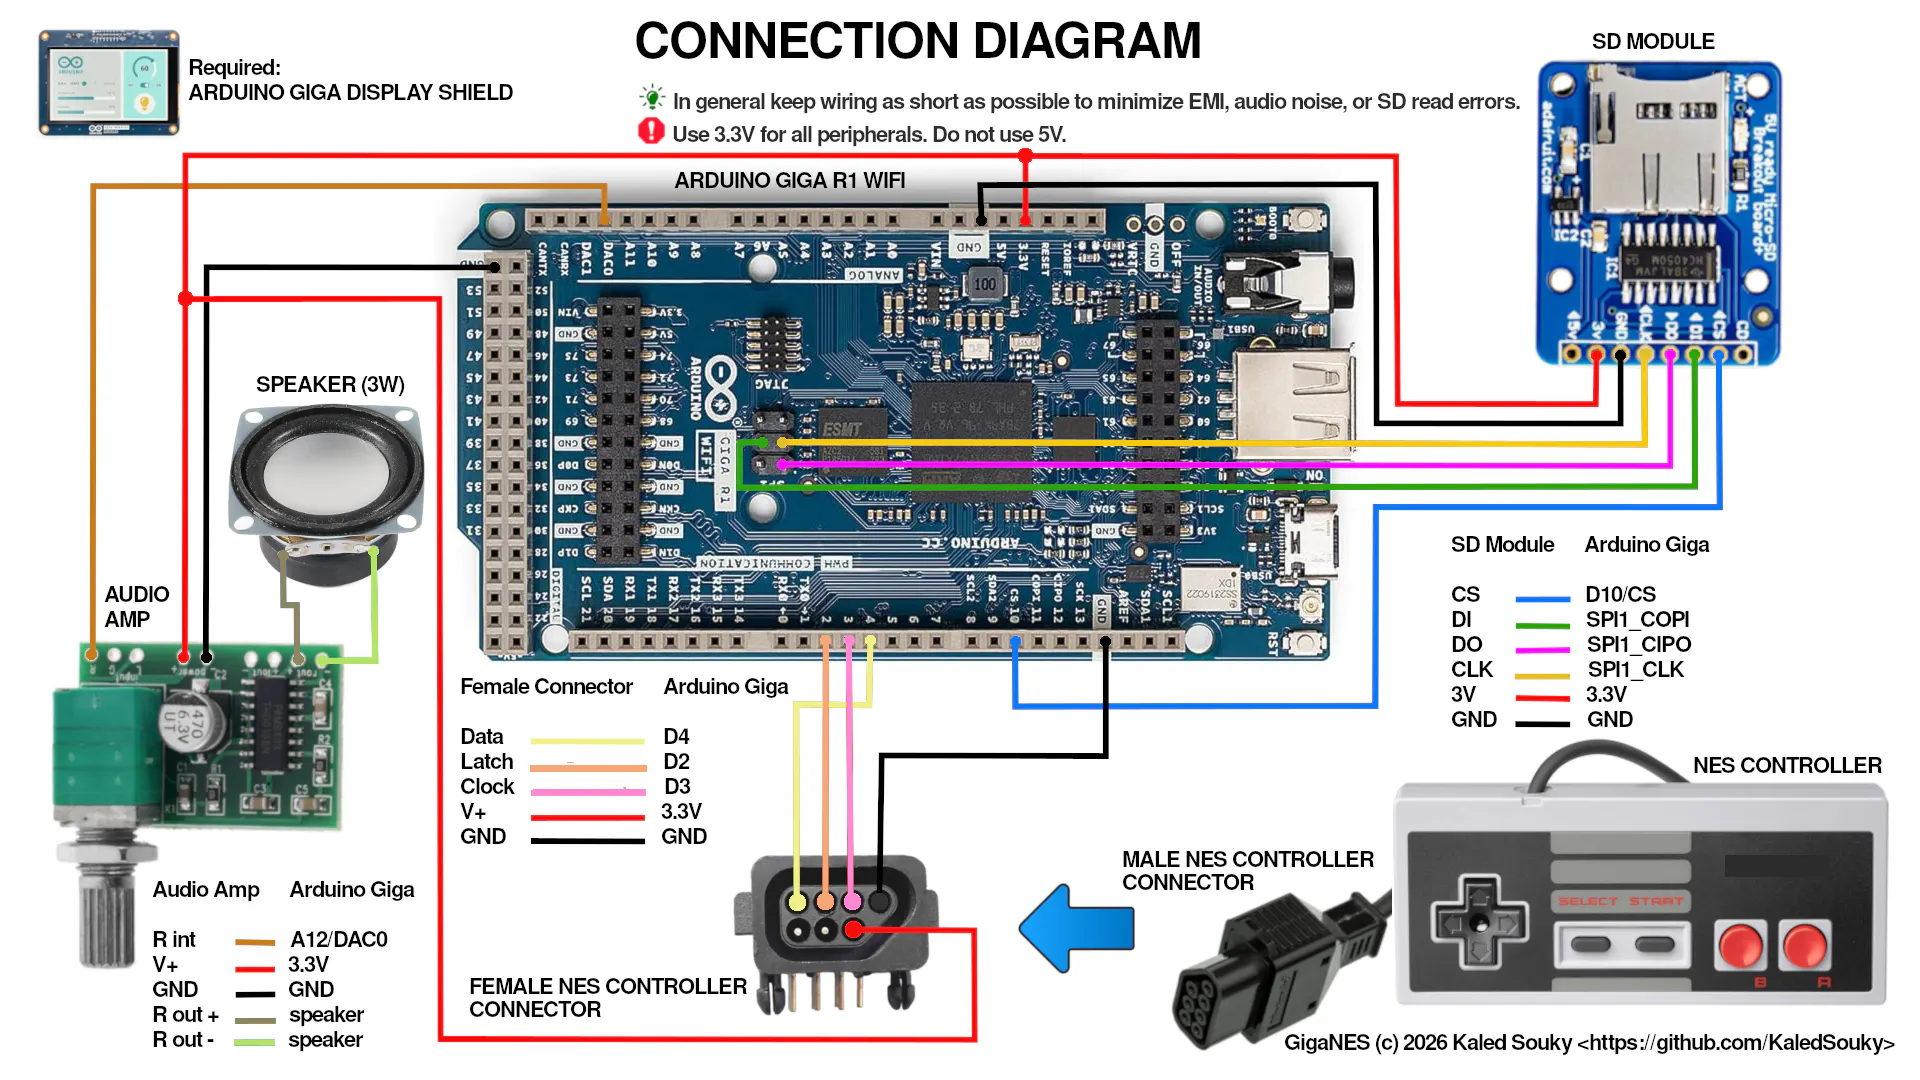
The connection diagram features a PAM8403 digital stereo amplifier module. Since the emulator generates a monophonic signal , only the Right Channel is used (Input: DAC0/Pin 12 | Output: 3W Speaker). You may use any monophonic (preferred) or stereo amplifier module, provided it operates at 3.3V and offers good noise protection.
⚠️ If using a stereo module, do not bridge the Left and Right inputs or outputs to achieve "dual mono" sound. This unnecessarily increases current consumption and may exceed your power supply's capacity, leading to instability or hardware damage.
💡 If you experience audio noise, it is highly recommended to place a 470 µF (10V) electrolytic capacitor and a 1 nF ceramic capacitor in parallel across the power pins (V+ and GND), as close to the module as possible.3.2 🎮 NES Controllers (Single & Multiplayer)
For a single-player setup, follow the connections shown in Connection_Diagram.png. For multiplayer mode, use the following wiring:
This project is tested with the Adafruit MicroSD card breakout board+. Any alternative module must be compatible with 3.3V logic.
- Format: The SD card (up to 32 GB) MUST be formatted in FAT32 .
- Filenames: Use the 8.3 filename rule (8 characters or less +
.nesextension). Place all ROMs in the root directory . - Logic Levels: If using a different module, ensure it has a built-in logic level shifter or is designed for 3.3V operation to match the Arduino Giga's I/O voltage.
⚠️ Operating Voltage: All peripherals must be powered with 3.3V . Do NOT use 5V, as it will damage the Arduino Giga R1.
💡 Wiring: Use short wires for all connections (SD, Audio, and NES) to prevent electromagnetic interference (EMI), audio noise, or SD read errors.4. 🚀 Usage Instructions
GigaNES is structured as a standard Arduino Sketch:
- Download or clone the GigaNES folder.
- Open
GigaNES.inoin the Arduino IDE. - Board Configuration: Ensure you have the Arduino Giga R1 board package installed (Tools > Board > Arduino Mbed OS Giga Boards) and select Arduino Giga R1.
- Hardware Assembly: Connect the Arduino Giga R1 WiFi to the Giga Display Shield and follow Connection_Diagram.png for hardware peripherals. Refer to Section 3 for critical safety and wiring notes.
- Upload and enjoy!
GigaNES ©️ 2026 Kaled Souky


Comments