

Olimex Micro Prototype Setup
A quick and easy prototype environment for the Olimex Micro Pinguino board adaptable to other MCU's.
About PinguinoPinguino is a boot loader and Arduino like programming language designed specifically for PIC computer chips so programs can be loaded directly from a computer using a USB cable - no programmer or additional hardware is needed. One difference is Arduino programs use C++ while the Pinguino compiles to C. The differences are small except for complex programs such as Libraries. A fully functional powerful 100mhz Pinguino controller can be made for $5 and less than a dozen components.
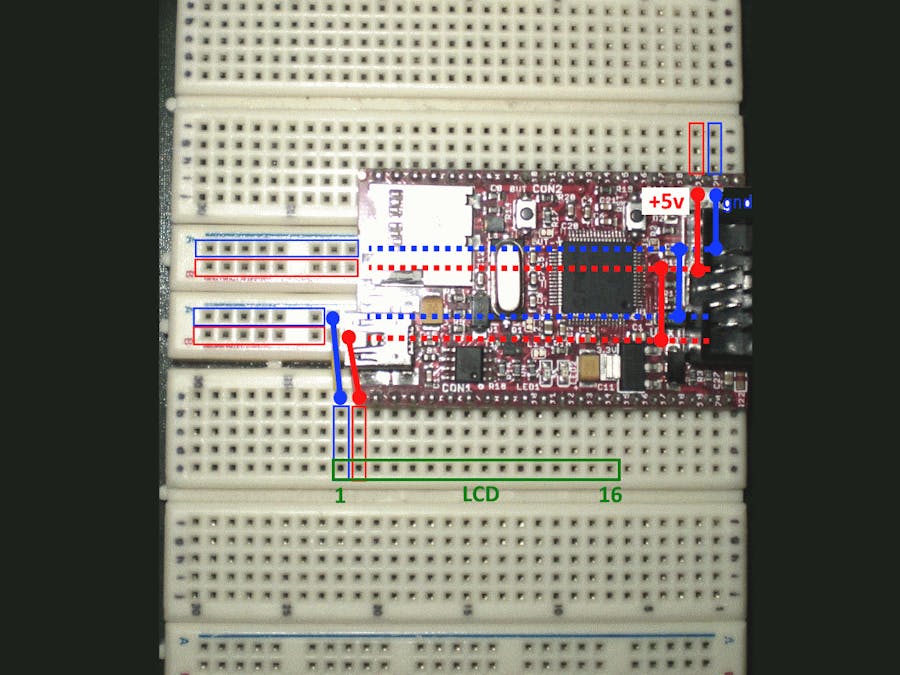
A quick and easy prototype environment for the Olimex Micro Pinguino board that can be adapted to other MCU's. Uses two half length solderless bread boards as shown in the picture. The bread boards should be mounted on a base plate of thin wood or a piece of fiberglass. They can be mounted by glue or strong double sided tape (I have even seen rubber bands used).
The two middle narrow power strips are necessary because the Olimex board is too wide for a single strip. The blue(gnd) and red(+5v) lines show how to connect to the on board power pins. These pins are powered when the MCU is connected to a USB cable.
Also note the lower jumpers connected just pass the MCU board pins. This allows appropriate power for a standard LCD.
Most Pinguinos are home made. Here are some examples of DIY...
- http://www.instructables.com/id/Pinguino-Egypt-PIC-Based-Arduino/
- http://electronics-diy.com/electronic_schematic.php?id=931
- http://www.kerrywong.com/2011/06/02/first-pinguino-build/
- http://circuit-zone.com/?cat=pic_microcontroller_circuits
- http://www.electronic4khmer.com/2013/11/pinguino-pic-microcontroller-based-open.html
However, there is good support from vendors. Most 32bit PICS are sold by manufactures due to the more complicated printed circuit design requirements.
- adafruit.com
- amazon.com
- olimex.com (search for Pinguino)
- digilentinc.com
- digikey.com
- mouser.com
- sparkfun.com
Here is an example where we take advantage of the pre-connected power bus and the use of the proto board. Using just one jumper, this circuit provides an alternating red/blue led light similar to a police cars emergency lights.
/*-----------------------------------------------------
Author:  Jan Zumwalt
Date: 2016-01-29
Description: Cop lights, alternate red/blue leds
<br/>
-----------------------------------------------------*/
bluePin = 30;               // blue led connected to pin 30
redPin  = 31;               // red led connected to pin 31
<br/>
void setup() {              // setup, run once
  pinMode(bluePin, OUTPUT);
  pinMode(redPin, OUTPUT);
  digitalWrite(bluePin,1);  // start with blue on
  digitalWrite(redPin,0);   // start with red off
}

void loop() {               // main loop
  toggle(bluePin);          // alternate blue & red lights
  toggle(redPin);
  delay(300);               // wait 1/10sec
}

Comments