
Hardware components | ||||||
 |
| × | 1 | |||
 |
| × | 1 | |||
 |
| × | 1 | |||
 |
| × | 1 | |||
 |
| × | 1 | |||
 |
| × | 1 | |||
| × | 1 | ||||
| × | 3 | ||||
| × | 2 | ||||
| × | 1 | ||||
Software apps and online services | ||||||
| ||||||
 |
| |||||
| ||||||
The importance of security has greatly increased in today’s world. Facial Recognition is surely an efficient way that leads towards a secured authentication system. There exist many static facial recognition systems where people have to wait in front of the camera to recognize. But we are proposing a dynamic authentication system which provides authentication on the go. The live video feed is processed as frames and in those frames the face detection and recognition takes place. We are using a library called ‘face_recognition’ which is a pre-trained model based on certain algorithms.
- Face detection using Histogram of Oriented Gradients (HOG) algorithm.
- High quality Face Recognition with Deep Metric Learning and Triplet Loss algorithm.
- Reducing the frame resolution while checking whether the face is a match or not which makes the process faster and wait less one.
- When a known person enters, his/her name is voiced out with the help of the GTTS library so that the security could be alerted on who is entering.
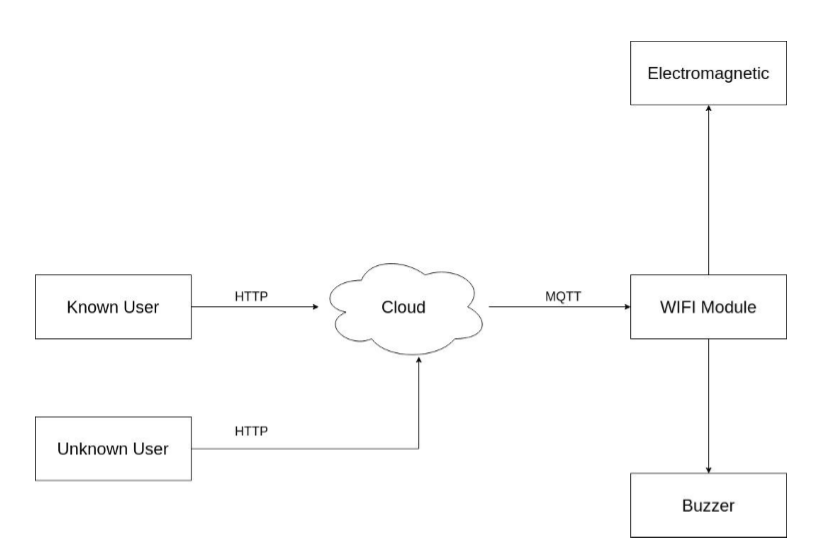
- When a known user enters, an API request is sent to the server and the server sends the request to the Bolt Wi-Fi – Module with the help of device ID and API key to open the gate only for a specified amount of time
Due to the corona outbreak, authentication through fingerprint is not advisable since it involves physical contact. The government has already suspended the bio metric entry system in a bid to prevent the spread of corona virus. But our proposed system doesn’t involve any physical contact for authentication. So when it comes to contact less authentication, one can go with this system without having any second thoughts.
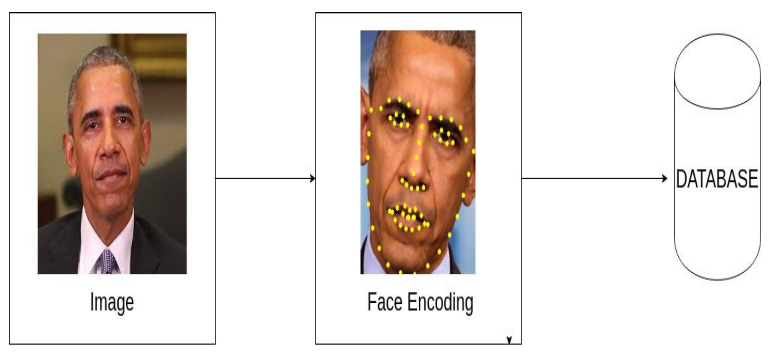
2. Demonstration3. Face RegistrationStep 1: Load the authorized personnel images by providing the path of the images
Step 2: Get the Face encoding from the loaded images
Step 3: Store all the face encoding in a list
Step 4: Store the face names in a list in the same order as of the face encoding list
Step 5: With the help of the gTTS API, convert “welcome ‘face name’ ” text to speech and save it in any audio format
4. Database TablesStep 1: Create a table with all the necessary details about the authorized personnel like person id and person name
Step 2: Create a table for entry time where the person id created in the previous table is included as foreign key in this table
Step 3: Create a table for exit time in the same entry time table format
Step 4: Create a table to store the indices of the seen faces
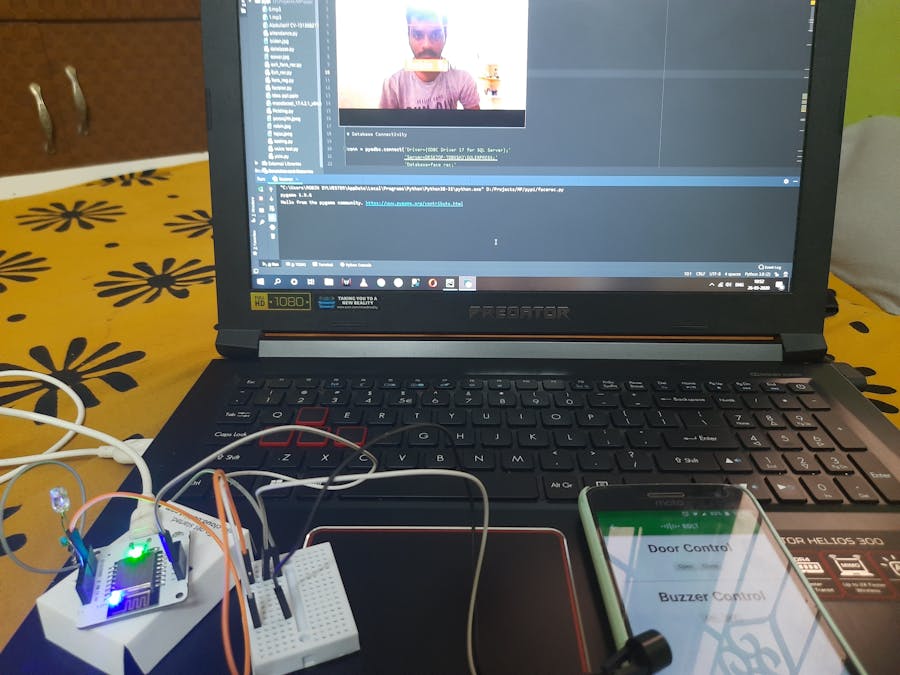
Step 1: Connect the ground pin to the breadboard using male to male wire
Step 2: Twist one end of the resistor around the positive end of LED. Connect the negative end of the LED to the ground pin in the breadboard using Female to male wire and the other end of the resistor to pin 0.
Step 3: Connect the buzzer’s positive end to pin 1 and its negative end to ground using Female to male wires
Step 1: Import the face encodings list from the face registration code
Step 2: Create an object of type Bolt and initialize the api key and device id
Step 3: Establish connection with the ODBC driver
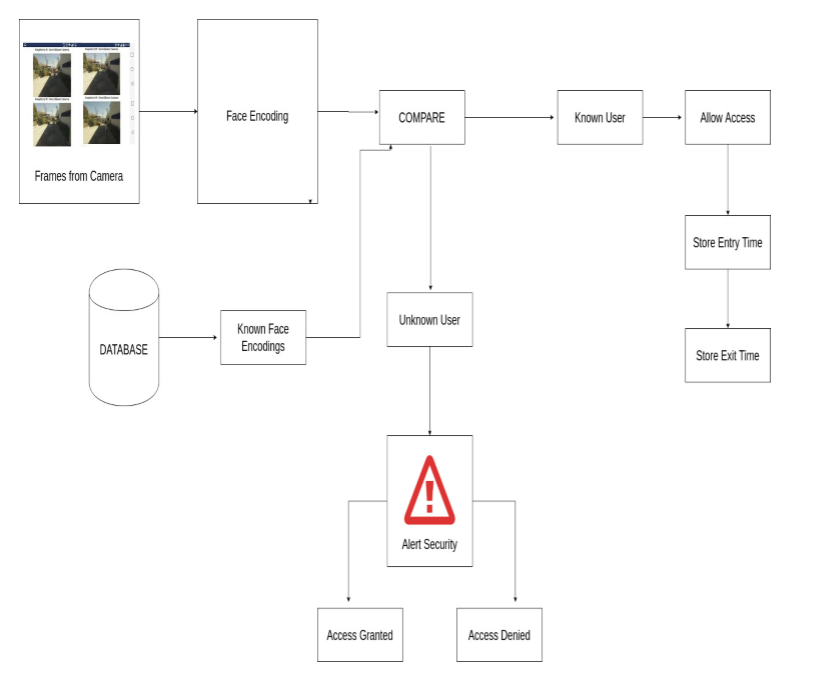
Step 4: Access your primary or secondary camera to capture the video feed
Step 5: Read the video feed as frames
Step 6: The frame resolution is reduced to 1/4th of its size to speed up the face recognition process
Step 7: Convert the image from BGR to RGB since Face_Recognition library only supports RGB images
Step 8: Get the face location and encoding from the current frame of the video
Step 9: Compare the current encoding with the known encodings list
Step 10: Initially the name is set as ‘Unknown’
Step 11: If it is a match then store the encoding’s index value in that list
Step 12: Using index value, get the name from the name list
Step 13: For the entry system, the condition is the seen faces list should be empty or the index value of the matched face should not be in the seen faces list.
Step 14: If the above condition is satisfied, then the previously created welcome audio is played and the index value gets appended to the seen faces list
Step 15: Current time and date is inserted into the Entry Time table along with the index as person id
Step 16: A digitalwrite request is sent to pin 0 to open the door
Step 17: After a specified amount of seconds, a digitalwrite request is sent to pin 0 to close the door
Step 18: If the name is still ‘Unknown’ then a digitalwrite request is sent to pin 1 which alerts the security through the buzzer
7. Exit SystemThe exit system is similar to the entry system. The code only differs in two things:
- Accessing the video feed camera
- The exit door is opened only if the matched index is in the seen faces list
The above product is linked with the bolt device through the bolt cloud. With this, the security can control the door and alert systems manually through the bolt mobile application. In case of situations where an unauthorized guest should be allowed, the security just needs to press the open button in the product. The security can also control the buzzer.

Authentication Control


Comments