I have always been annoyed at the fact that when I get into bed every night in my dorm room, if I forget to turn my A/C on or to Cool, I have to get out of bed and go turn it on. This is especially annoying when I am in a lofted bed 6 feet off the ground and have to climb down in the pitch black. So, for a final project for a class of mine, I came up with a design for a project that will solve this problem for me. Using an Arduino, an Adafruit Feather nRF52832, 3 servo motors, a power board, a DHT11 temperature and humidity sensor, and a cellphone, I solved my problem.
Since the thermostats are mounted into the wall, and owned by the school, I could not do any physical altering of said thermostat. This meant I couldn't hardwire into the thermostat. To overcome this hurdle I decided to use 3 SG90 micro servos that would press the buttons when I told them to. The Arduino would serve as the control for these servos. Next I needed to communicate with the Arduino wirelessly. So I used an Adafruit Feather nRF52832 BLE module.
The programming for the Feather was the hardest problem to solve. I needed to store what state the thermostat was in so I went through and interconnected the button presses for the different modes the thermostat would be in. This was the user interface that would be printed out to the app on the phone. Once that was complete I connected the two boards together and used serial communication to communicate between the two boards.
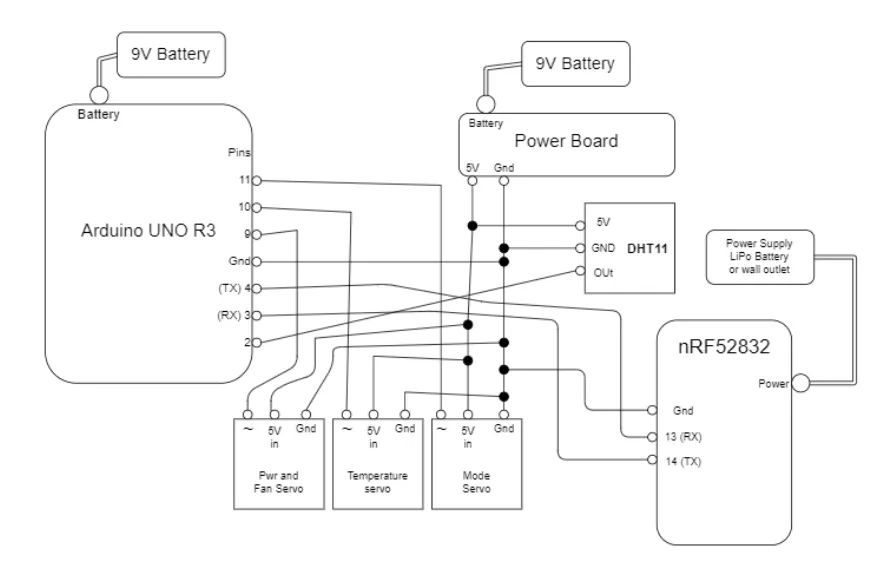
The app I used was the Adafruit Bluefruit app. This app had built in control options that were already available to be used with the bluetooth module I used. I used the control pad which had up, down, right, left, 1, 2, 3, and 4 buttons on the screen with a small UART text display at the top. Button 1 controlled the power, button 2 controlled the fan speed, button 3 requested the current mode of the thermostat, up turned the temperature up, down turned the temperature down, and right progressed through the modes. The resulting code is provided as well as the circuit diagram.
In all, this project took me around 30 hours of work to complete with my experience with software and microcontrollers. It was extremely fun and satisfying to create a functioning prototype. I have even considered putting it up as an item that people at my school could order from me. The thermostat it is made to be mounted onto is the "Mitsubishi PAC-YT53CRAU-J Simple MA Remote Controller."
I will advise that anyone looking to replicate my 3D printed parts to go in an increase all measurements by about 1mm on everything except the Arduino holder and the battery pack. My tolerances were too tight therefore it was very difficult and with the imperfections of 3D printing, I had to do a lot of sanding down of parts.
Thanks for checking out my project! Leave a like if if you found my project to be interesting!
Helpful tips if you are looking to recreate this project:
Things will needed to be added onto the thermostat buttons or servo arms to allow the interaction to be proper. I used a 5V 2600 mAh battery pack with a micro usb male port on it to power the nRF52832 since mine seemed to have problems with the LiPo battery I got. That being said, you can attach a LiPo batter to the nRF52832 and get battery readings sent to the phone using pre-existing code from Adafruit. Feel free to leave a comment on this post if you try to recreate this project and run in to any problems. I will try to check this every once in a while just to see if there is any activity. Enjoy!


_ztBMuBhMHo.jpg?auto=compress%2Cformat&w=48&h=48&fit=fill&bg=ffffff)


Comments