

Hardware components | ||||||
 |
| × | 1 | |||
_copy_P5AWOdT4dX.png?auto=compress%2Cformat&w=48&h=48&fit=fill&bg=ffffff) |
| × | 1 | |||
 |
| × | 1 | |||
 |
| × | 1 | |||
 |
| × | 1 | |||
 |
| × | 2 | |||
| × | 2 | ||||
 |
| × | 2 | |||
| × | 2 | ||||
| × | 2 | ||||
| × | 2 | ||||
| × | 3 | ||||
| × | 2 | ||||
| × | 2 | ||||
| × | 2 | ||||
| × | 12 | ||||
| × | 6 | ||||
| × | 3 | ||||
| × | 2 | ||||
| × | 14 | ||||
Hand tools and fabrication machines | ||||||
 |
| |||||
 |
| |||||
Imagine building your own RC cars... that's where this project came from! Ever since I can remember, I've always wanted to build a custom remote controlled vehicle. The original idea for this project was to use a Walabot for positional feedback of such cars and control them via code to follow a designated path. After many days and countless attempts to get the system working, I found that the Walabot is not meant for such applications requiring precise and accurate realtime feedback.
After thinking for a while, I finally thought of using the Walabot to track a person (what it's really good at). Specifically, I would use the Walabot as a "virtual gas pedal," sensing the distance your foot is from the scanner and translating this value into the throttle signal for a remote control car.
You may be thinking "Well that sounds easy... I'll just get some cheap remote control cars from Amazon, open them up, and modify the signals sent to the car. Simple." If you are somewhat observant, you could tell that was exactly what I was thinking, and oh boy was I wrong. The process sounds a lot easier than the reality of it based on a number of things that I would come to find out...
- Toy manufacturers use different protocols
- Toy manufacturers use different protocols... per toy
- It's a nightmare to decode all of the countless protocols
This is why I decided I would just build a remote control car... which is actually quite easy. I spent the next couple days designing parts that would be 3D-printed, and fitting some electronics into them. Yes not every person could do this, but it's a whole lot easier than decoding SPI bus traffic only to have to figure out how to interface with that protocol, and I've already done the heavy lifting for you!
Awesome! It seems my story has not bored you to death so... feel free to follow my structured outline to build your very own (you guessed it) 3D-printed cars remote controlled via some Walabot gas pedal things and a mobile app for steering.
Yes, I know the name could use a little work :)
ExplanationHere is just a quick rundown of how the whole process will work in the end...
The 3D-printed cars will communicate with a Raspberry Pi using nRF24L01 modules. The Raspberry Pi will be running a Python script to connect to the Walabot and read your foot's distance from it, translating that into a throttle value for the car you are controlling. On top of the Python program, the Raspberry Pi will also connect to a mobile app I designed to read your devices accelerometer/gyroscope values and convert that into steering commands for the cars. On top of steering, the app will allow you to shift between Park, Reverse, Neutral, and Drive, and select which car you are controlling.
Now... it's time for the nitty gritty.
DemonstrationHow about a video demonstrating the final setup!
Print all necessary partsEvery good hobbyist project uses a 3D printer and this is certainly not an exception! Here's a list of parts you'll need to print for this project.
Note: This is thelist of parts for one car. If you want more cars... print more!
- (4x) Wheel
- (2x) Differential Outer
- (4x) Bevel Gear
- (1x) Drive Gear
- (1x) Chassis
- (1x) Top Plate
- (1x) Servo Horn
- (1x) Steering Bracket
- (1x) Steering Linkage
- (2x) Front Wheel Mount
- (2x) Axle Spacer
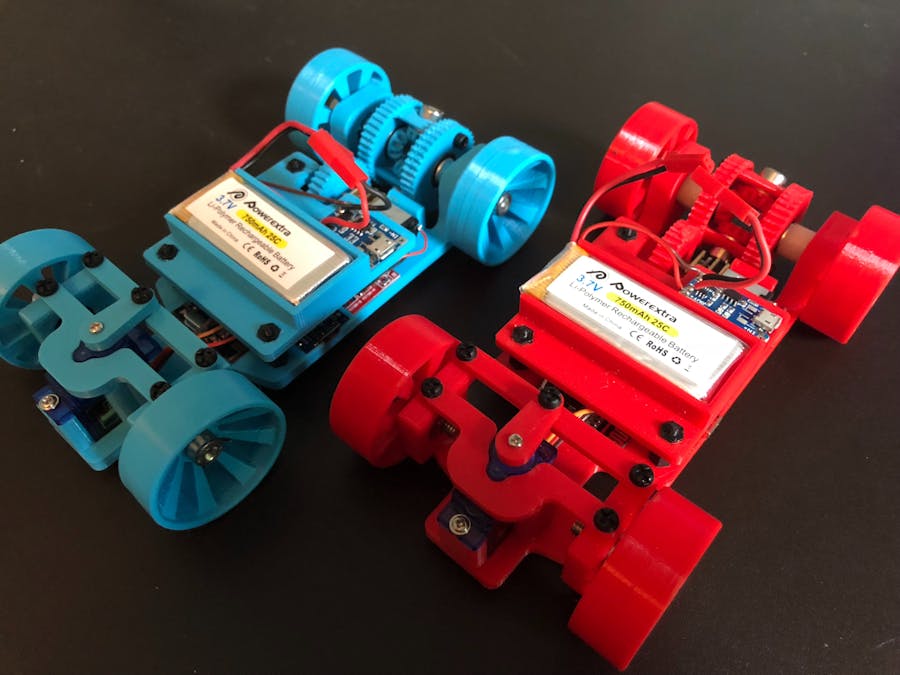
Note:There could be a lot of printing time required for this project depending on how many cars you want. As an example, I printed two sets of parts to make two cars;each car took about 5 hours of print time.
Assemble each carNow that all of the parts are printed, we can get on on to actually building the cars. Follow these steps to get on your way!
#1: First, we will be building the front steering mechanism. Start by threading 2 wheels with M5x16 bolts from the outside of the wheel.
#2: Place an M5 washer on each of the 2 front wheel assemblies.
#3: Press an 13mm bearing into each of the FrontWheelMounts. Note which side you are pressing the bearing on, one will be on the left side, the other on the right, making each bearing on the outside of the car. Place this FrontWheelMount on the M5 bolt of the wheel.
#4: Thread and tighten an M5 nut onto each wheel assembly.
#5: Mount the servo at the front of the chassis using one of its mounting screws.
#6: Place the SteeringBracket upside-down on top of the servo and connect it to the chassis with 2 M3 bolts from the underside of the chassis.
#7: Mount the front wheel assemblies to either side of the chassis with an M3 bolt on top through the SteeringBracket, and another through the corresponding hole in the chassis.
#8: Connect the SteeringLinkage to both front wheel assemblies with an M3 bolt going through each FrontWheelMount.
#9: Press the ServoHorn onto the servo and secure it with the small screw provided with the servo. Make sure to also screw the other end of it into the SteeringLinkage with an M3 bolt.
#10: Now onto the rear of the car! Start by threading an M5x30 bolt into the 2 remaining wheels.
#11: Place a washer, bearing, washer, AxleSpace, and finally another washer on the bolt. Push both of these assembly into the rear bearing hole on the chassis.
#12: Time to assemble the differential that the rear wheels will connect to! Press a bearing into both of the DifferentialOuters.
#13: Put an M5x8 bolt and washer through the side hole in each DifferentialOuter.
#14: Thread a BevelGear onto both of the bolts. You should now have 2 halves of the differential.
#15: Put each half together so that the holes in each are opposite to each other. Connect them together with 2 M3 bolts.
#16: This part is a little tedious but you'll need to mount the differential between the two rear wheel axles. Slide both axle bolts through the bearings on either side of the differential. Finally, but most annoyingly, place a washer on each bolt, then thread a BevelGear onto each.
#17: Now that the rear axle is ready, slide the MotorGear onto the geared DC motor's shaft, and snap it into the slot in front of the rear axle.
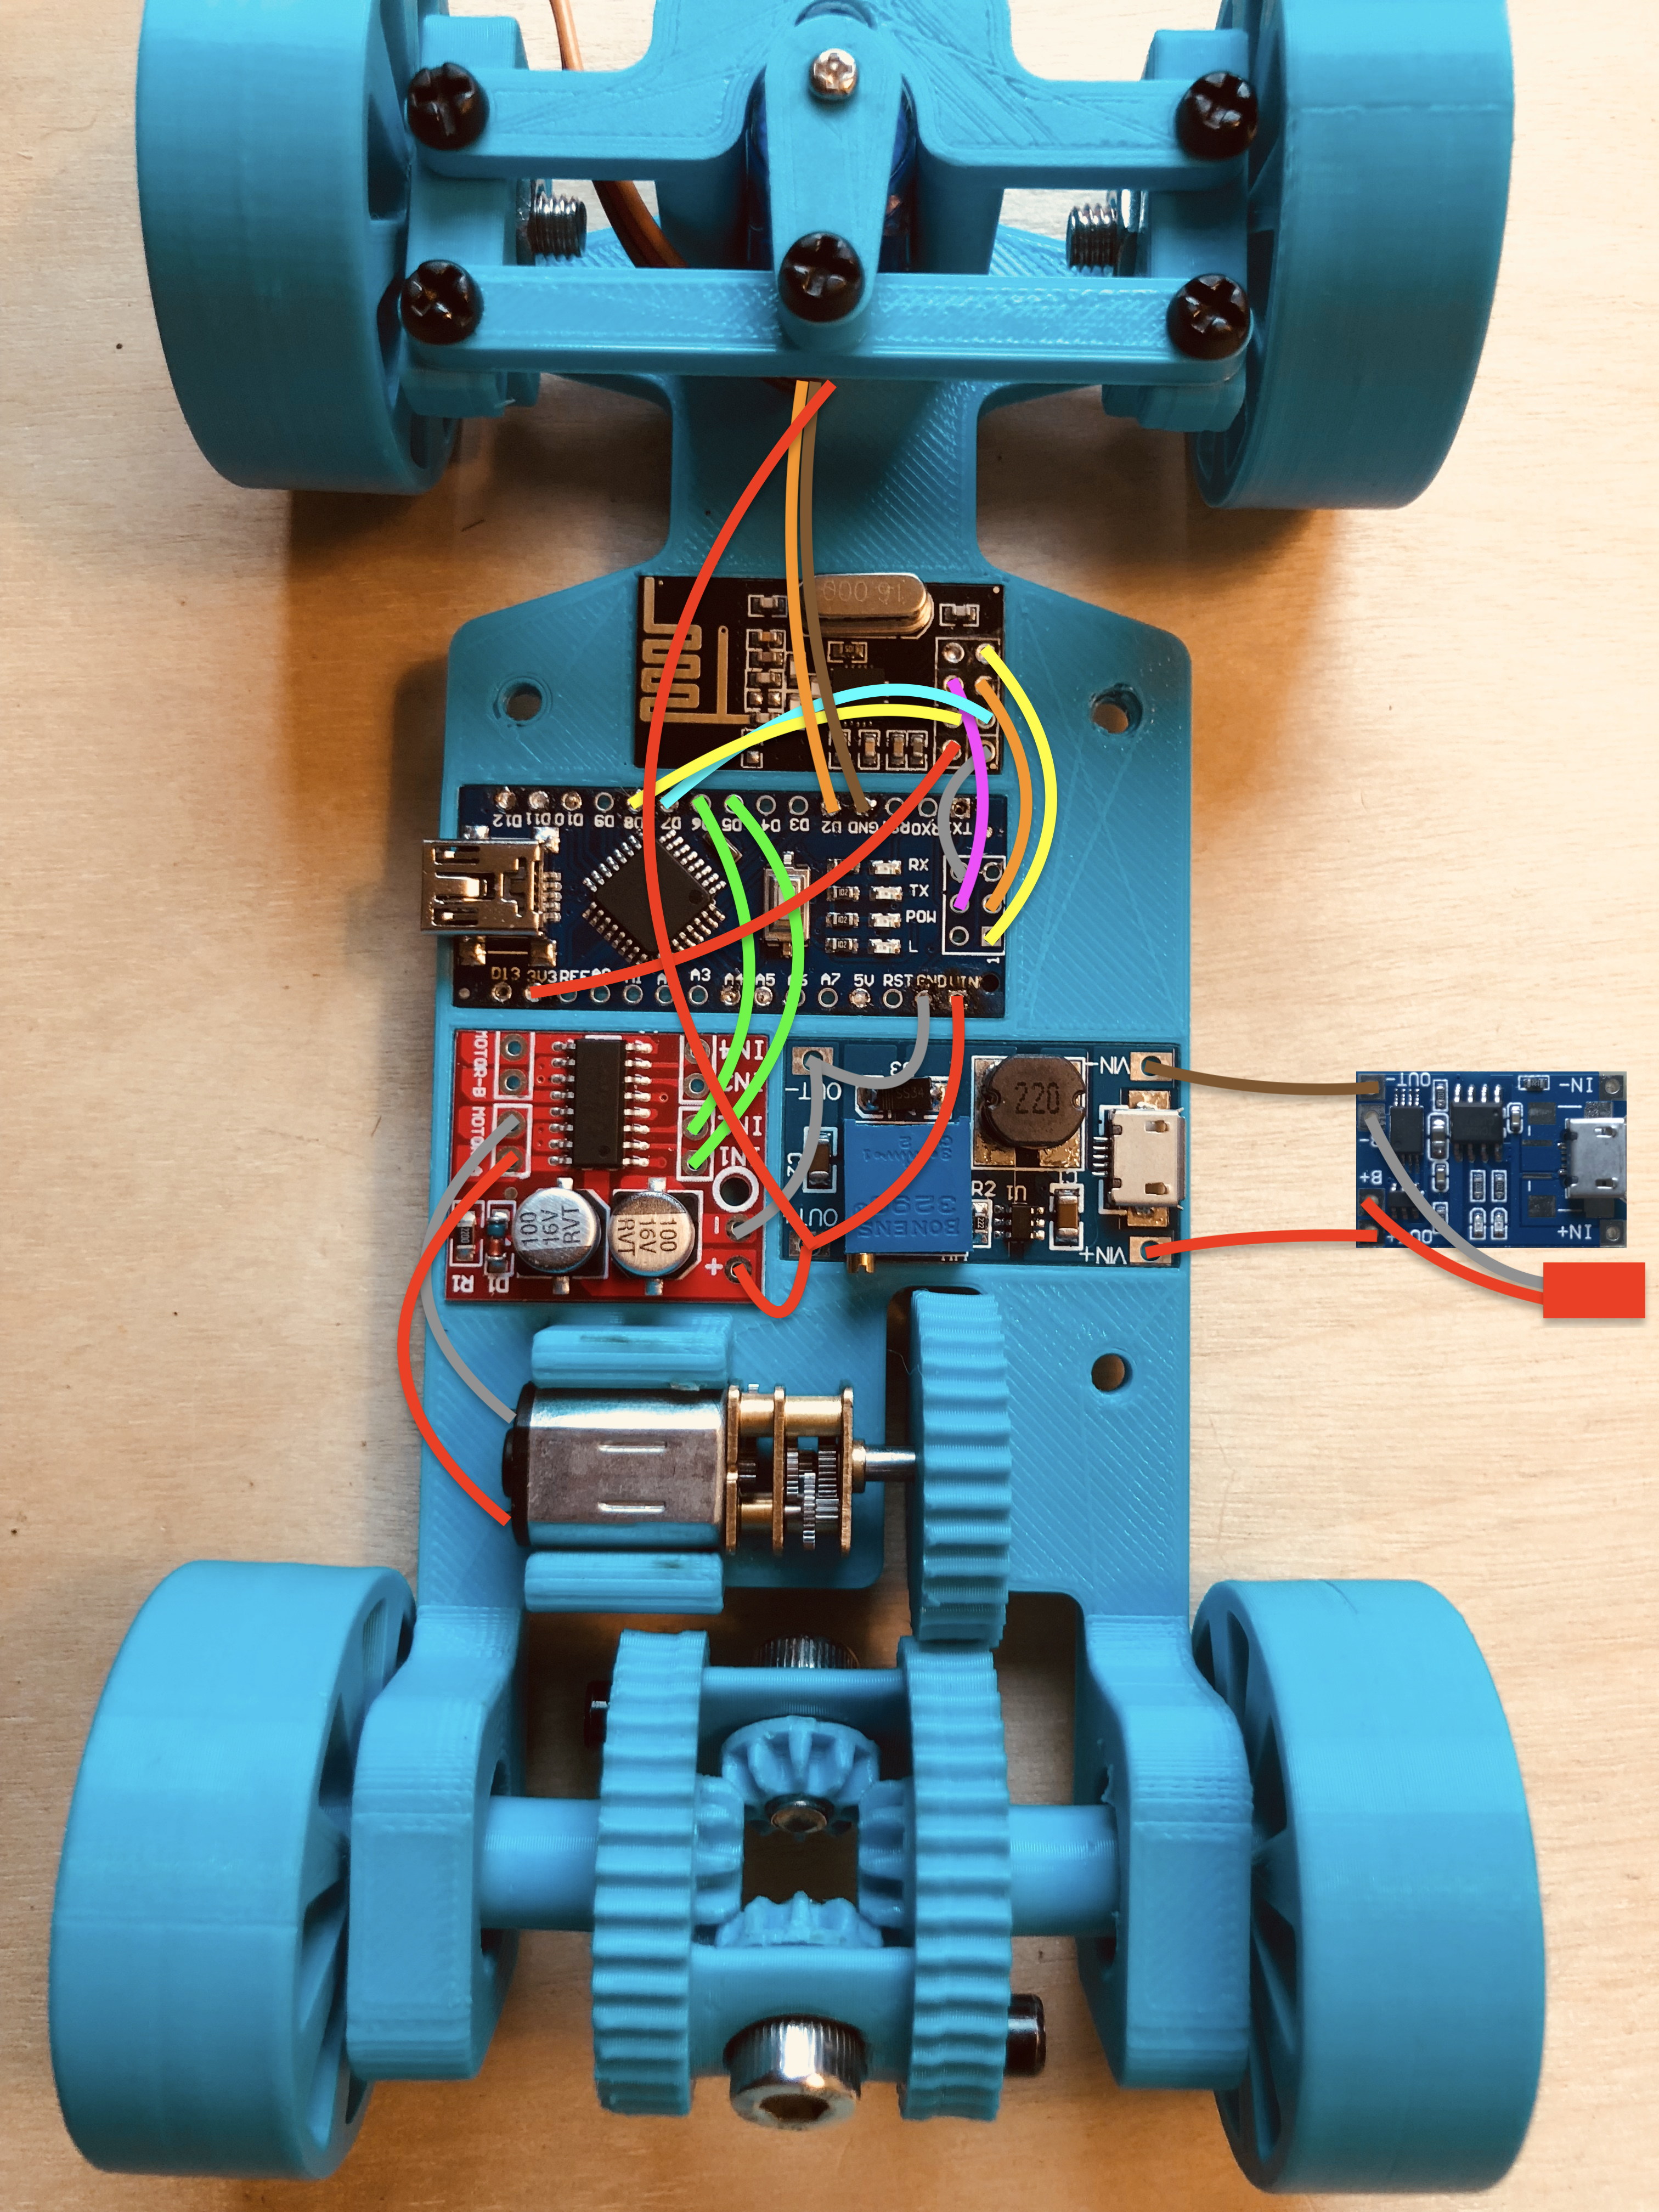
#18: Snap the motor driver, nRF24, Arduino Nano, and boost voltage regulator into their corresponding slots in the chassis. Make sure if any of the boards have pins, to desolder them so they can sit flat in the slots.
#19: Follow the wiring diagram to connect the pins on each board using small flexible wire. This soldering job is rather tedious due to the small space and number of overlapping wires but hang in there!
#20: Now, put an M3 nut into each hole on the TopPlate, and thread an M3x10 hex spacer through the bottom side of it.
#21: Mount the TopPlate to the Chassis using 3 M3 bolts from the bottom, so that the slot in the TopPlate fits around the MotorGear.
#22: Snap the battery protection and charging module into place on the TopPlate, and place a battery into the tray. You do not need to plug the battery in yet.
Congratulations, you've completed half of the project! Soldering all of those tiny wires must have been very tedious... Sadly, this section has wiring but it's much simpler. Follow these easy steps to build your base station!
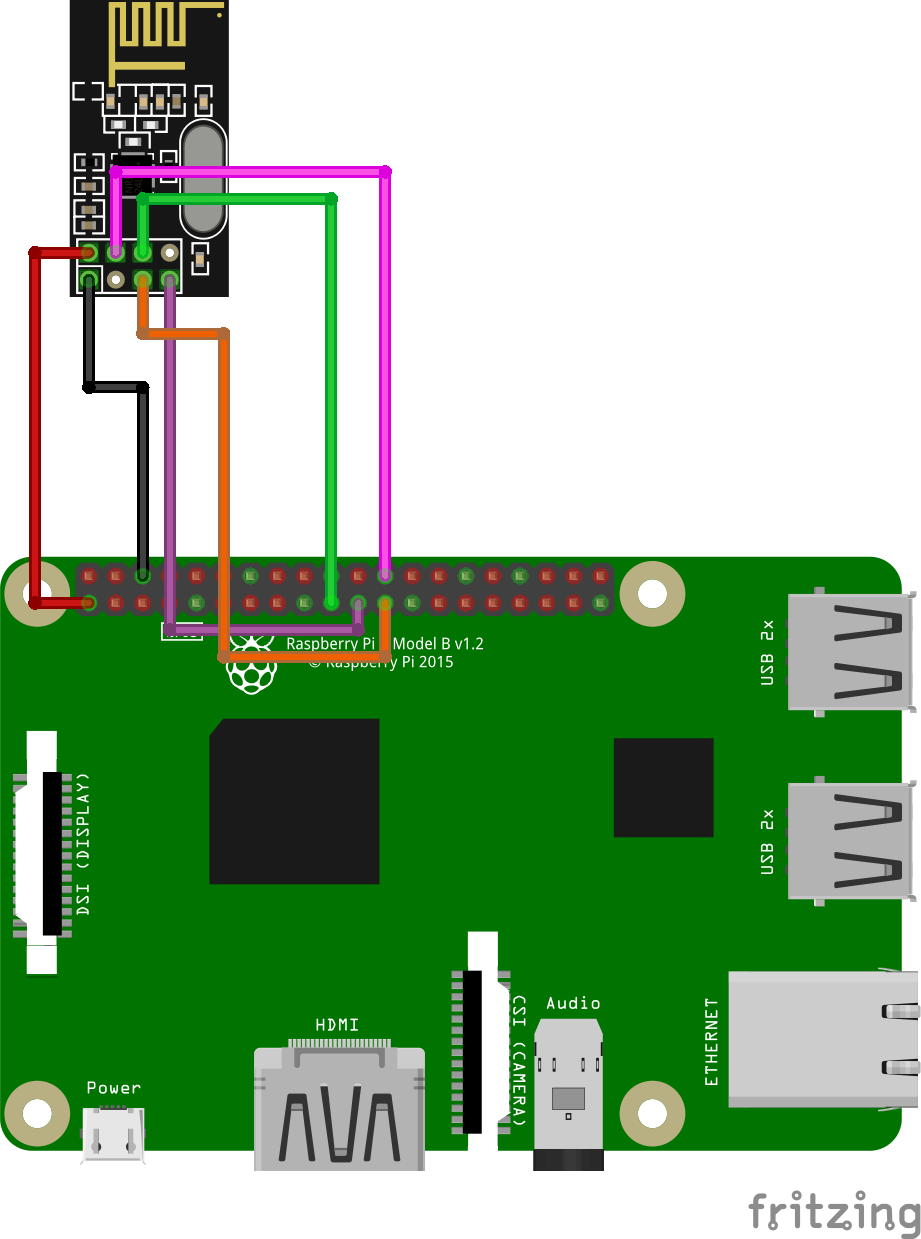
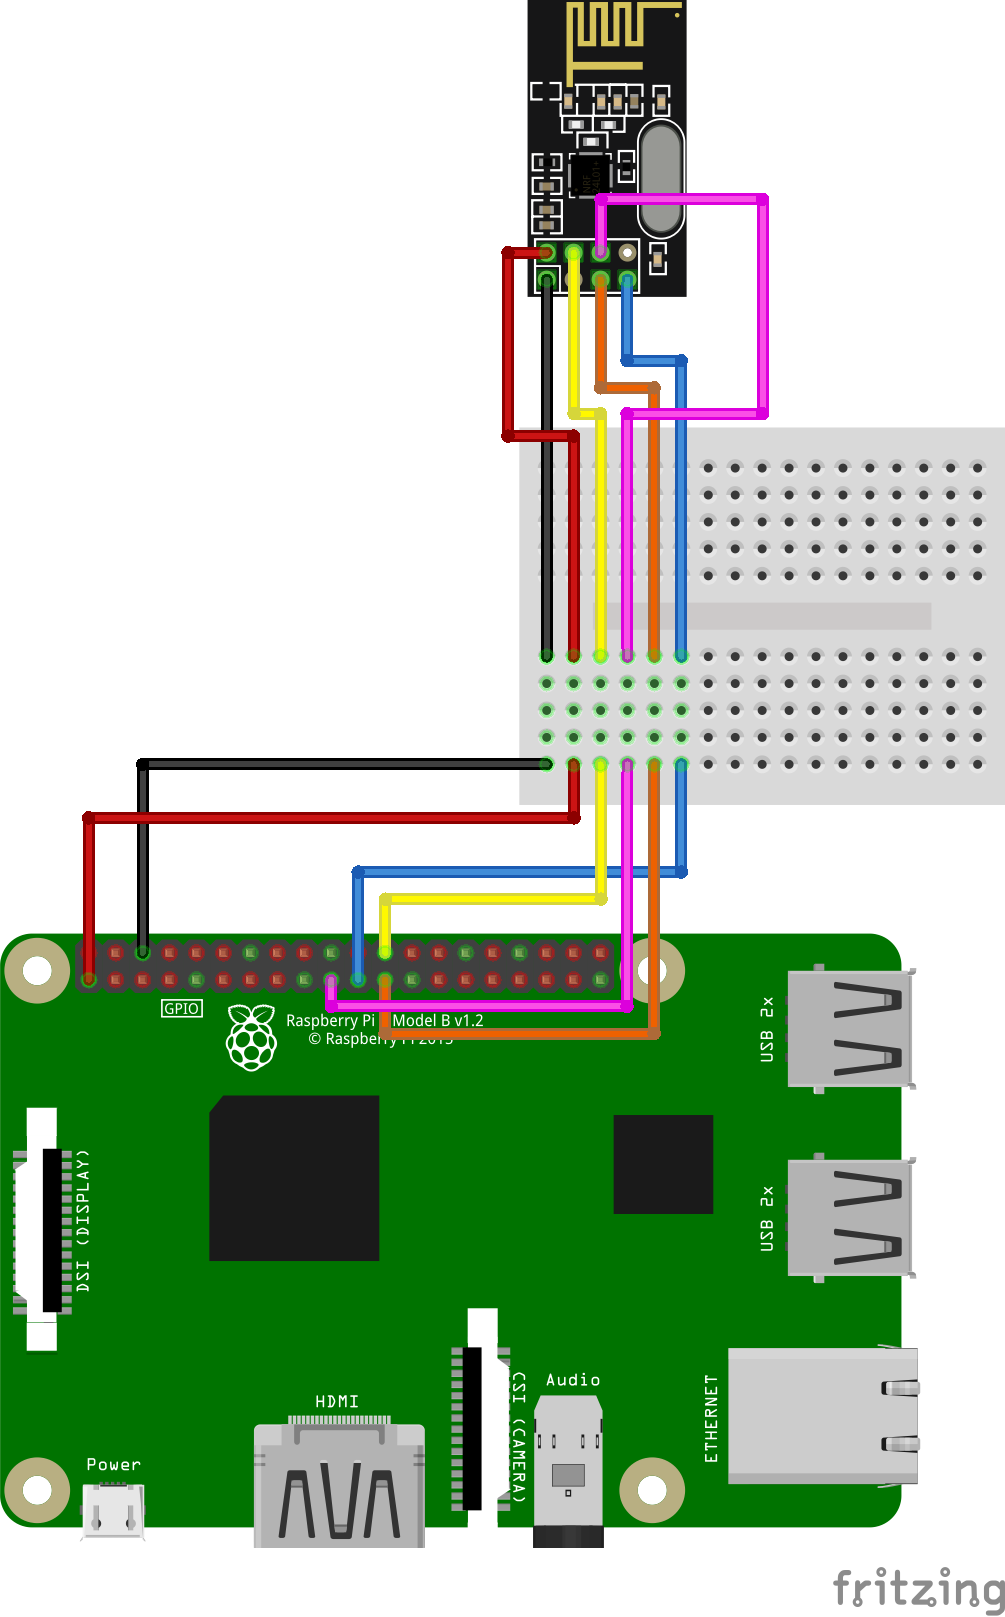
#1: If you do not have female-female jumper wires, grab a breadboard and 12 male-female jumper wires; if you do, don't worry about the next step; simply connect the Raspberry Pi to the nRF24L01 module as shown in the diagram.
#2: Follow the wiring diagram below and connect jumper wires from the Raspberry Pi to the breadboard, and then another set from the breadboard to the nRF24L01.
#3: Finally, grab a micro-USB cable and connect your Walabot to any of the USB ports on the Raspberry Pi.
Set Up the Raspberry Pi#1: Plug in the power supply for your Raspberry Pi and wait for it to boot. I recommend using SSH to set up your Pi, but you could use the Pi by itself if it has a keyboard and monitor connected.
#2: In your SSH session or terminal, run the following command to download the GitHub repository for this project.
git clone https://github.com/jonmendenhall/walabotRCCar.git
#3: Run the following commands to set up and install the necessary libraries.
cd walabotRCCar
sudo ./setup
#1: Now that you have your cars and base station complete, you can finally program these speed machines! Download and open the Arduino Sketch that comes with this project.
#2: First, making sure the batteries are unplugged from each car. Then plug a USB cable into the Arduino Nano's USB port. I recommend programming one car at a time so you do not lose track of which car has what settings.
#3: Give the car a unique address on line 7 of the Arduino code, and leave everything else the same. Upload this code. After driving the cars, if you notice that the forward of one car actually goes in reverse, just swap the values of MOTOR_A and MOTOR_B in the code, and re-upload. If you notice that one car tends to veer towards one direction when it should drive straight, modify the CENTER value to be a different degree, then re-upload the code for that car.
#1: To get the Python code running, use the next command on the Raspberry Pi. This will start the Python code that connects to the Walabot, Android App, and nRF24 module.
python3 walabot.py
Note:You'll need to make sure the addresses in walabot.py match the addresses of the cars when you programmed them. Also, make sure SPI communication is enabled when running:
sudo raspi-config
Once that part is set up, you'll be able to control your cars by running the provided mobile app on your Android device. This Android app will let you control and steer the cars. To control the throttle, place a box approximately 10cm tall in front of the Walabot laying on the floor. Then, just rest your foot on the box, and step down with the front of your foot above the Walabot.
You can install the APK by opening this link on your Android device and downloading it. The app is named Walabot Drive, and has a purple icon with a car on it.
When you launch the app, make sure the server is running on your Raspberry Pi. The app will say "Searching for Raspberry Pi" until it finds your Pi automatically. Once it finds it, it will hand over controls to you, and you'll be free to drive! The driving can be done as shown in the demonstration video at the beginning of this project.
Base Station Wiring Diagram #1
Base Station Wiring Diagram #2


Comments