

Hardware components | ||||||
 |
| × | 1 | |||
 |
| × | 10 | |||
 |
| × | 1 | |||
 |
| × | 1 | |||
| × | 1 | ||||
| × | 2 | ||||
| × | 2 | ||||
| × | 6 | ||||
| × | 1 | ||||
| × | 1 | ||||
| × | 1 | ||||
| × | 1 | ||||
| × | 1 | ||||
| × | 1 | ||||
| × | 1 | ||||
| × | 2 | ||||
| × | 8 | ||||
Software apps and online services | ||||||
 |
| |||||
 |
| |||||
Hand tools and fabrication machines | ||||||
 |
| |||||
 |
| |||||
| ||||||
| ||||||
| ||||||
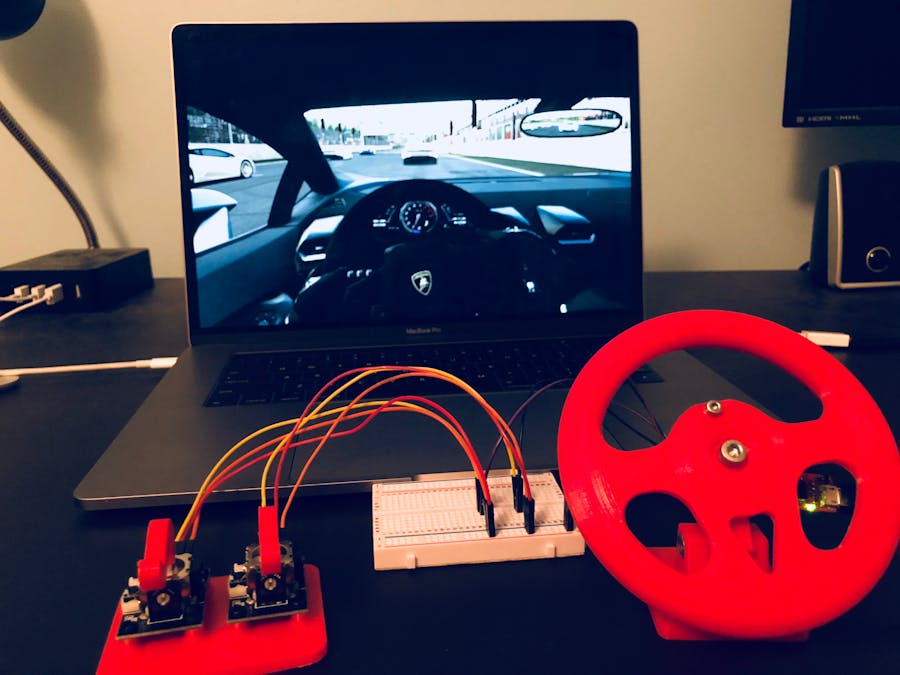
Playing racing games with a keyboard and mouse is one thing. Playing racing games with a controller is another. Playing racing games with a steering wheel and pedals though... that's on a whole other level!
You can find a countless number of gaming wheels on Amazon or other retailers, but how about making your own? DIY is always fun, especially when you know that the project will work in the end!
I bring you the Mini Gaming Wheel and Gas / Brake Pedals. Made out of 3D-printed parts anyone could assemble, the mini gaming wheel will give you a taste of the realistic racing world!
ExplanationI'd hope the sales pitch style introduction could spark your interest in this project enough to get to this point. Now it's time for the technical details; after all, this is a community of makers and hardware enthusiasts!
Here is a quick run-down. The Infineon 3D Magnetic Sensor 2Go board will be used as the central microcontroller. The magnetic sensor on the end of it will be used to read the angle a magnet attached to the mini steering wheel that turns as you turn it. The microcontroller will also read an analog value from one axis of two joystick modules which have 3D printed pedals on them in place of thumb sticks. After gathering all of this data, the microcontroller will send the data through a serial port to a Windows application on running on the computer. The application will create a fake USB device that acts as an Xbox 360 controller (recognizable to games), and stream the data from the mini steering wheel and gas / brake pedals to various outputs an Xbox controller.
In this way, you will be able to drive in a racing game with a mini steering wheel and finger operated pedals! I hope this sounds interesting, and that you'll try this project out for yourself!
DemonstrationThey say pictures are worth a thousand words. After all of those words, how about a video? or even two? Here are a couple showing this awesome project in action!
Print All Necessary PartsOk, you've seen the videos, and decided you want to make this. Let's get right to it. Time to get your 3D printer going! You'll need to print the parts from the following list:
- (1x) Wheel Front
- (1x) Wheel Back
- (1x) Wheel Mount
- (1x) Magnet Coupler
- (1x) Stand
- (1x) Dual Pedal Base
- (2x) Pedal
Note: Printing time should take around 4-5 hours depending on how fast your printer can print.
Now it's time to put these printed parts to good use; after all, they're useless right now! Follow these simple steps to assemble an awesome Mini Gaming Wheel with gas / break pedals.
#1: First thing's first. Solder 4 male header pins onto the 3D Magnetic Sensor board as shown in the pictures below. You may set this aside.
#2: Now, press one of the bearings into the WheelMount, then place the spacer that came with the bearing on it, then finally, another bearing.
#3: Push the M3x20 bolt through the hole on the side of the WheelMount, and thread the nylon handoff onto it. You may set this assembly aside.
#4: Time to build build the wheel! Connect the WheelBack and WheelFront together with the M5x8 bolts from the back side.
#5: Thread the M3x12 bolt into the top hole of the WheelFront, and an M5x25 bolt into the center hole.
#6: Place the M5 nylon spacer on the center bolt, followed by the WheelMount assembly from step #3, then the M5 washer.
#7: Press the magnet into the rectangular side of the MagnetCoupler, then screw it onto the end of the bolt on top of the washer.
#8: Place the 3D Magnetic Sensor 2Go board on the threaded end of the nylon standoff, and secure it with the nylon hex nut. You may set this assembly aside.
#9: Press the M5 nut into it's respective slot on the Stand.
#10: Mount the WheelMount onto the Stand by placing the unused hole between the columns on the Stand. Push the remaining M5x25 bolt through the opposite side of the nut, and tighten it to tighten the hinge. You may set this assembly aside.
#11: Mount each of the joystick modules onto the DualPedalBase using 4 M3x8 bolts. I used nylon Phillips head bolts for mine.
#12: Press the Pedals onto the joystick modules where the thumb sticks would go.
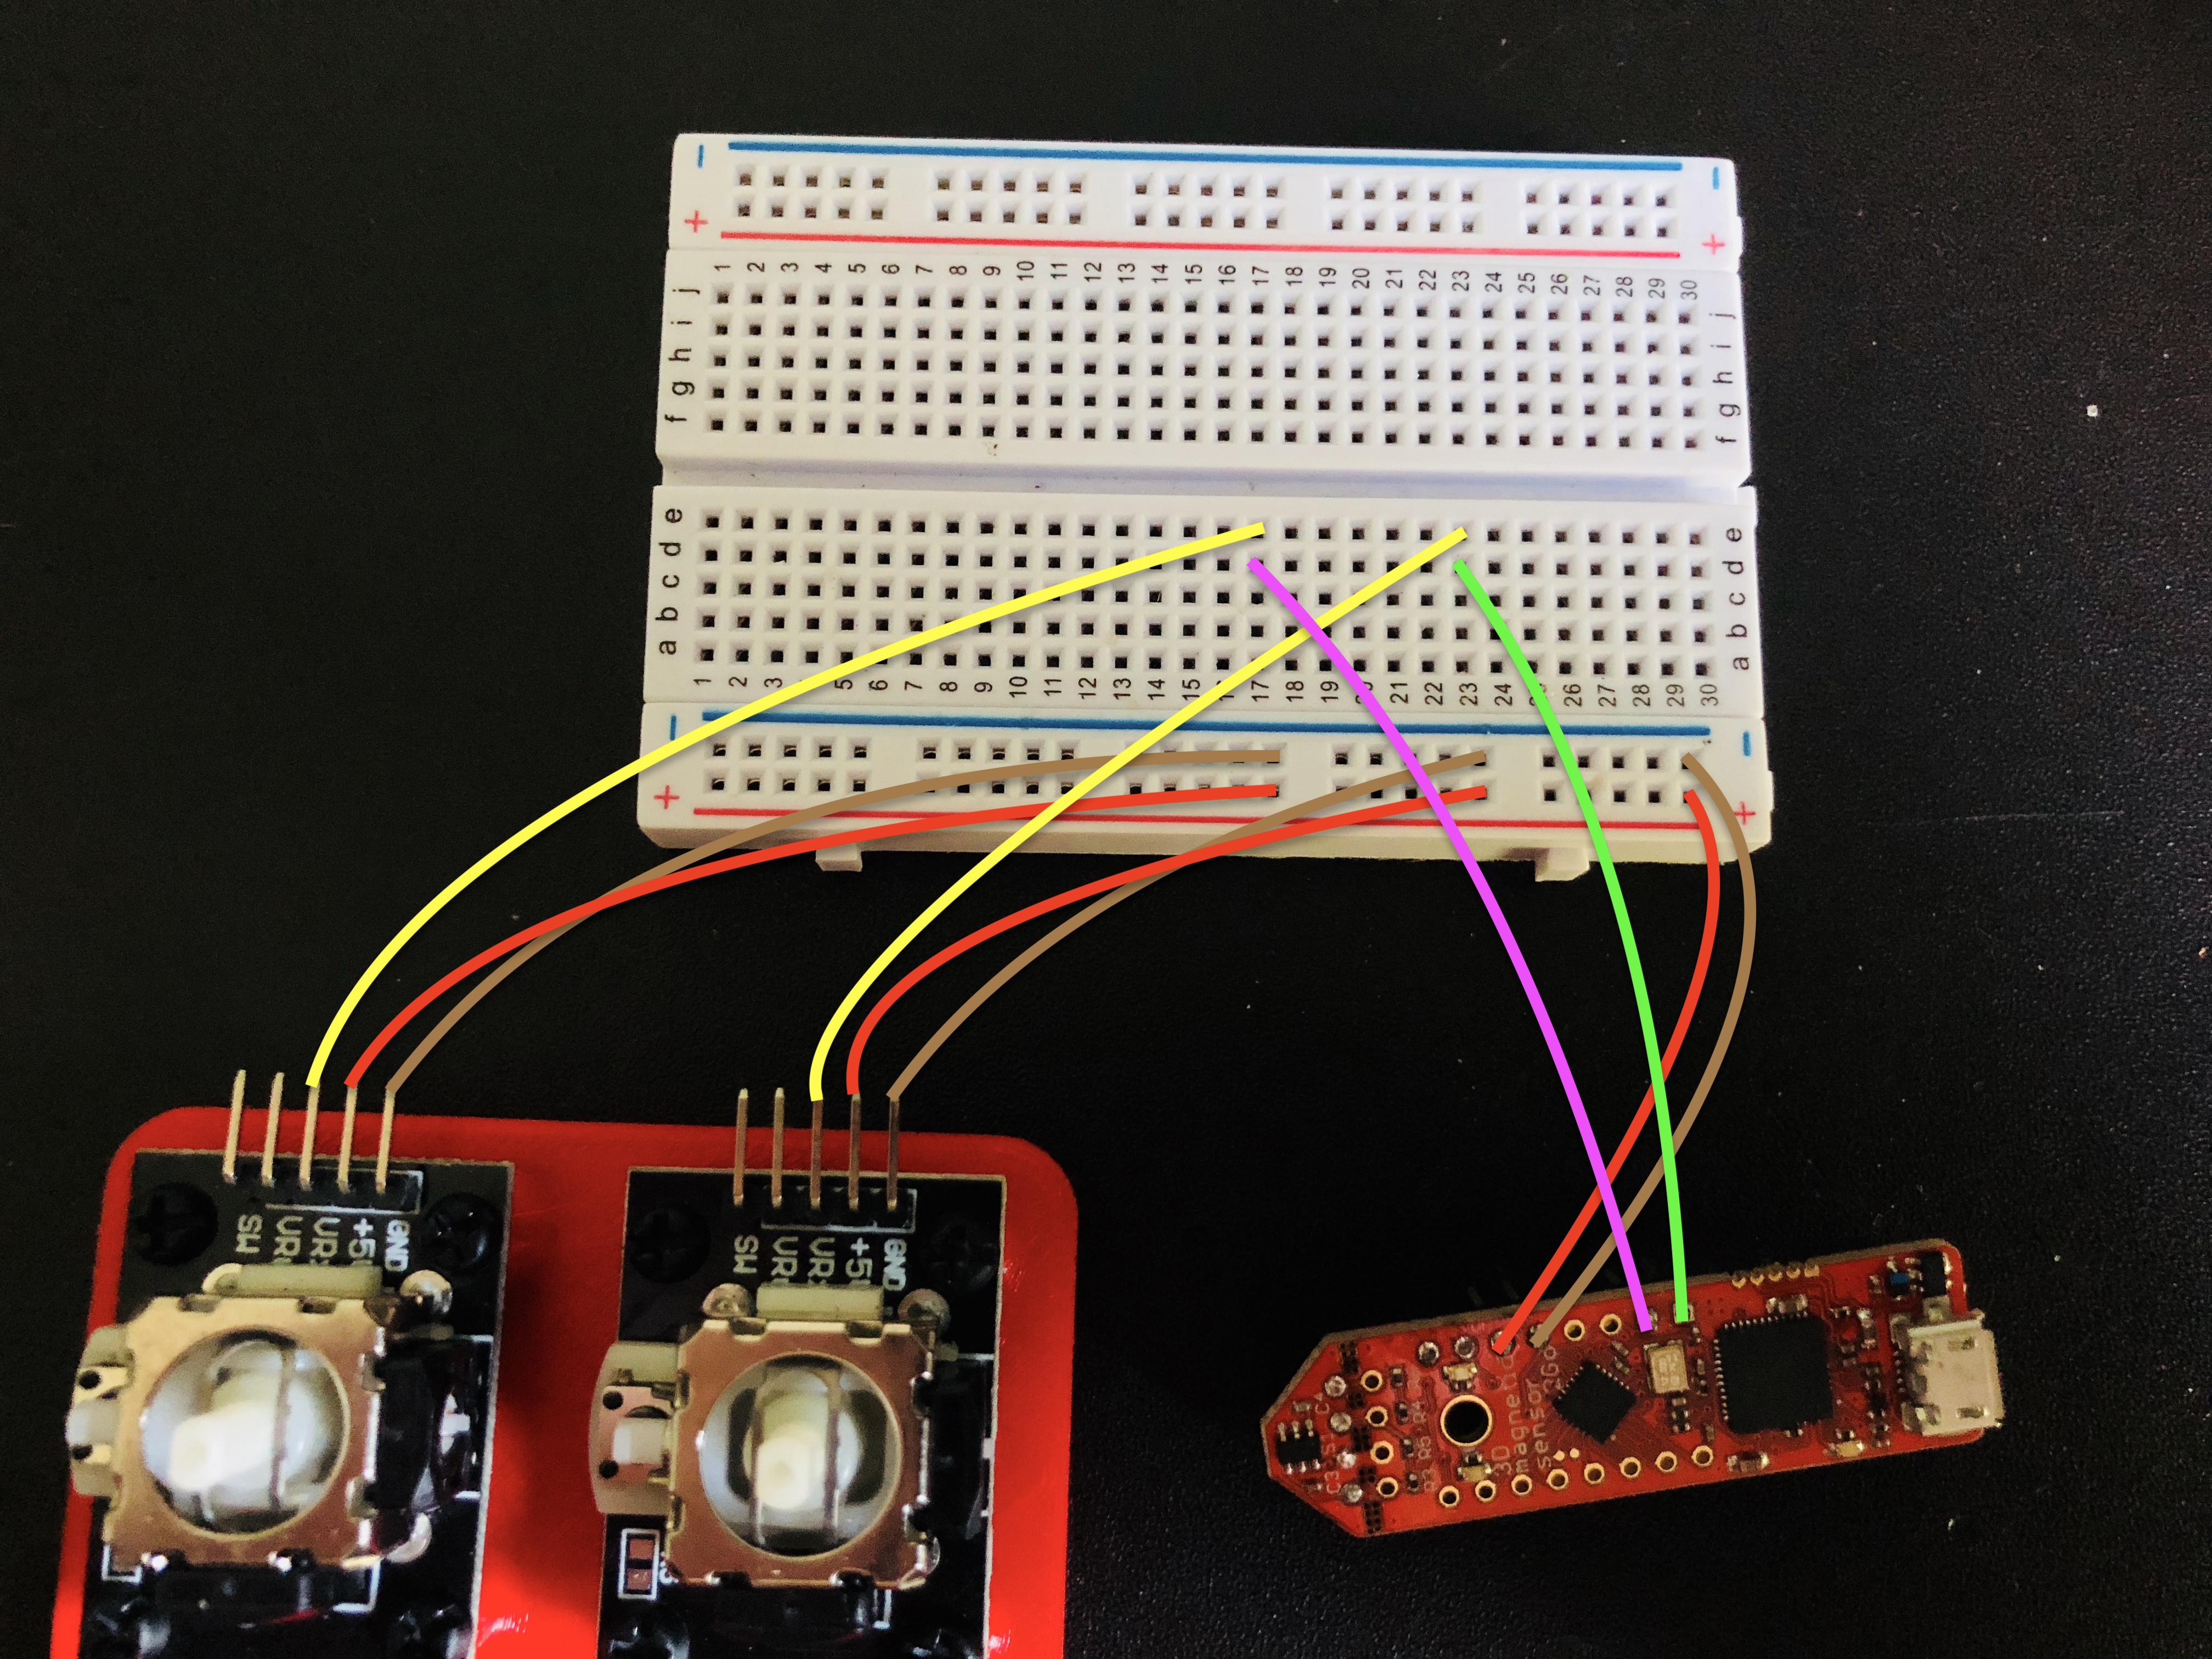
#13: Now that you have the steering wheel and pedals assembled, you'll need to connect them together with jumper wires (female - male). Use the following diagram.
That wasn't too hard was it? Well, this part is even easier. Now that everything with hardware is complete, the rest of this project is just software. Let's start with programming the 3D Magnetic Sensor 2Go board!
#1: Plug the board into your computer with a USB cable.
#2: Download this project's GitHub repository here, and open the provided SteeringWheel.ino code in the Arduino IDE.
#3: Right now the code will not build because it requires an extra library and the Infineon boards manager. To fix this, open the preferences for the Arduino IDE.
#4: In the field named "Additional Boards Manager URLs", paste the following, and press ok.
https://github.com/Infineon/Assets/releases/download/current/package_infineon_index.json
#5: Now, go to Tools > Board > Boards Manager... in the Arduino IDE. Search for "xmc" in the search box, and install Infineon's XMC Microcontroller.
#6: In Tools > Board, select XMC1100XMC2Go, and set the Serial Output Selection to PC.
#7: Remember how I said you need an extra library to compile the code? Well now you'll get that library. Click here, and download the repository as a zip.
#8: Back in the Arduino IDE, go to Sketch > Include Library > Add.ZIP Library and choose the zip file you just downloaded.
#9: Now you can finally upload the sketch to your 3D Magnetic Sensor 2Go microcontroller. Once the upload finishes, you can open the Serial Monitor and watch the data including the steering angle, and the brake and gas pedals come through!
What you have now is a steering wheel that is sending its angle, and the value of the gas and brake pedals, but only as text. We need something that converts this into the data an Xbox 360 controller would send. That's where this Visual Studio project comes in! If you don't already have Visual Studio, download it now!
#1: Open the Visual Studio Solution which is a part of the GitHub repository for this project. (You downloaded it earlier)
#2: Right now the code is trying to use a library that you likely do not have, so it will not build properly! Head over here to download the SlimDX library. This allows access to some special functions the manage USB devices, or even create a fake one and send it inputs... an Xbox 360 controller perhaps?
#3: Next, you'll need to setup the ScpDriver. Luckily, this is very simple because I've included it in the repository, and all you'll need to do is run ScpDriver.exe under the ScpDriver folder of the GitHub repository.
#4: Now, build and run the project! You should see a window popup with a start button in it. Make sure your steering wheel is plugged in, and press Start. The sound that plays when a USB device is plugged in should play, indicating that the code has created a fake Xbox 360 controller and is now mapping the input from afyour steering wheel to L2, R2, and the Left Stick X. You can now race with it!
Note: If you're looking through the code, the main section is the method Serial_DataReceived. This part handles the serial data received and sends Xbox 360 controller reports with the data mapped.
Start DrivingI think you know what time it is now... RACINGTIME! I'll be playing Forza 6 for this project because it's a very high quality game with great mechanics and physics, and it's FREE!
The first step is obviously to launch the game. Next I just modified the controller mapping so that gas was on R2, brakes were L2, and steering was on the X value of the Left Stick.
The following video has a demonstration of how the controls work for driving.


Comments