

W5300 (https://www.wiznet.io/ko/product-item/w5300/) is an embedded hardwired TCP/IP ethernet controller chip with network performance up to 80Mbps – which makes it a good choice to build a camera where high-speed network communication is required.
For this project, let’s build a network camera using W5300.
First step is to port WIZnet’s ioLibrary Driver (https://github.com/Wiznet/ioLibrary_Driver) to STM32 and measure the network performance with TCP Loopback Test.
Next, connect the camera to the STM32 DCMI interface and test it transmit video to the network.
The complete source code can be downloaded at https://github.com/elabsystem/STM32_RP\.
MCU SelectionSince the interface of W5300 is address/data bus, STM32F417Zx (144 pin package) from STM32F4 series was selected as the MCU; STM32F417Zx provides data bus along with camera interface.
STM32 can easily scale to higher performance with the same pin map.
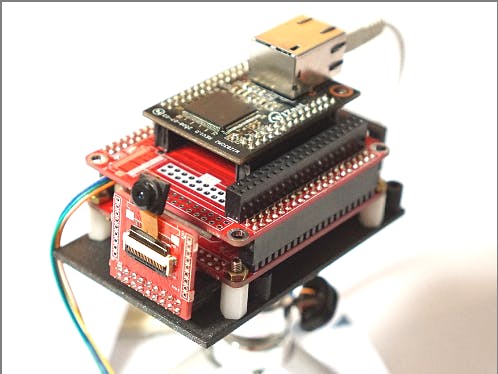
Board SetupThe MCU Board is designed in a form that is easy to experiment with, considering its scalability.
It was produced in the Raspberry Pi form (https://pinout.xyz/) using a common standardized pin map and considering later scalability.
Connect the W5300 to STM32 Flexible static memory controller (FSMC), CS pin to NE2.
Then, connect the camera to STM32 Digital camera interface (DCMI), camera configuration is connected to I2C2.
Full diagram can be downloaded from https://github.com/elabsystem/STM32_RP.
STM32CubeIDE( https://www.st.com/en/development-tools/stm32cubeide.html)development environment from STM32 was used.
For W5300 Wiznet ioLibrary Driver (https://github.com/Wiznet/ioLibrary_Driver) was downloaded and used.
For test purposes, full code is available at https://github.com/elabsystem/STM32_RP.
Project generation and basic operation testFirst, generate new project using STM32CubeIDE and configure interfaces like UART, FSMC, DCMI, I2C and etc.
Let’s start with basic - printing “W5300 Hello World” through UART.
Set USART1 mode to Asynchronous in Connectivity section from STM32CubeIDE.
STM32's clock setting is set to an external crystal of 8Mhz and a clock speed to 168Mhz.
After saving the settings, basic project will automatically generate.
Set Optimize level to -Ofast in STM32CubeIDE Settings.
To use printf function override _write() function to print through UART1.
Create the code to print “W5300 Hello World” message using printf function and download it.
Download using SWD (Serial Wire Debugging).
Debugging can be done by connection USB2UART module to UART.
Once the program is launched it is possible to check message through serial port.
It is necessary to configure STM32 FSMC to operate with W5300.
Since W5300 CS pin is connected to STM32 PG9, it should be configured as NE2(BANK2).
Jong Ho Park
 Jake Lee


Comments